You carefully compose the shot, focus, and take the photo.
Later, you discover something frustrating:
The camera focused perfectly—just not on what you wanted.
Maybe the background is sharp while your subject is soft. Or a branch is tack sharp instead of the bird sitting behind it.
Often, this isn’t an autofocus failure. Your camera simply chose a different target than you intended.
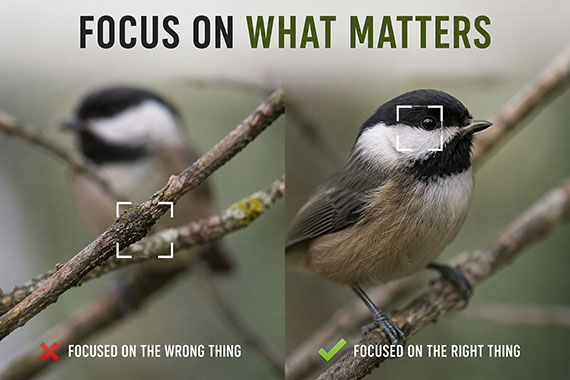
Your Camera Doesn’t Know What’s Important
You see a person, bird, flower, or other obvious subject.
Your autofocus system sees something different: edges, contrast, detail, distance, faces, and potential subjects.
Imagine photographing someone wearing a plain shirt in front of a detailed brick wall. You immediately recognize the person as the subject, but the wall may contain much stronger contrast.
If you’re letting the camera choose the focus point, that background can become surprisingly attractive.
The same thing happens with birds behind branches, flowers surrounded by grass, or people in crowded environments.
Your Focus Area May Be Too Large
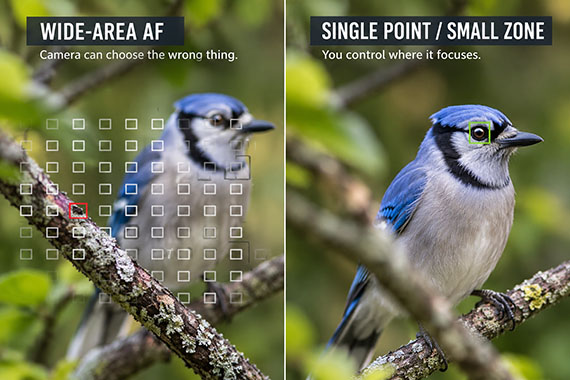
One of the easiest ways to accidentally focus on the wrong thing is using an autofocus area that’s larger than necessary.
Think of it this way:
Wide AF area: “Camera, find my subject.”
Single point or small zone: “Camera, focus right here.”
Wide-area autofocus can be excellent for moving subjects, especially with modern face, eye, and animal detection. But complicated scenes give the camera more opportunities to choose incorrectly.
If your camera keeps grabbing the background, try reducing the autofocus area.
Watch Out for Foreground Objects
Autofocus can also be attracted to objects between you and your subject.
This happens constantly in wildlife photography.
You’re photographing a bird through a tree, but a small branch crosses the autofocus area. The camera locks onto the branch because it’s closer and provides plenty of contrast.
Using a smaller AF point or zone can help you thread your autofocus through those distractions and place it directly on the subject.
Even Eye Detection Can Make Mistakes
Eye-detection autofocus is incredibly useful, but it isn’t infallible.
It can grab the wrong person, switch between eyes, lose the subject when they turn, or jump to another object entering the frame.
These small errors become especially obvious at wide apertures like f/1.4 or f/1.8, where depth of field can be extremely shallow.
Pay attention to where the eye-detection box actually appears rather than assuming it’s always on the correct eye.
Focus-and-Recompose Can Shift Focus
Sometimes your camera did focus exactly where you told it to—and the problem happens afterward.
A classic example is focusing on someone’s eye with the center AF point and then rotating the camera to recompose.
At moderate apertures and distances, this often works fine. But at close distances with a wide aperture, that movement can shift the plane of focus enough to leave the eye slightly soft.
Instead, try positioning an AF point directly over the eye or using eye detection so you don’t need to recompose after focusing.
Try This Simple Test
If your camera repeatedly focuses on the wrong thing:
- Switch from wide-area autofocus to a single point or small AF zone.
- Place it directly over the most important detail.
- Choose an area with good contrast, such as an eye rather than a cheek.
- Focus and take the photo.
- Zoom in and check the result.
If the camera suddenly focuses exactly where you wanted, you’ve discovered the problem.
It wasn’t that your camera couldn’t focus.
You were simply giving it too many places to choose from.
Modern autofocus systems are remarkably intelligent, but they still can’t read your mind. When a scene gets complicated, sometimes the fastest route to sharper photos is simple:
Give your camera less freedom—and tell it exactly what matters.
Like This Article?
Don't Miss The Next One!
Join over 100,000 photographers of all experience levels who receive our free photography tips and articles to stay current:






The foreground object issue is something I run into constantly at events. You’re trying to lock onto a subject across a crowded room, and the autofocus grabs the back of someone’s head in the middle ground instead. What you wrote about shrinking the AF area makes a real difference there. I’d add: with eye-detection at f/1.8 in low-lit event venues, manually confirming the detection box before each shot matters more than trusting it to hold. At those apertures, the camera picking the wrong eye isn’t a small error. The shot’s gone.