Of all 24 hours in a day, only two mean anything to photographers: the hour after sunrise, and the hour before sunset. That’s when the sun does its magic, casting a heavenly golden glow over the world, making mountains shine and lakes sparkle beautifully, hence the name. Photographers crave this light—it’s ideal for weddings, portraits and, of course, landscapes.
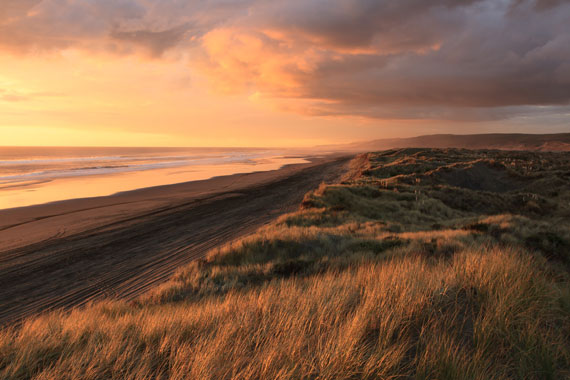
Photo captured by Petr Vysohlid; ISO 100, f/9, 1/20s.
Remember, though: the word “hour” there is pretty loose. Depending on the time of year and where in the world you are, the golden hour can last anywhere from 20 minutes to well over an hour. If clouds are passing by, the whole thing might only be useful for 10 minutes—that’s why the elusive moment is so desirable among professional photographers, and why setting up the right shot in advance is so crucial. If you get it right, the golden hours are pretty much guaranteed to enhance any landscape shot.
How do the golden hours work?
When the sun is below six degrees above the horizon, it casts a warm, diffused soft light onto the world. Because the sun shines basically level with the Earth’s surface, it eliminates awkward shadows that an overhead sun would cast over mountain peaks.
If you adjust your exposure and aperture correctly, you can also bring out the orange that a bright, low sun casts across the sky.
How to best capture the golden hour
If you want a pristine landscape, set your alarm early. Sunsets are great, but I defy you to try and find a landscape that’s less crowded during sunset than sunrise. Even if avoiding crowds isn’t an issue, showing up early is a good idea so you can find the best spot to stand your tripod and adjust your manual settings.
Early morning in nature is often dewier than the late afternoon. This can be great for misty mountain shots, or awful for your camera if it fogs up.
The golden hour is also an ideal time to play around with an ND filter and nab a few magical long exposures of flowing clouds or water. Use a low ISO with a slow shutter speed, and the sun’s glow can capture a beautiful moment.
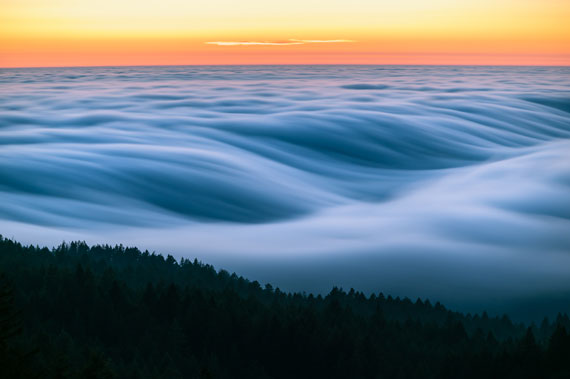
Photo captured by Zetong Li; ISO 100, f/2.8, 15 seconds.
Using multiple exposures
Golden hour shots offer a rich natural warmth that’s difficult to accurately match in post-production. That said, if you’re shooting into the sun at this hour—which you might very well be, if you want to capture the purple or orange rays cast over the clouds, or above an ocean—it’s a good idea to use exposure bracketing for high dynamic range (HDR), a method of composing multiple exposures in post-production that balance out various conflicting exposures.
We’ll talk more about shooting sunrises and sunsets in the next section. But for now, know that exposure bracketing is a great idea even if you’re not shooting into the sun, because when the golden hour lasts as briefly as it does, you want to guarantee that at least one of your shots turns out great and make HDR processing a possibility.
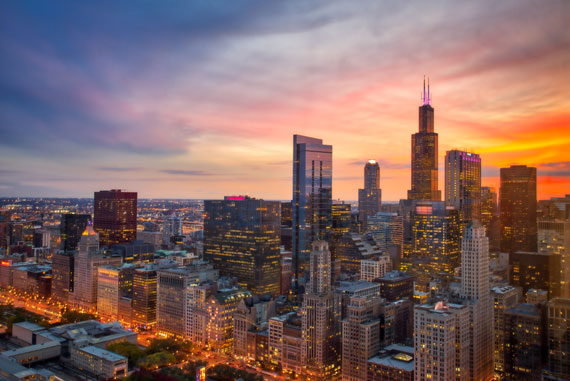
Golden Hour in the City
Certain landscapes are known for their golden hours. Most cityscapes aren’t. But capturing a city during its golden hour can produce a magical result, as most of us can’t appreciate the cities in which we live during these hours—we’re too busy sleeping, commuting or eating dinner. At its finest, photography shows us our world in a way we don’t normally see. Because so few of us see the sun rising or setting over our skylines, the golden hour is a great opportunity to define a city’s character in, literally, a new light.
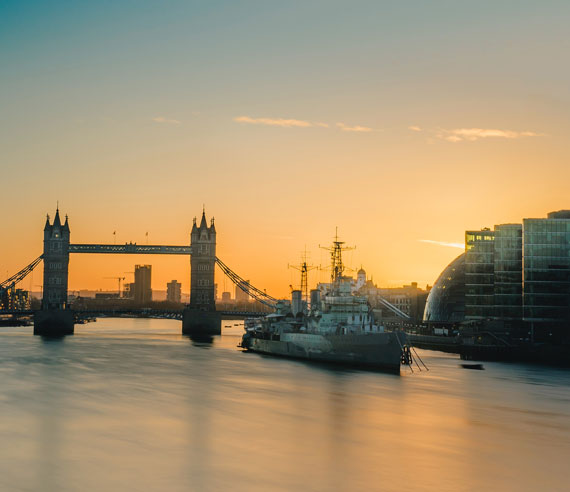
Photo captured by tom coe; ISO 200, f/14, 15 seconds.
There are a few city-specific techniques you should keep in mind to bring out the best your city has to offer.
Plan ahead
Take stock of which direction the sun is going to rise and set in. With landscapes, it can be easier to maneuver yourself nature, crossing your fingers only for good weather. But in cities you may be faced with skyscrapers, odd street angles and difficult vantage points. Finding a high angle from which to shoot is one way to avoid those types of problems, but if you’re shooting from the ground, knowing which buildings get hit by certain lights is always best.
Do some location scouting. Walk through your city during the golden hours instead of driving when you need to get somewhere (or not during the golden hour, but with an eye for cardinal directions) and notice which parts light up. If something strikes you in particular, take note of it for a return camera outing.
Do some reflecting
Many modern buildings feature curtain walls—lightweight, reflective exteriors created purely for smooth design, rather than structural integrity. In other words: their surfaces are shiny. Aside from being aesthetically cool, these glassy exteriors make for beautiful city mirrors, and can double the clouds during golden hours. Use them whenever you can.
You can find many more reflective surfaces in cities than in natural landscapes—you can find reflective surfaces in car windshields, storefronts, bays and fountains. But when it comes to shooting during the golden hours, wider water bodies like lakes, rivers and fountains tend to work better, because sunlight doesn’t hit them straight-on, and they can double up the orange glow and any clouds floating above.
Again, it’s good to have spots in mind; stumbling upon city locations is possible, but planning ahead will make your cityscape photography experience much easier.
The unbearable lightness and darkness
Probably the single biggest difference between cityscapes and landscapes: light variance. During pure night this doesn’t matter quite as much, as you’re exposing to manage building or lamp lights, but the surrounding scene is otherwise black. That’s not the case during the golden hour, when the sky’s light and buildings’ light are both powerful, burning bright, and vastly different. Moreover, you’ll likely be adding some pure black in the mix as well, not to mention in-between shades.
Exposure bracketed photo captured by Raf Winterpacht
This is where exposure bracketing becomes absolutely critical. I try to shoot five-shot brackets in these situations whenever possible, in order to capture all the tones of light: the natural sky tones and artificial building ones. The range of light can be quite drastic here, so you’d do best to try and catch everything perfectly, in one shot or another.
Another lighting trick to balancing the light, if you’re shooting a city without very much sky (but using the golden hour light to enhance a building or street), is to switch your metering to spot-metering, and spot it to a part of a city set in the shadows. Underexpose your camera by one f-stop to balance the details between the highlights and shadows. This is valuable in landscapes, too, but in cities, it’s almost always the case where half your scene will be blocked by buildings, and the other half lit up by gorgeous light. But such is the contradiction of cityscape photography: it hinges on balancing the beauty of our natural world with the magnificence of our hand-built one. Do it well, and you’ll forge an unforgettable moment out of a fleeting one.
Like This Article?
Don't Miss The Next One!
Join over 100,000 photographers of all experience levels who receive our free photography tips and articles to stay current: