Here are ten common photography mistakes to avoid to take your photos to the next level.
Mistake #1: Combining Light & Shadow
A good example of the mistake of combining light and shadow into photographs can be seen when family photos are taken outdoors. They might be in a really nice location, but the one orchestrating the photograph fails to appreciate how the light from the sun, as it filters its way through tree branches and foliage, is going to impact the resulting image.
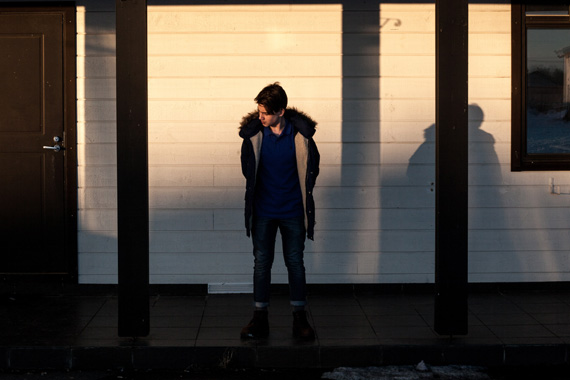
Photo by Elisey Vavulin; ISO 200, f/13.0, 1/200s.
An example of bad lighting is where you’ve got your subject in some shade and it just ends up being a really, really bad place to take a photograph of someone. And this is what happens with typical family orchestrated portraits taken outdoors.
The ideal to aim for is something more neutral, such as placing your subject in shade and then adding light with a reflector or even an external flash. The key is to start with the right location (such as in the shade), so that you don’t have any shadows falling on your subject and creating a really strong and visually off-putting combination of bits of shadow and bits of light.
Mistake #2: Wrong Location
This tends to happen when the elected photographer is too shy to get their subjects to move to a location that will help result in a more appealing photograph. They’ll tend to make-do with any old location, if their subjects are suddenly all together. What then happens is they’ll end up with something in the background that totally ruins what could be a really nice photograph, such as random cars that aren’t out of focus enough to truly stop them from being a visual distraction. Or, there are rubbish bins or just something that detracts from the overall appeal of the resulting photograph. And, most of the time, all the photographer had to do was move their subjects to a spot only a few meters away, or turn them to a slightly different angle, and they would have had either a clutter-free background, or at least one that would have blended nicely behind the main subjects without being an eyesore or unwanted distraction.

photo by Mateus Lunardi Dutra
Mistake #3: Focus in the Wrong Place
Many a time, people have managed to compose a really nice photograph, but the elements you’d want to see clearly just aren’t in focus. You have to be aware that the eyes of those viewing the photos are going to go to whatever happens to be sharp and bright.
Examples are flowers, where the head of the flower is blurred and out of focus, but the leaves (nice as they are, but which most likely aren’t the main feature to show off) are the parts that are in focus. So, the focus was good on the leaves, but as it was the head of the flower that was meant to be the main subject, the focus was clearly in the wrong place.

photo by Benson Kua
When it comes to taking portraits, it’s not uncommon to see that the photographer has managed to get something either in the foreground or the background in sharp focus, but then they’ve made a total hash of the face and eyes of the subject, which is frustratingly blurred. When viewing the photos, you want to see the detail of the person and don’t want to be impeded by the facial details being blurred and out of focus; this is often what ruins an otherwise nice portrait photo.
When taking a portrait, always make sure you have tack-sharp focus on the person’s eyes. If you’ve positioned the person at a slight angle to you, using center-point focus, lock it in on the closest eye to you. The key to good portrait photos is to get the eyes in crystal clear focus—unless you’re aiming for something creative and artistic, that is!
Mistake #4: Wrong Aperture
Using a wide aperture (low f-number), to create a shallower depth of field, enables you to use selective focus to determine what is in focus and what will be blurred and out of focus. This approach helps you to dictate what those viewing your photos will look at.
For example, if you’re photographing a pilot standing in front of his or her plane, you want the pilot in focus and not the plane, because you want to draw the viewer’s attention to the pilot—the one who flies the plane—and, in this case, not so much the plane. If it were the plane you were wanting to draw the eye to, you probably wouldn’t have the pilot in foreground of the shot… he/she may be in the plane, but it’s going to be more obvious that the plane is the main subject of the photo, as you photograph the plane in its environment (such as about to taxi onto the runway); the background would be secondary to the plane, so you’d allow the background to become out of focus.

photo by DVIDSHUB
Of course, if you purposefully wanted to capture both the pilot and the plane in clear focus, with the pilot standing in front of the plane, then you’d shoot with a narrower aperture, such as f/11 or all the way down to f/22, depending on how far the pilot was standing in front of the plane.
Learn to use your DSLR in Aperture Priority mode to learn how to take photos with a low aperture number (f-numbers such as f/4, f/2.8, f/2, f/1.4, etc.), as these will allow you to explore selective focus, to get away from the “point-and-shoot look”, where everything is in clear focus.
Mistake #5: Bad Composition
Landscape photography is a good example where the average photographer tends to come away with poorly composed photographs. The problem usually stems from them not knowing what their subject actually is. If you were out at Niagara Falls, it’d be fairly obvious that your subject would be the stunning waterfall, and so that is what you would want as the star attraction in your frame. However, problems can arise when there are multiple candidates for being the main subject. Is it the autumnal colors of the leaves? Is it the flowing stream as winds its way down into the valley beyond? Is it the valley? If you know what your subject is, it will help you to craft a better photo.
You can sometimes get interesting photos by angling your camera. This is using a technique known as “Dutch angle,” “Dutch tilt,” “canted angle,” “oblique angle,” or “German angle” photography to produce a point of view that’s pretty much like what you see when you tilt your head to one side. It is a technique that can be used to add a dramatic effect to an otherwise ordinary subject matter.
Another cause of bad composition is not getting down to the level of your subject to take the photo. Photographers can get a bit lazy and shoot everything from the height that they stand, regardless of the height of the subject they’re photographing. If photographing, say, kids or animals, you’ll often be rewarded with better images if you make an effort to get down to their level—even going as far to lay on the ground, if you have to—in order to get the shot so you can portray in the photo what it’s like to be at their level. If you can get low, below your subject and shoot upwards, it has the effect of making your subject look much bigger and/or more powerful.

photo by PhotoAtelier
Another composition mistake is trying to shoot every subject from head-to-toe. This is typical of portrait photos. Images can be more interesting if you get in close, either physically closer or with a zoom lens, to photograph your subject(s), say, from the waist, upwards.
Always centering subjects in photos is a habit that can create routinely poor photos. If you don’t center subjects in the frame, you get to take your viewer on a journey through your photograph, which can help make your images a little more compelling. For instance, you photograph a monument and instead of placing that monument in the center of the frame, step back enough so that it can be positioned to either side (where you think it looks better), and then use leading lines (such as the shape of the land, or a fence, or a road, or path), to lead your viewer’s eye from the far side of the image up to the monument (or whatever your subject is), where they may spend a little while taking in the details of that subject before their eyes naturally travel back along the leading line to where they started—at which point they’ll either be done looking, or they may take another visual walk through your photo if it’s compelling enough to them.
Mistake #6: Don’t Shoot Tight Enough
If you take a photo of someone, for example, and you show the person from head-to-toe, plus a lot of what’s in the background and surrounding that person, then the photograph tends to be about the environment that your subject is in – it could be the person is wearing a football kit and is on the pitch, with the goal posts in the background. If, instead, you focused in really tight, so that you fill the frame with your footballer, as much as possible (from the waste up, for instance), then the resulting photograph will now be more about the person, than where they are.
It’s not that you shouldn’t shoot in one way versus the other (head-to-toe versus up tight), but consider shooting both types, in order to give you more options – once you get the photos printed or onto your computer, with a bit of reflection, you might find you prefer one style over the other. But, if you only shot one way, such as always trying to get everything in the frame, from head-to-toe, then you’re missing out on achieving a totally different feel or look to your images.
It doesn’t matter what the subject is; if it’s a car, for example, take one photograph showing the entire car, which will include some of the surrounding environment, and then get in really close and tight, and photograph an appealing section of the car in isolation. It could be just one side or a diagonal shot either taken from the front nose section looking toward the back or from the interesting back end of the car looking forward.
Mistake #7: The Wrong Use of Flash
First of all, a flash unit at full power can be really harsh, which can result in the loss of interesting features and details of your subjects. So, if using flash, turn down the power, such as to -1 stop. You’ll know when you’ve used too much flash, because people will be commenting on the fact you used flash to take the picture. It should be used to enhance the subject(s) in the photo, not to become the main feature or talking point of the image.
You should also take time to learn how to use your camera during the day, as much as at night. If you’re taking photographs outside on a bright sunny day, flash can help to get rid of some of the harsh shadows that may be present in the background or shining onto your subject(s).
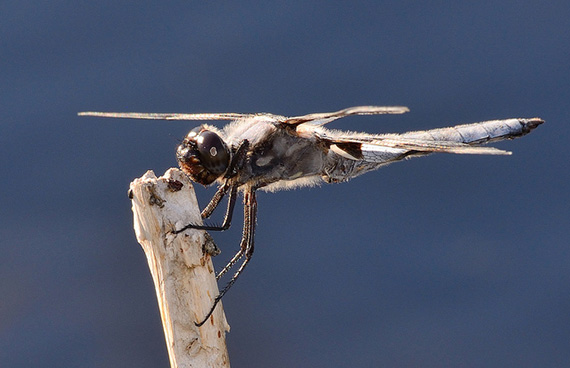
photo by Darron Birgenheier
If photographing someone outside, in the sun, and you find a small pocket of shade, you might end up with the sun shining down on them and, while you may get the sun adding a nice portion of hair light to the top of their head, the rest of your subject may be lost in a silhouette. By adding a subtle amount of flash, you can capitalize on the hair light coming from the sun, and kiss just enough light with your flash, to illuminate your subject from the front, to take them out of the dark silhouette. The result will be a nicer portrait, overall.
It can be very effective, when outside on a sunny day, to position your subject so the sun is coming from behind, and then you use your flash to help illuminate them from the front. With the sun shining down from the side, it can tend to add really dark shadows, particularly around the eyes, giving your subject a kind of “raccoon look”. This is something you can avoid, with the use of a flash, and simply positioning them so that they are between you and the sun, with the sun directly behind them.
Another problem with photographing people looking into the sun, is they all invariably end up squinting into the camera, which is never a flattering look to have in a photo.
Mistake #8: Not Aware of the Shutter Speed
Photographs that have captured, say, a sportsman in midair as they’re about to touch down and score a try in rugby; where they’re frozen, with no image blurring, will have been shot with a fast shutter speed. Conversely, when you see a bit of motion blur in the photo, such as the movement of the arms and legs of a marathon runner, then these will typically have been taken with a slower shutter speed. The shutter stays open fractionally longer, giving enough time for the camera’s sensor to record the movement of the limbs at various different points as the athlete moves along.
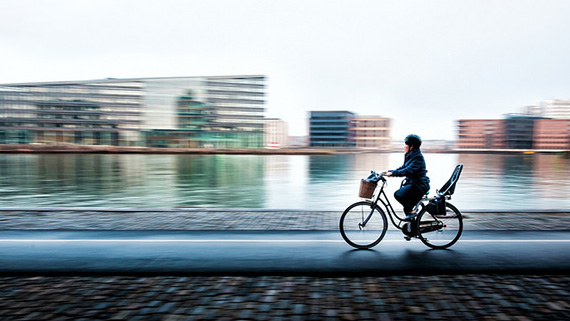
1/30 of a second, photo by Dragan
It all depends on the speed of the subject, as to how fast or slow your shutter speed needs to be, in order to capture either some movement in your photo, or to ensure that there’s no motion blur and the subject is completely frozen in that moment. A person jogging along might allow you to capture motion blur at 1/40 or 1/50 of a second, as you pan with them. But, a motorbike or race car may require 1/100 of a second or so, in order to get a similar result.
Mistake #9: Trying to Shoot at Night Without a Tripod
If you know you’re going to be photographing at night, take a tripod along, as you will most likely be needing to use slower shutter speeds. You don’t want to discover a fantastic photographic opportunity, only to be prevented from capturing that moment because you didn’t have a tripod—and because you couldn’t hand-hold the camera, as the outcome would have been photo-ruining blurring, due to having to hold the camera during the slow shutter speeds.
There are some places you go where they don’t allow tripods, in which case you will need to make the best use of whatever stable platform is available. This could be a ledge or a wall, or, if you’re forward thinking, you might be able to arrange a mini tripod in a backpack, which pokes out just enough to let the camera appear like it’s just sitting very well behaved atop your bag. But, in general, if you can use a tripod, it’s often the best choice. Camera bean bags are another option; you just have to scrunch your camera down into them to get it level, but that can solve a problem of not being allowed to take a tripod somewhere and yet still manage to get your camera onto a level base to take your shot.
Mistake #10: Standing By Walls & Bushes
If people know they’re going to have their photos taken, they inevitably find a wall or a bush and reverse themselves right up to it and then wait there until you take their picture.
If you’re using flash or you’re outdoors in bright sunlight and you let them remain in front of the bush or wall, this will most likely result in them having a harsh shadow around them. The bush or wall can also merge with your subjects and you may not get sufficient separation between subject and these background objects, resulting in a rather cluttered portrait.

photo by Anna Davidson
What tends to happen when people have their photo taken up against a wall or a bush is that people viewing the photos will get somewhat distracted, as they may find their minds are caught between looking at the people and looking at that bush or wall. By all means, if the bush is attractive, you can have it in the background, but just bring them far enough away from it so that you can use a wide aperture (small f-stop number), combined with a longer focal length, to have the bush nicely defocused in the background, while letting your subjects take the starring role, as should be the case.
About the Author:
Graham Wadden created and maintains the Creative Commons photography website, WaddenCCPhotography, specializing in creating stock photography primarily for home educators and those in education.
Like This Article?
Don't Miss The Next One!
Join over 100,000 photographers of all experience levels who receive our free photography tips and articles to stay current:


really good tips for my school project!
The shutter speed (photograph #8) is NOT by mistake. I have chosen 1/30 in order to get the background blur and the main subject in focus. The technique is called panning.
Here is a shot panning HOWTO:
– aperture to f8 or f11
– shutter speed 1/30th (i calculate speed (kmh) x 1 -1.5)
– manual focus (zone focussing) set to ~ 3,5m. DoF should be ~ 2-10m
– when the subject approaches, track it, release the shutter and continue to pan