Lens distortion is a common issue in photography that affects the shape, size, and sharpness of images. This optical aberration occurs due to the imperfections in camera lenses. There are primarily two types of lens distortions: barrel distortion and pincushion distortion.
Related reminder: only a little while left for the Photo Editing Cheat Sheets ☀️ Summer Sale
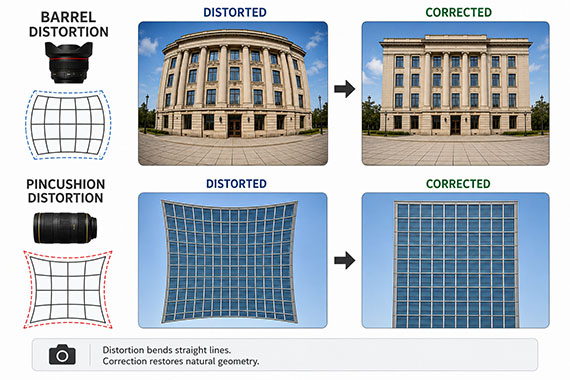
Barrel Distortion occurs when the edges of an image appear to bulge outward, giving the photo a rounded, barrel-like appearance. This type of distortion is most commonly seen in wide-angle lenses and can give an unnaturally curved look to straight lines near the edges of the frame.
Pincushion Distortion, on the other hand, is the opposite effect, where the edges of an image seem to pinch inwards, making the middle part of the image appear to puff out. This distortion is more common in telephoto lenses and results in straight lines bending inward towards the center of the image.
Both types of distortions can detract from the aesthetic appeal of a photograph, making architectural lines appear curved when they should be straight, or creating unnatural proportions in subjects.
How Does Lightroom Fix It?
Adobe Lightroom includes tools specifically designed to correct lens distortion. The process Lightroom uses can be broken down into a few steps:
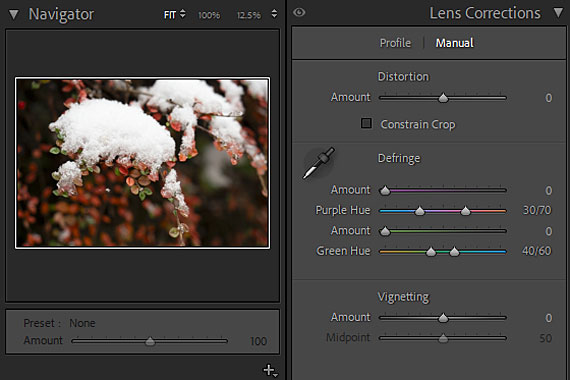
- Profile Corrections: Lightroom has a database of lens profiles that contain information on how different lenses distort images. By selecting the make and model of the lens used to take the photo, Lightroom can automatically apply a correction that counteracts the known distortion characteristics of that lens. This feature significantly simplifies the correction process, making it accessible to photographers of all skill levels.
- Manual Corrections: For lenses not included in Lightroom’s database, or for fine-tuning corrections, Lightroom provides manual distortion correction sliders. The manual controls allow photographers to adjust the amount of barrel or pincushion correction applied to the image. By adjusting these sliders, photographers can straighten curved lines and restore natural proportions to their subjects.
- Guided Upright Tool: For complex distortion issues or when straight lines are essential (such as in architectural photography), Lightroom’s Guided Upright tool allows users to draw lines directly on the image to indicate where straight lines should be. Lightroom then automatically adjusts the image to align with these guides, correcting perspective and distortion simultaneously.
- Edge Refinement: After correcting for distortion, Lightroom offers tools to crop the image to remove any unwanted empty spaces or distorted edges that result from the correction process. Additionally, the software can perform edge stretching to fill in these spaces, preserving the original dimensions and composition of the photo.
Whether you’re dealing with wide-angle barrel distortion or the pincushion effect of a telephoto lens, Lightroom’s comprehensive toolkit can restore the natural appearance of your photographs.
For Further Training:
If editing often feels scattered or uncertain, these cheat sheets provide a clear, repeatable process for tackling exposure, color, masking, retouching, and finishing touches in the right order.

Paired with time-saving keyboard shortcuts, they help you edit faster, stay consistent, and know when an image is truly finished.
Deal ending soon: The Photo Editing Cheat Sheets ☀️ Summer Sale
Like This Article?
Don't Miss The Next One!
Join over 100,000 photographers of all experience levels who receive our free photography tips and articles to stay current:





Leave a Reply