Have you ever opened a photo that looked perfectly sharp on the back of your camera—only to get it onto your computer and think:
Why does this look so soft?
Your first instinct might be to reach for the Sharpening slider. But sometimes the photo isn’t actually blurry at all.
It simply lacks local contrast.
And there’s a quick editing trick that can make it appear dramatically sharper.
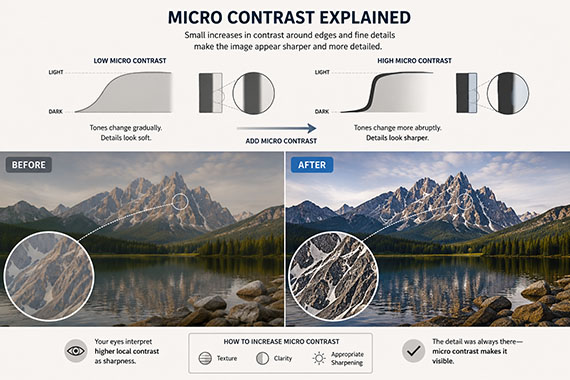
Sharpness Isn’t Just About Focus
We tend to think of sharpness as a technical issue: focus accuracy, shutter speed, lens quality, or camera shake.
But our eyes also judge sharpness by looking at contrast along edges and fine details.
If neighboring tones are too similar, details can appear soft—even when they’re perfectly in focus.
That’s why a RAW file straight from the camera can sometimes look surprisingly flat.
The detail is there. It just isn’t being emphasized.
The Editing Trick: Add Micro-Contrast
In Lightroom or Adobe Camera Raw, try increasing Texture and Clarity slightly.
These controls aren’t the same as traditional sharpening.
Texture enhances smaller details without dramatically changing larger areas of the image. It’s especially useful for landscapes, architecture, wildlife, clothing, and other subjects with lots of fine detail.
Clarity increases contrast around larger edges and midtones, giving the image more definition and “bite.”
Try starting around:
- Texture: +10 to +20
- Clarity: +5 to +10
Then zoom out and look at the entire image.
You may be surprised by how much sharper the photograph suddenly appears.
Don’t Forget the Blacks
There’s another simple adjustment that can help.
Try lowering the Blacks slider slightly.
A photo with weak blacks can look washed out and soft. Adding a little depth to the darkest tones creates more separation between details and can make the entire image feel crisper.
You don’t need much.
The goal isn’t to crush the shadows—it’s simply to give the photograph a stronger tonal foundation.
Then Apply Actual Sharpening
Once you’ve improved the local contrast, then evaluate whether the image needs additional sharpening.
In Lightroom, hold Alt/Option while adjusting the Masking slider in the Sharpening panel.
You’ll see a black-and-white preview.
White areas receive sharpening. Black areas are protected.
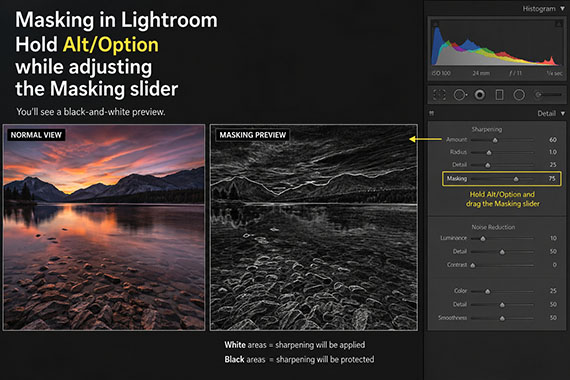
Increase Masking until you’re primarily sharpening important edges rather than smooth skies, skin, or out-of-focus backgrounds.
This often produces a much cleaner result than simply pushing the Amount slider higher.
The Mistake to Avoid
Don’t try to rescue every soft-looking photograph with aggressive sharpening.
Too much sharpening creates halos, emphasizes noise, and can give fine details an unnatural, crunchy appearance.
Instead, think of perceived sharpness as a combination of:
Focus + Detail + Edge Contrast + Tonal Contrast + Appropriate Sharpening
Sometimes your camera captured plenty of detail.
Your editing software just hasn’t brought it out yet.
So the next time you open a photograph and immediately think, “I missed focus,” don’t delete it just yet.
Add a little Texture. Add a touch of Clarity. Deepen the Blacks slightly. Then apply carefully masked sharpening.
You may discover the photo was sharp all along.
Like This Article?
Don't Miss The Next One!
Join over 100,000 photographers of all experience levels who receive our free photography tips and articles to stay current:






Leave a Reply