Just about anyone that you ask will agree that there’s a sophisticated beauty to black and white photography. However, there are certain scenarios where vibrant color really brings a photograph to life. Converting a color photograph to black and white is attainable in a single click. Bringing color to a black and white, on the other hand, is no easy feat.
For over a century, artists have specialized in hand coloring black and white images. In this tutorial, Nathaniel Dodson explains how to practice the process digitally with the help of Adobe Lightroom:
Dodson goes into the fine details on everything that goes into a complex photo coloration. The following are a few highlights for beginners to take into consideration:
1. Create a Virtual Copy
Before beginning the process, the first thing you’ll want to do is create a virtual copy of your original image. While the changes you make to a file are nondestructive, it’s helpful to have the original file as a reference point as well as fallback should you find that you’re not satisfied with your edit. Making a copy is pretty simple; just select your image, right-click, and select “Create Virtual Copy.
2. Know when to use Auto Mask
To bring in your colors, use Lightroom’s adjustment brush with the customized color swatch applied. Using the sliders on Lightroom’s right hand panel, it’s possible to adjust the contrast, clarity, and exposure of each brush stroke using a series of corresponding sliders. Also included in the adjustment brush menu is an “Auto Mask” option. For the most part, you’ll want to make sure that Auto Mask is off; when working with black and white photographs, the tool often proves to be limited and, at times, detrimental.
3. Separate elements with Pins
Avoid making all of your changes on a single adjustment brush layer. Instead, Choose the “New” option in the adjustment brush panel to lay down new pins when working with separate colors or touching up new segments of an image. You can then go back and make changes to exposure, and contrast to the entirety of a specified pinned area.
4. Pay close attention to edges
When colorizing an image, take extra care to make sure that your colors aren’t bleeding over hard edges. Likewise, use a feathered brush for subtle transitions between similar colors. Zoom in to your image to examine the fines details of your shot.
Should you make a mistake, don’t fret. It’s easy enough to convert your brush into an eraser. In this particular scenario, you may want to consider temporarily turning on Lightroom’s Auto Mask option to make the clean up process a bit less excruciating.
5. Utilize different shades of the same color
Layering your colors is incredibly important to maintaining the semblances of realism. When working in a specific area, paint in lighter and darker shades of your base color. This will create the illusion of shadows and highlights, adding depth to the photograph.
6. Know your shortcuts
Using shortcuts to your advantage can effectively reduce your time spent editing. A few pointers covered in this tutorial include:
- Temporarily converting a brush to an eraser by holding down the ALT or OPTION key
- Erasing a perfectly straight line between two points by holding down SHIFT between clicks
- Using the bracket keys ( [ and ] ) to adjust brush sizes
- Duplicating an adjustment brush layer by right clicking its corresponding pin icon
7. Bring in reflections
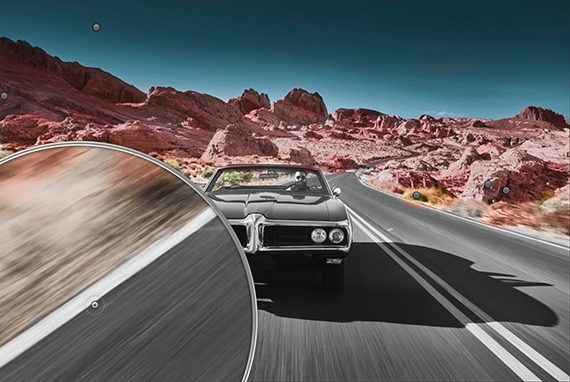
Pay close attention to the content of your image and take into consideration the elements within a shot might interact with one another. Though not always immediately evident, small touches make a scene entirely more convincing. For instance, after contemplating how the blue sky might reflect off of the red rocks in Dodson’s desert scene, he adds a low-opacity purplish shade to his landscape. Though it initially seems to clash, it ultimately blends in perfectly.
8. Don’t forget to make overall adjustments
When all of your local adjustments are finished, don’t forget to apply any necessary overall adjustments. A few tonality tweaks and color shifts can drive home the mood of a photograph and tie together the piece as a cohesive whole.
“I know it took some time guys. I know it’s a labor of love doing this…but the point is, it’s very possible to do this in Lightroom.”
Like This Article?
Don't Miss The Next One!
Join over 100,000 photographers of all experience levels who receive our free photography tips and articles to stay current:


Leave a Reply