I like to learn by doing—so when I opened my first RAW photo, naturally, I simply played around with the various sliders until I found a level I was happy with. But while experimenting is a vital part of learning both photography and post-processing, grasping a full understanding of the process allowed me to both troubleshoot specific issues and cut back on editing time.
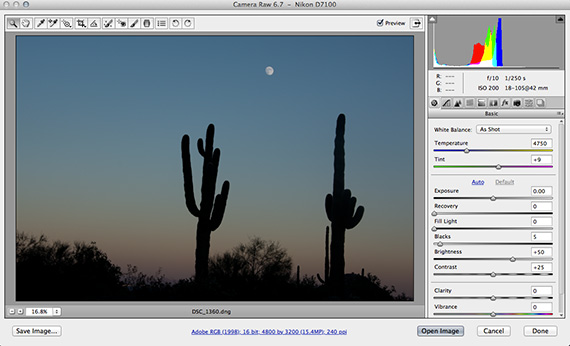
photo by Hillary K. Grigonis
Tonal sliders apply adjustments to the image as a whole, but each one controls a different tone. By adjusting each tone, you can turn a digital file into one that’s much closer to the picture you have in your mind. Tonal adjustment sliders are fairly universal too—once you learn the sliders in Camera RAW, you can comfortably use the Lightroom controls and vice versa. Here’s what beginners need to know about tonal adjustment sliders.
A Note About the Histogram
Whether you use Camera RAW or Lightroom, you’ll see a histogram in the upper right corner of your screen. Just like the histogram on your camera, it’s simply a depiction of all the pixels in the image on a chart. Ideally, the peaks on that chart should never be cut off on the right or left sides. But if the peaks are cut off, that’s often something that can be remedied by using the tonal adjustment sliders.
If the high points in your histogram are too close to one side, move the sliders in the opposite direction to correct it. Watch both the image and the histogram as you make adjustments to help decide how far to move the slider.

photo by Bert Heymans
Exposure
The exposure slider works in the same way as your camera’s exposure compensation control. Adjusting this slider changes the image’s overall exposure, lightening and darkening the image across all the tones. Unlike the more specific controls, the exposure slider adjusts lights, darks and midtones all at once. Making even small adjustments with the exposure slider can have a big impact on your photo. This slider is best used for fixing small exposure errors. While it’s one of the first sliders to use, you can leave it alone if you nailed the exposure in-camera.
Highlights
The highlight slider adjusts only the lighter parts of the image, without affecting the other tones. The very lightest portions of the image aren’t affected (the whites slider takes care of that), but this slider affects most of the lighter tones. Pulling the slider to the left will help bring back details lost in lighter areas of the image—like inside the clouds, for example. Moving the slider to the right will emphasize the bright areas—like if you want to intentionally blow out the background on a backlit portrait without affecting the subject.
Tip: To turn on the highlight warning or “blinkies” in Camera RAW or Lightroom, click the arrow in the upper right corner of your histogram.
Shadows
The shadows slider is the exact opposite of the highlights—it adjusts the darker portions of the image, though again not the very darkest. Adjusting to the left will darken the shadows, which helps enhance an image’s contrast. On the other hand, if the shadows are concealing some details, moving to the right will help recover some of them. This slider can be a big help in processing an image that’s backlit.
Whites
What the white slider adjusts is pretty obvious—it’s the brightest tones that the highlight slider doesn’t adjust. But what kind of scenarios call for using this option? Brightening (dragging to the right) the whites will add contrast to an image—this is one slider that black and white photographers shouldn’t ignore. And while most of the time the highlight slider will recover clipping, drawing the slider to the left is sometimes needed to correct an extreme clip.
Blacks
Again, there’s no guessing here—the blacks slider will lighten or darken the image’s darkest tones that aren’t affected by the shadows adjustments. Just like the white slider, the blacks is a good one to use for a black and white image, helping ensure that the image has a true black. On a color image, moving the black to the left will saturate the color a bit more.
Contrast
Of course, we can’t leave out the midtones. Using the contrast slider actually adjusts all tones, but affects the midtones the most. Instead of moving the peaks on the histogram (i.e. lightening or darkening), the contrast slider will widen the peaks. This option is best used when adjusting the other sliders didn’t offer enough of a contrast boost.

photo by Hillary K. Grigonis
What Order Should I Use the Tonal Sliders In?
For the most part, Adobe lists the sliders about in the order that you should use them. It’s okay to go back and make small adjustments in the earlier sliders if you see the photo is a little off. The thing to keep in mind is that contrast should always be saved for last. If you lighten the lights and darken the darks, you’ll get quite a bit of contrast without even touching the contrast slider.
The tonal sliders in Camera RAW and Lightroom are great for making big adjustments in a minimal amount of time. Individual sliders help you make specific adjustments to just the light colors or just the darks. Keep an eye on the histogram as well as the image and you can make some pretty dramatic changes to your shots.
About the Author:
Hillary K. Grigonis is a lifestyle photographer and writer. She combines those two passions by writing photography tips for CreativeLive.
Like This Article?
Don't Miss The Next One!
Join over 100,000 photographers of all experience levels who receive our free photography tips and articles to stay current:


Leave a Reply