When a photo feels too dark, the obvious solution is to increase the Exposure slider.
But here’s something worth knowing:
Making a photo brighter and making it look brighter aren’t necessarily the same thing.
In fact, simply increasing exposure can sometimes make an image look washed out without actually improving it.
Related: only a little while left for the Photo Editing Cheat Sheets ☀️ Summer Finale Sale
What the Exposure Slider Does
In Lightroom, Camera Raw, and similar editors, increasing Exposure broadly shifts the image toward brighter tonal values.
That’s useful when the entire photograph is genuinely underexposed.
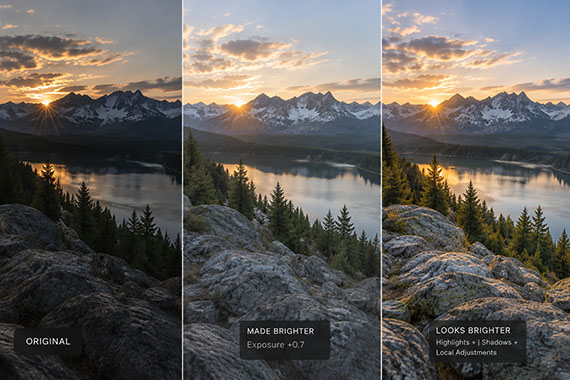
But imagine a landscape where the sky is already bright while the foreground is dark. Increasing Exposure enough to fix the foreground might make the sky far too bright.
The image is technically brighter—but it may not look any better.
That’s where perceived brightness becomes important.
You Can Make a Photo Look Brighter Without Raising Exposure Much
Our eyes don’t judge brightness based only on the average amount of light in an image.
We also respond to contrast and relationships between different tones.
For example, instead of adding +0.7 Exposure, you might get a better result by:
- Raising the Shadows slightly
- Increasing the Whites
- Adjusting the Tone Curve
- Brightening the subject with a local mask
- Slightly darkening surrounding areas
That last one sounds contradictory, but it’s particularly powerful.
If you darken the area surrounding your subject, the subject can appear brighter even though you haven’t brightened it at all.
You’re changing the relationship between the tones rather than simply adding brightness.
Whites Can Create “Light” Without Raising Everything
The Whites slider is another useful example.
Increasing Exposure affects a broad portion of the photograph. Increasing Whites primarily pushes the brightest tonal regions higher.
Used carefully, this can give an image more brilliance and make highlights feel luminous without dramatically brightening the midtones and shadows.
This is one reason two photos with similar overall exposure can have very different feelings of brightness.
One may look dull and heavy.
The other can look crisp, luminous, and full of light.
Local Brightness Is Often More Important
Modern masking tools make this even more useful.
Suppose you’re editing a portrait where the person’s face feels slightly dark, but the overall exposure is already correct.
Increasing global Exposure affects everything.
Instead, create a mask around the subject and brighten the face slightly. You could then subtly darken the background.
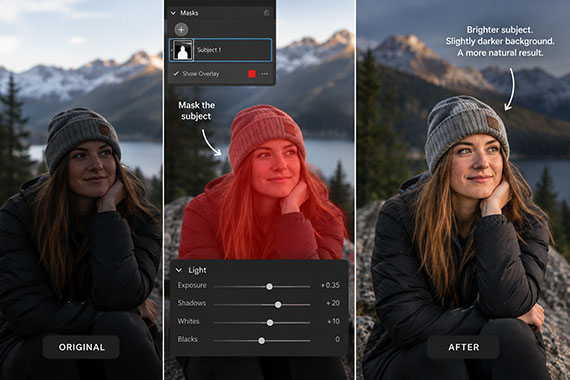
The difference might only be a fraction of a stop in either direction, yet the subject suddenly seems much brighter.
Landscape photographers can do the same thing with:
- Sunlit mountains
- Foreground objects
- Paths and leading lines
- Reflections
- Clouds
- Areas where sunlight naturally falls
You’re effectively sculpting the light that’s already in the photograph.
Try This Editing Experiment
Open a photograph that feels slightly too dark.
Before touching Exposure, try this:
- Raise the Shadows just enough to reveal important detail.
- Increase Whites slightly to give the brightest areas more life.
- Add a subtle S-curve if the image needs contrast.
- Use a mask to brighten the main subject.
- If appropriate, slightly darken less-important areas around it.
Now toggle the edits on and off.
You may find that the photograph feels significantly brighter even though you barely changed its overall exposure.
The Bigger Lesson
The Exposure slider is extremely useful—but it shouldn’t automatically be the first answer whenever an image feels dark.
Sometimes the photograph doesn’t need more brightness everywhere.
It needs brightness in the right places.
Once you start thinking about perceived brightness rather than simply moving the Exposure slider, editing becomes less about correcting the entire photograph and more about directing the viewer’s eye.
And that’s when brightness stops being just a technical adjustment—and becomes a creative tool.
For Further Training:
If editing often feels scattered or uncertain, these cheat sheets provide a clear, repeatable process for tackling exposure, color, masking, retouching, and finishing touches in the right order.

Paired with time-saving keyboard shortcuts, they help you edit faster, stay consistent, and know when an image is truly finished.
Deal ending soon: The Photo Editing Cheat Sheets ☀️ Summer Finale Sale
Like This Article?
Don't Miss The Next One!
Join over 100,000 photographers of all experience levels who receive our free photography tips and articles to stay current:



Leave a Reply