A camera with manual controls gives you the power to capture some amazing effects, once you know how to use it. You can develop all the skills of a professional once you understand your manual settings.
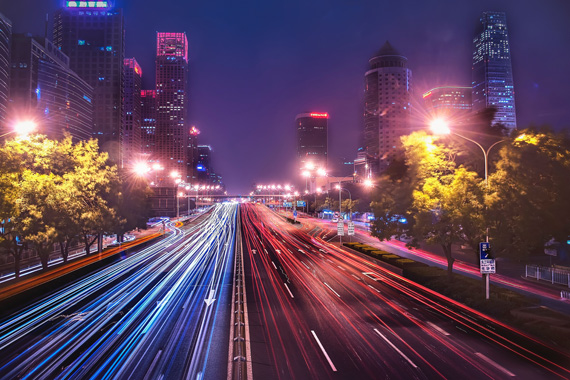
Photo captured by zhang kaiyv
If you’ve grown up with a ‘point and shoot’ camera and have just taken the plunge with a new digital SLR or mirrorless camera, don’t just leave it on auto. That is a waste of good technology; it means you’re still using your equipment as a point and shoot camera. The key to improving your photography is to learn to use your manual settings.
One of these settings is shutter speed. It’s fun to experiment with and easy to see the results in your photos. Although we usually try to freeze our subject with the fastest shutter speed possible, you can get some great effects by using a slower shutter speed to capture movement.
To try this out, you can set your camera to Shutter Priority mode, in which case you set the shutter speed and the camera takes care of the aperture for you. Or, you can go to fully manual mode and adjust both settings yourself. Just remember to keep your exposure balanced by compensating each movement in the shutter speed setting with a corresponding movement of the aperture setting.
Remember to always use a tripod for slow shutter speed photos.
5 Ideas for Long Exposure Photography
Here are five ideas for great capturing great motion effects, simply by slowing down your shutter speed to capture the movement of the subject. If you haven’t tried this before, you’ll have some fun and be thrilled with the results.
1. Waterfalls
This is the obvious first choice. You have certainly seen the silky effects of flowing water in photos, but perhaps you have wondered how it’s done. Just set your camera to a very slow shutter speed—about one second or a half-second—and see the results. The silky slow movement effect is not always your best option. For each waterfall you should try a few shutter speeds to see which one works best for that particular subject.
2. Cars at Night
When doing night photography, you usually need fairly slow shutter speeds anyway. If you try shutter speeds of one second, two seconds, ten seconds, and even longer, you will see some amazing results.

Photo by Ben; ISO 400, f/6.3, 4-second exposure.
In color photos, the lights of the vehicles will create streams of bright color, stretching away into the distance. The more traffic you see, the more remarkable the effect becomes.
3. Lightning
People often ask me how I take my lightning photos. Some people imagine it takes superhuman reflexes to snap the picture at just the right moment. The truth is, my approach is exactly the opposite.

“Windmill and Lightning” captured by Jeremy Weber
First, I wait for a storm (at night) with lots of lightning; in particular, fork lightning that will appear well defined in a photo. I set the shutter to the ‘B’ setting, which lets me open the shutter for any length of time I choose. Then I wait for the lightning to flash. I can capture just one flash of lightning, or several flashes, just by leaving the shutter open for longer.
4. Waves
The movement effect of water in a waterfall can also be applied at the beach, although you don’t see it so often in photography. When you visit the beach, experiment with different shutter speeds.
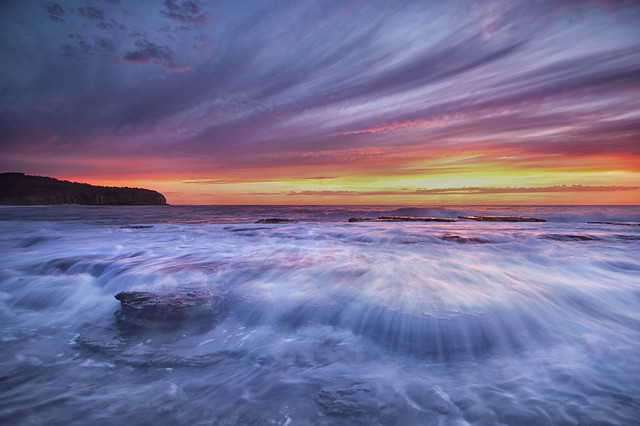
“Narrabeen Sunrise” captured by Nigel Howe
Sometimes you will find that soft movement effects are just as satisfying as freezing everything with a fast shutter speed.
The misty appearance of fast moving water captured with slow shutter speeds can be most effective where waves are crashing over, or swirling around rocks.
5. Crowds Of People
A crowd of people moving in different directions can create a fascinating motion effect in a photo. You don’t need extremely slow shutter speeds to capture some nice results. Photos taken around 1/4 of a second will show substantial blurring, but of course you can exaggerate the effect by going even slower.
For a really impressive image, have a friend stand very still, while everyone around them is moving. Your subject will appear frozen in a sea of moving humanity. Very striking!

Photo captured by Jaanus Jagomagi
So there you have some experiments to go out and try yourself. If you haven’t done it before, you are bound to have fun and be excited by the results. And of course it will force you to get to know your camera a little better, which is guaranteed to make you a better photographer.
About the Author:
Andrew Goodall writes for https://naturesimage.com.au/ and is a nature photographer based in Australia. He manages a gallery in Montville full of landscape photography from throughout Australia.
Like This Article?
Don't Miss The Next One!
Join over 100,000 photographers of all experience levels who receive our free photography tips and articles to stay current:


thank you so much for the informative write up…. have a passion for photography and just bought the latest canon Powershot Sx30 IS… even though its not a DSLR.. its pretty impressive…. have just started to experiment with shutter speeds… thanks
Thank you for this….I participate in a weekly scavenger hunt and one of the prompts this week is MOTION…i’ve never attempted it and so this is perfect.
It’s good to find articles like this. It might suggest to people that they may want to put down their cellphones and compose an actual picture and the advantages you have with DSLR’s
it’s good to write a little about Paning technique which is used in tow pictures above
nice idea you have shared with us man. I tried lots of time to take this kind of photograph but it didn’t happen. whatever nice sharing bro.