With the flexibility of adjusting white balance during post-processing, is it really that important to get it correct in-camera? While some may argue that white balance can only be changed for RAW files, what about JPEG files? Gerald Undone discusses the common misconceptions about white balance and shares his thoughts:
Adjusting White Balance in RAW Files
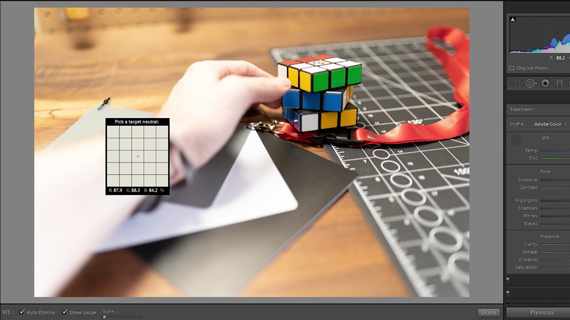
While Undone tests how RAW files perform when changing white balance for stills, the same results can be expected for RAW videos. In his test, Undone takes three images with a grey card in the frame, shot at different color temperatures:
- manual white balance setting (5500K)
- very warm white balance setting (10,000K)
- very cool white balance setting (2,500K)
Then, with the white balance dropper tool, he sets the white balance using the same portion of the grey card. After adjustment, the final colors in all the three images look identical.
This test confirms that RAW images are able to have their white balance changed drastically in post with no discernible losses.
Using a Neutral Object to Adjust White Balance
“When it comes to making videos, shooting the b-roll or even my product product photography, my hands are often in the scene. I don’t always remember to put out a color checker or a grey card. But if I have something consistent from scene to scene, like the neutral shoelace, I can get a consistent look throughout my shots.”
It really is a neat trick. By taking the shoelace as a reference, Undone can ensure that the white balance is being set consistently in any type of lighting conditions. He uses the white balance dropper tool on the shoelace around his wrist to get consistent results in images shot with varying white balance settings. The results are very close to the ones where the grey card was used to adjust white balance.
“Having something with you at all times that is a neutral grey can be quite beneficial to keep a consistent look throughout your shots. Just make sure it doesn’t have its own color, though, or that defeats the purpose.”
Adjusting White Balance in JPEG Files
Next, Undone goes on to see if the white balance can be fixed as conveniently when working with JPEG files. Following the same process of using the white balance dropper tool on the grey card, here’s the results:
- The image with the manual white balance setting undergoes unnoticeable changes.
- The colors in the image with a very warm white balance setting lose intensity.
- The colors in the image with a very cool white balance setting appear totally off, and the overall image appears overexposed.
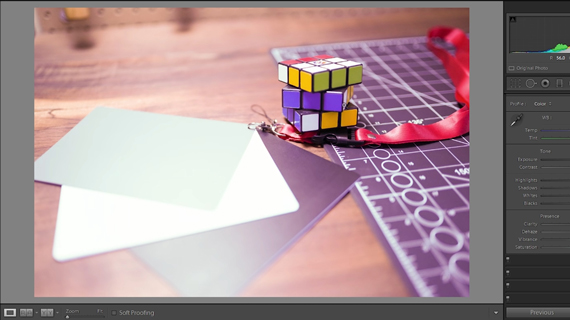
Colors in the image look totally off when a JPEG is subject to extreme white balance adjustment
We can conclude from this test that while minor white balance adjustments have no drastic effect on the image, extreme adjustments are not good for JPEGs.
It doesn’t matter whether you’re overexposing or underexposing. In any case, the image will face issues when you’re warming or cooling the image. But if you’re confident that you’ll be warming the images up later, then it is a good idea to underexpose a bit.
Setting a Correct White Balance
Use custom white balance in-camera before shooting. Either take a photo and scan it, or hold a grey card in a target to set the white balance.
Use a neutral grey object in the scene. This option is the second best in case you don’t have a grey card with you. Having something neutral in the scene like Undone’s shoelace or a piece of paper with 18% grey printed on it can later help you to correct white balance in post.
Eyeball it or set white balance to lights. This is a simple trial and error technique. You need to continuously check if what you see in the screen appears close to the actual scene and adjust the white balance in-camera. Try to set your camera’s white balance close to the Kelvin temperature of the lights being used.
Set your white balance to a neutral value. If you don’t have the time to adjust the white balance continuously, simply choose a neutral setting between 4500K and 6000K and forget about it. Since you’ll be somewhere in the middle, the adjustments won’t be too extreme. You can make the corrections without any adverse effects. Another advantage of using this technique is that you will have consistency throughout your shots.
Auto white balance. Auto white balance does a decent job most of the time. But the problem is its inconsistency. This may not be an issue if your images are not going to be juxtaposed. However, the inconsistency will be noticeable if the images are in a sequence or a collection.
In conclusion, you can make white balance adjustments in RAW files quite easily in post without any side effects. Anything else will suffer if extreme white balance adjustments are to be made.
Like This Article?
Don't Miss The Next One!
Join over 100,000 photographers of all experience levels who receive our free photography tips and articles to stay current:


Leave a Reply