Auto ISO is one of the most useful features on a modern camera. It automatically adjusts ISO as lighting changes, helping you maintain a usable exposure without constantly changing settings.
But there’s a catch.
If Auto ISO isn’t configured correctly, it can quietly contribute to photos that look softer than they should.
And the problem usually isn’t ISO itself.
The Real Problem Is Shutter Speed
Higher ISO can introduce noise and reduce fine detail, but Auto ISO can cause another problem: your camera may allow the shutter speed to become too slow.
Imagine you’re shooting with a 200mm lens in Aperture Priority mode at f/5.6.
As the light fades, your camera might allow the shutter speed to drop to 1/100 second before significantly increasing ISO.
The photograph may look fine on the LCD. But zoom in later and you’ll notice slight softness from camera shake or subject movement.
The focus wasn’t necessarily wrong.
The shutter was simply open too long.
Sometimes Higher ISO Produces a Sharper Photo
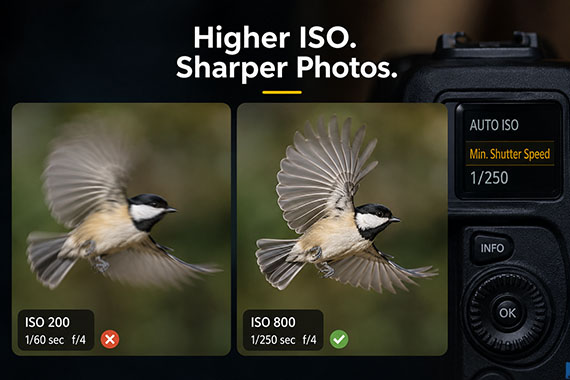
Consider these two exposures:
ISO 200 — 1/60 sec — f/4
versus:
ISO 800 — 1/250 sec — f/4
The first produces a cleaner file, but the second has a much better chance of being sharp.
Modern software can do an excellent job reducing noise. Motion blur is considerably harder to repair.
That’s why a slightly noisy sharp photograph is usually better than a clean blurry one.
Check Your Minimum Shutter Speed
Many cameras let you specify the slowest shutter speed Auto ISO should tolerate.
Look for a setting called something like Minimum Shutter Speed in your Auto ISO settings.
Instead of allowing the camera to drop to 1/60 second, you might tell it not to go below 1/250 second. Once it reaches that limit, the camera raises ISO instead.
For moving subjects, you might choose 1/250, 1/500, or faster. Stationary subjects may allow considerably slower speeds.
Remember that image stabilization only reduces camera shake. It can’t stop your subject from moving.
Try Manual Mode + Auto ISO
One particularly useful approach is Manual Mode with Auto ISO.
You choose the shutter speed needed for sharpness and the aperture needed for depth of field. The camera adjusts ISO as the light changes.
For example:
1/500 sec + f/4 + Auto ISO
Now you’re controlling the two settings that most directly determine how your subject looks, while letting the camera handle changing light.
The Better Way to Think About ISO
Extremely high ISO can still reduce perceived sharpness. Noise—and aggressive noise reduction—can hide fine textures and detail.
So the goal isn’t to use unnecessarily high ISO.
But it also shouldn’t be to always use the lowest ISO possible.
Instead:
Use the lowest ISO that still gives you the shutter speed and aperture your photograph requires.
Take a minute to check your camera’s Auto ISO minimum shutter speed setting. If you’ve never adjusted it, your camera may be prioritizing low ISO over the shutter speed you actually need.
Your ISO numbers might become a little higher.
But your photographs might become noticeably sharper.
Like This Article?
Don't Miss The Next One!
Join over 100,000 photographers of all experience levels who receive our free photography tips and articles to stay current:






Leave a Reply