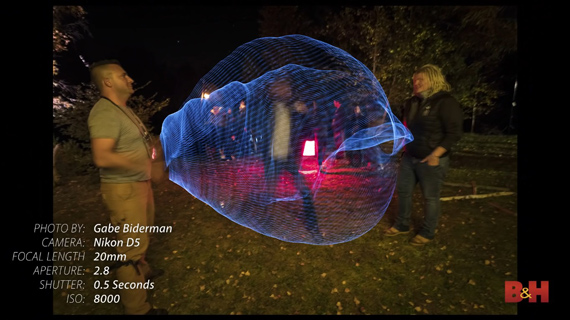
Long exposure photography allows you to create images that our eyes cannot recreate naturally. In this video, photographer Gabriel Biderman from B&H takes you through the fun world of light writing in a dark environment. Join him as he shows you how easy it is to generate unique images in no time:
Light Writing vs. Light Painting
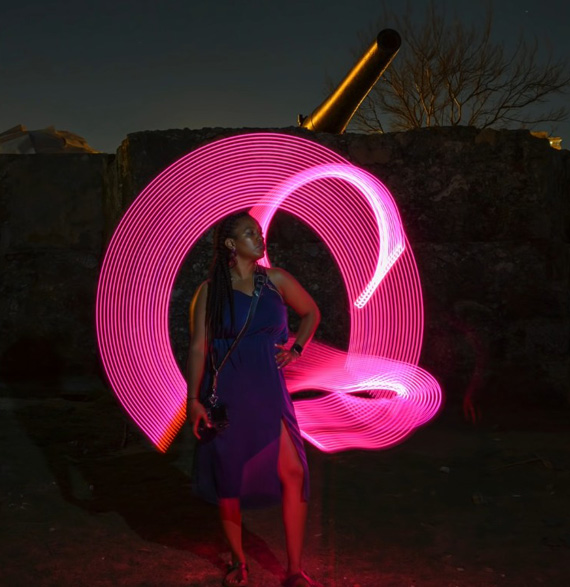
Light painting is using a light source to raise the shadows or create interesting highlights in a dimly lit scene. The light source itself is not usually visible in the final image when light painting.
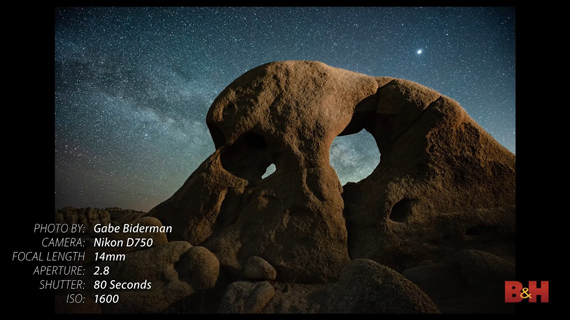
Light painting landscapes
Light writing is using a light source like a flashlight to actually write words. If you’re artistic enough, you can even draw patterns and characters to make the image more interesting.
What You Need for Light Painting
A blank dark canvas. You’ll need a dark environment to get started with light writing. And the good thing is, you don’t need to go too far to look for one. Simply turn off all the lights, close all the doors, and pull the curtains down.
Camera. You’ll need a camera with long exposure capability. Almost every camera has this feature. If you want to try out light writing with a phone, make sure that the camera app lets you take a long exposure photo.
Tripod. Tripods are essential for any kind of photos you take in low light. Since you’ll be taking a long exposure, you can’t risk shaking the camera, as you’ll end up getting a blurry image. Make sure that your camera is mounted on a sturdy tripod or on a solid, stable surface.
Cable Release. Using a cable release will let you open up the camera’s shutter remotely without shaking the camera. Biderman uses the Vello ShutterBoss cable release, but other simpler and economical cable releases on the market will get the job done.
A Light Source. You will need a light source to write in your canvas. It can be as simple as a flashlight, a phone, glow sticks, sparklers, or car lights. You can literally use anything that emits light. However, if you want to take your light writing to the next level, there are some specialized tools designed for light writing.
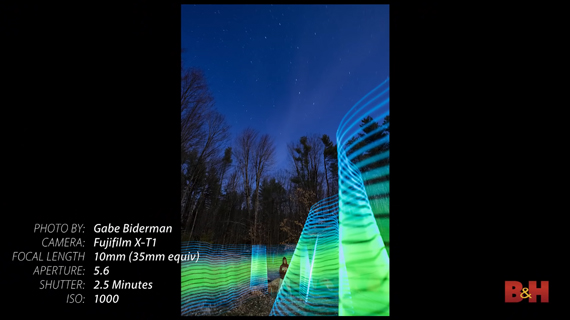
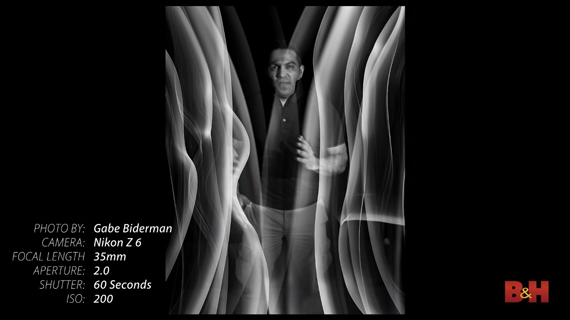
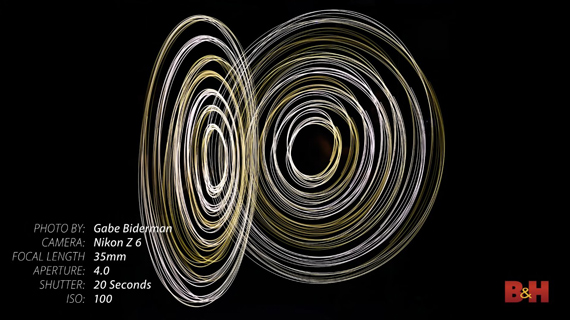
Light wands help you create waves of light.
Plexiglass blades emit light from their edges and allow you to create light waves.
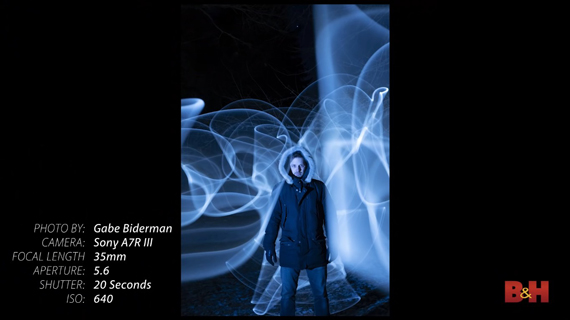
Another option is fiber optics. The tiny fiber optics act as multiple tiny light sources and emit light out of the ends, acting like a light brush and allowing you to really paint light on the subjects.
If you have some holiday lights laying around, you can use them too. Try hanging them or moving them when taking the photos to create special effects.
There are even specialized high-end tools like the Pixel Stick and the Magilight that not only emit light of different colors but can also read designs off a micro SD card.
![]()
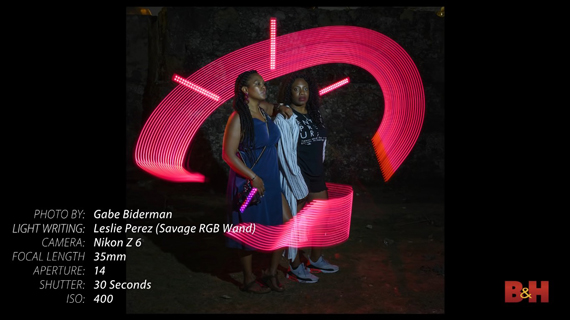
Then, there are tools like the Savage RGB light wand, which allows you to dial in any RGB color and color temperature. This can be a really fun tool to draw and design with.
Steel wool has been quite a popular tool for light writing and it undoubtedly creates interesting results. However, you’ve got to be careful when using steel wool as there have been instances when the dry grass around the area caught fire. Just make sure that you work with steel wool in a damp area. You can even try it on the sand at the beach.
One important thing to consider when choosing a light source is to make sure that it can be used at a lower power setting. Otherwise, you run the risk of blowing out the exposure.
Camera Settings for Light Writing
ISO. Keep the ISO fairly low. Although you’ll be working in a dark area, the purpose of light writing is not to reveal the details on those areas. Instead, the purpose is to reveal what you write using light. It is thus a good idea to start from a lower ISO setting somewhere between 100 to 400.
Aperture. Set the aperture somewhere around f/5.6–f/11, adjusting it to control the brightness of the scene.
Shutter speed. When deciding on shutter speed, consider the time you need to write what you plan on writing. Depending on the length, you can set the shutter speed to around 15–30 seconds or even for a few minutes.
Focus. Focusing in the dark is really tricky. One good idea is to pre-focus. Have a source of light placed at the plane where you want to write with light. Then, with the lens focused to that distance, switch the focusing mode to manual. You can then move into the scene, trigger the camera, and start writing on the same plane that you focused on. To ensure that you remain in focus, stay at the same distance from the camera for the entire exposure.
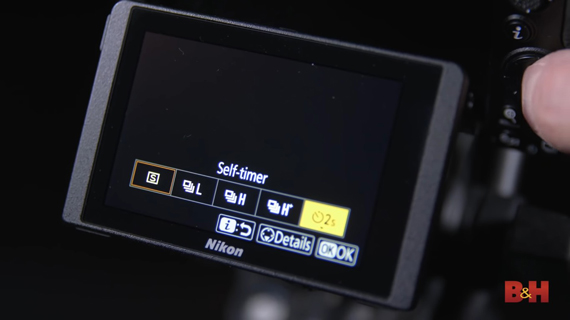
Whether you’re using a remote trigger or having a friend press the shutter button, be sure to have the camera in self-timer mode. This will allow you some time to get ready to start writing with your tool.
Light Writing Tips
Dress Like a Ninja
When writing with light, chances are that some of the light from the light source will get reflected from the surroundings onto you. This will allow the camera to capture your movement as well. If you don’t want that to happen, wear dark clothing.
Environment
Find or create a dark environment to work in. If you’re working outside, be aware of the bright and dark regions in the surroundings, and work in the shadow areas.
Low Power
Using a light source that is low powered—around 5 lumens—gives you the perfect amount of brightness for light writing. This brightness lets you write at a natural pace, whereas, if you use something that’s very bright, you’ll end up having to write very quickly so that you don’t blow out the highlights.
Timing
“Practice before you even turn on the camera, so you can figure out what that shutter speed’s gonna be.”
A practice run without the camera gives you a basic idea of how you will be writing and what shutter speed should be ample for you to get the job done.
Write Backwards
What you see as normal will appear backward in your image. Hence, when writing letters, write backward. It can get a little confusing, so a bit of practice helps.
Cover Light
When writing words, you will need to add breaks between the letters. When moving from one letter to the other, be sure to either turn the light off or cover it with a dark glove.
Use Aperture to Control Brightness
If your writing appears dim and you can’t change the power output of your light source, open up the aperture. This will allow more light to enter the camera and makes the writing brighter.
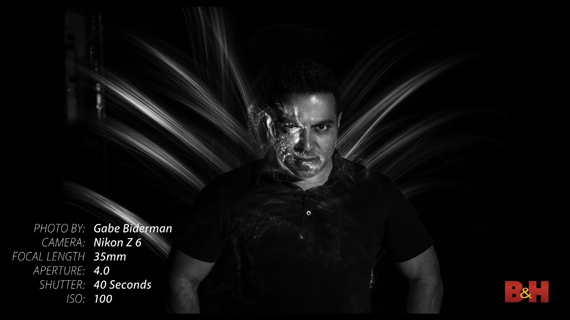
Including People
If you plan to have a person included in your light writing image, make sure that you pop a flash with the subject posing. This will freeze the moment and prevent the subject from appearing blurry in the final image.
“With light writing, the world of opportunity is open to you.”
Like This Article?
Don't Miss The Next One!
Join over 100,000 photographers of all experience levels who receive our free photography tips and articles to stay current:


Writing backwards is completely unnecessary.
Instead, write in the normal fashion. In post, just reflect the photo horizontally and the writing will be correct.