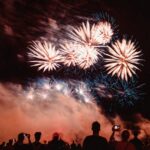
Dusk and dawn are magical times of day! Combine an interesting background with an interesting well-lit subject at exactly the right moment… Home Run! A photograph that everyone takes a second look at. A shot to be proud of!

40mm lens, ISO 400, F7.1 x ½ sec., WB 6000K. WB set for speedlights. Underpass goes very warm & sky goes deep blue. Very little ambient light on subject allows a long exposure.
This dusk image and article demonstrate the following techniques:
- Dragging the Shutter
- Multiple Speedlights
- Line of Sight Communication
- Different Color Temperatures of Multiple Light Sources in One Photograph
Fifteen to 45 minutes before the sun rises or after the sun sets is usually the very best time to be shooting. The sky is rich and dark—but not black—and the night lighting is visible.
Secrets to Creating a Successful Photograph
- Choose a visually interesting location that is well-lit at night.
- Select a subject that is relevant to your background.
- Scout and shoot tests prior to the photo session to determine the best time and camera angles.
- Experiment with various length lenses and find out the color of the natural ambient light (skylight and man-made).

This photo was taken only a few minutes before the previous photo.
How to Light a Subject at Dusk
Multiple speedlights are preferable, but even one speedlight used correctly will be dramatic!
Three speedlights were used for this photograph: a main light, fill light, and a kicker or accent light.

Lighting Setup for the Above Photo
The Main Light (B) was placed into an Umbrella Softbox nine feet from the subject. The Umbrella Softbox was raised slightly above the subject’s head and angled down a little. The main light’s job is to light most of the subject. This light should make the subject appear three dimensional—difficult to achieve with a single on-camera speedlight. The speedlight was set to ½ power.
Fill-light (A) is an on-camera speedlight with a medium sized diffuser attached to soften the flash. The fill-light’s job is to fill or lighten dark shadows with just the right amount of light. The speedlight was set to 1/8 power.
Kicker Light (C) was placed just outside of the camera’s frame. It is sitting on the concrete wall with the plastic mini stand attached. (Now you know what that thing is for!) A small diffuser was attached to soften the harsh flash a little. This light created the highlight on the right side of the subject’s face and hat. The speedlight was set to ¼ power.
No radio slaves were needed for this photo. “Line of Sight Communication”—the system that is built into modern speedlights—made all three speedlights fire simultaneously. It works flawlessly when used correctly. You must make sure that the Slave Speedlights’ sensors are aimed at the Master Speedlight’s sensor. The Master Speedlight is on the camera and the Slave Speedlights are off the camera. The Speedlight’s adjustable head makes this system of lighting possible! Point the light at the subject and rotate the sensors toward each other.

Speedlight Modifiers Used: Umbrella Softbox, left; Diffusion Cup, middle; Diffusion Mitt, right.
Line of site communication:

Rotate the head of the speedlight toward the subject. Sensors must see each other without obstructions
Note! It is critical that any modifier attached to the speedlight not obstruct the sensor.
Shoot in Manual Mode
The speedlights and camera were set to manual mode. Manual mode gives the photographer maximum control—very important under rapidly changing lighting conditions. The camera was mounted on a tripod since we were shooting at a very slow shutter speed.
The photographic term “Dragging the Shutter” is a technique that combines a slow shutter speed with a burst of flash (1/500 second or faster) from the speedlight. The slow shutter exposes the background and the nearly instantaneous flash exposes the subject.
To lighten the background, slow the shutter speed. To darken the background, increase the shutter speed. To lighten the subject, increase the speedlight’s power or move the lights closer to the subject. To darken, do just the opposite.
Note! Once the speedlight lighting ratio is dialed in and the background exposure is calculated, it is easier to make overall exposure corrections by adjusting the ISO up or down in 1/3 stop increments.
Multiple colors of light in the same photograph should usually be avoided or corrected. Dusk and dawn take advantage of these color differences, offering the early bird or night owl photographer a rich, vibrant color palette to work with!
About the Author:
John Rogers is an award winning photographer in Boise, Idaho and owner of ProLightSecrets.
Like This Article?
Don't Miss The Next One!
Join over 100,000 photographers of all experience levels who receive our free photography tips and articles to stay current:


I applaud at Mr.Roger’s comments on his ability to encourage young aspiring photographers as himself and obviously there are different opinions on the subject of being a professional photographer. He is right about the first step is making the decision to become a professional photographer. That is if you truly have a passion for photography but there is more to just learning photography, and not in just 6 months.
Here are my credentials – A graduate of Brooks Institute of Photography, commercial advertising photography in Los Angeles for over 30 years, an educator teaching Advanced Studio Lighting at Santa Monica College since 1992 as an adjunct photography instructor, who also teaches photography workshops on weekends.
I admire Mr. Roger’s opinion and feel that we are all free to have an opinion but learning photography in six months? Really. To me professional photography is not only knowing your camera equipment but also the business side as well.
Upon graduating from Brooks Institute, my last professor turned to the class and said “Today marks the end of your formal education in photography as it pertains to photography techniques”. But you are embarking on your first step into the “Real World” which will take you about five years before you can call yourself a Professional Photographer. In my mind, I said, ya right”! But you know, he was exactly right. From 1974 when I graduated and returned to Los Angeles, which is one of the toughest city in the country to break into the commercial field of photography I might add, to 1980 when I had enough clients to make a decent living at practicing photography as a career.
I am appalled that Mr. Rogers would use such a “broad brush” and say that learning photography is as simple as “1,2,3,”. Although he did mention that there are some areas of photography that do take more then just knowing how to push the camera button. He also mentioned that having a “inflated ego” is also helpful. I have spent my whole life in photography and I truly know what it take to become a Professional Photographer. I’m not looking down on photographers who do weddings, portraits, high school photography, baby pictures, but that is only one small part of the photography industry. It’s like saying that fast food is a professional practice in fine dinning but compared to a chef in a sit down restaurant, they are not the same. Yes, you are still ingesting food, but the food is prepared by an hourly person making mass quantities of burger’s! Which does take 6 months to learn. But compared to a culinary chef who also prepares food for consumption, skillfully creating works of art using food as a fine art painter would use his or her paints.
I don’t want to say that Mr. Roger’s opinion is wrong, I just think that everyone should also know that photography is more then being just a fast food chef.
Brian Leng