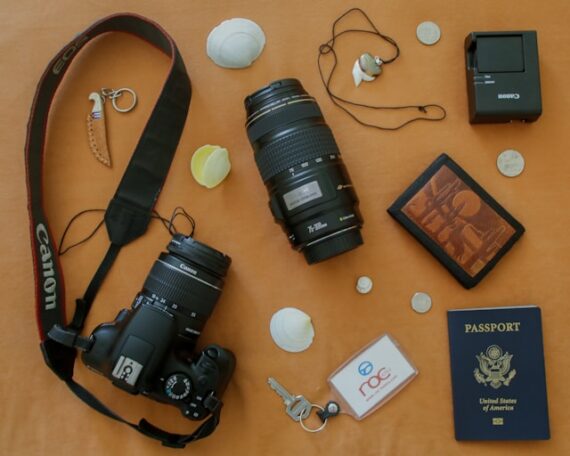
Getting ready for a photography trip usually means packing gear, charging batteries, and clearing memory cards. But one of the most overlooked steps happens inside your camera menu. A few small settings can make a big difference—not just in image quality, but in how smoothly your shooting experience goes when you’re out exploring.
If you want a quick-reference guide for real-world travel scenarios, the April Aperture Sale on the Travel Photography Cheat Sheets (88% off) is worth a look. They’re designed to give you exact settings for common situations you’ll run into on a trip—so you’re not digging through menus when the moment matters.
1. Set Image Quality to RAW (or RAW + JPEG)
Before anything else, check your image format.
RAW files capture far more detail than JPEGs, especially in highlights and shadows—something that becomes critical when you’re dealing with harsh sunlight, bright skies, or mixed lighting while traveling.
If you like quick sharing, use RAW + JPEG. Otherwise, RAW-only gives you the most flexibility later.
2. Customize Your Auto ISO Limits
Auto ISO can be incredibly useful when you’re moving quickly between scenes.
But if your maximum ISO is set too high, your camera may push into noisy territory without you realizing it. Set a reasonable upper limit based on your camera’s performance (for many cameras, something like ISO 1600–3200 is a safe starting point).
This keeps your exposures flexible without sacrificing too much image quality.
3. Turn On Highlight Warnings (“Blinkies”)
This setting alerts you when parts of your image are overexposed.
When traveling, you’ll often encounter bright skies, reflective surfaces, or midday sun. Highlight warnings help you quickly see when you’re losing detail—especially in clouds or bright architecture.
It’s one of the fastest ways to avoid blown highlights in the field.
4. Set a Consistent White Balance Strategy
Auto White Balance works well most of the time, but it can shift unpredictably between shots.
For travel photography, consistency matters—especially if you’re shooting a series of images in the same location. Consider using a preset like Daylight or Cloudy when appropriate.
If you’re shooting RAW, you can always fine-tune later—but starting consistent makes editing much easier.
5. Enable Grid Lines for Composition
Turn on grid lines in your viewfinder or LCD.
This helps with:
- Keeping horizons straight
- Using rule-of-thirds composition
- Aligning architecture and vertical lines
When you’re shooting quickly in a new environment, this simple overlay can dramatically improve your framing.
6. Optimize Your Autofocus Mode
Different travel situations call for different autofocus settings.
- Single-point AF → great for landscapes and static scenes
- Continuous AF (AI Servo / AF-C) → useful for people, street, or movement
- Face/Eye Detection → helpful for portraits on the go
Make sure your default mode matches what you expect to shoot most often.
7. Turn Off Unnecessary Sounds and Lights
Camera beeps and focus confirmation sounds can be distracting—especially in quiet or crowded environments.
Turning these off helps you stay discreet, which is especially useful for street photography or cultural locations where subtlety matters.
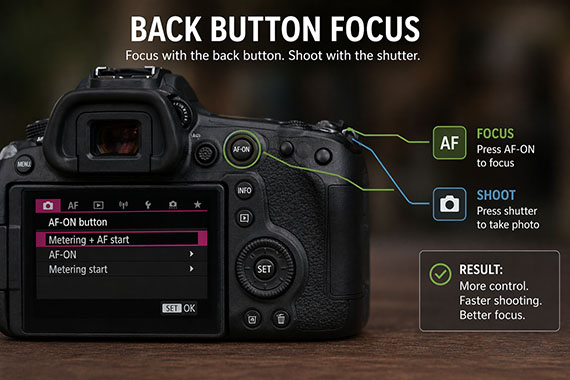
8. Set Up Back-Button Focus (Optional but Powerful)
If your camera allows it, consider separating focus from the shutter button.
Back-button focus gives you more control, especially when recomposing or tracking subjects. It takes a little practice, but many photographers never go back once they switch.
9. Format Memory Cards and Reset File Numbering
Before your trip:
- Format your memory cards in-camera
- Reset file numbering if needed
This helps avoid file conflicts and ensures everything runs smoothly from day one.
10. Check Battery and Power Settings
Go into your menu and review:
- Auto power-off timing
- Battery-saving modes
- Spare battery readiness
Travel days can be long, and you don’t want your camera shutting off too aggressively—or draining faster than expected.
11. Save Your Settings as a Custom Mode
Many cameras let you save your preferred setup to a custom mode (C1, C2, etc.).
This is incredibly useful for travel. You can build a “default travel setup” and instantly return to it if you change settings mid-shoot.
Final Thoughts
Travel photography is often fast, unpredictable, and full of once-in-a-lifetime moments. The more your camera is set up ahead of time, the more you can focus on composition, light, and timing instead of digging through menus.
If you want a shortcut to getting the right settings in real-world travel situations, the April Aperture Sale on the Travel Photography Cheat Sheets (88% off) is a practical companion. They’re designed to help you quickly dial in the right setup—whether you’re shooting city streets, landscapes, or low-light scenes—so you can spend less time guessing and more time capturing.
Showing you step by step how to dial in settings, avoid common mistakes, and get the shot — even when you’re tired, rushed, or shooting in unfamiliar conditions. Travel-ready, no Wi-Fi required, and designed to be quick to reference so you can spend less time guessing and more time shooting.
Deal ending soon: Travel Cheat Sheets 📸 April Aperture Event
Like This Article?
Don't Miss The Next One!
Join over 100,000 photographers of all experience levels who receive our free photography tips and articles to stay current:


Leave a Reply