Photography is a useful tool for different industries. It is a powerful tool for selling just about anything, be it food, clothing, or property. Having good images is the key in commerce. This attracts potential buyers and also makes products or services appealing.
In real estate, photography is just as important. With the markets starting to heat up and the demand is increasing, this can be good news to photographers especially those who specialize in real estate photography.
If you want to venture into this kind of photography, here are the basics that you need to touch on in order to guide you in your journey.
Best Camera for Real Estate Photos
If you are still getting started with real estate photography, there’s no need to purchase the most expensive gear. Although this will definitely give you an edge, you can always work with what you have even if it’s an entry-level digital SLR.
As long as you have a working DSLR, then you’re good to go. Just make sure that you know how to use your camera. If it’s a camera that has a cropped sensor, then you should know that this crops out the edges of the frame. A full-frame camera, on the other hand, gives you a wider angle.
If you can spend on a camera, then go for a full-frame camera because of its wide angle and higher quality image.
Lenses for Real Estate Photography
In shooting real estate properties, wide angle lenses are needed. If you have a camera with a cropped sensor, then go for lenses that are around 12–24mm or 10–22mm. If you have a full-frame camera, then a 16–35mm lens will do the trick.
Tilt-shift lenses can help you avoid converging vertical lines in wall edges or door frames leaning out. There are different tilt-shift lenses available for your camera depending on its make. For example, Canon has the 17mm while Nikon has 24mm. Although these lenses are great to use, they have a fixed focal length so you might need to adjust. Find a perspective that fits your focal length.
Real Estate Photography Camera Settings
Having the right camera equipment is necessary to get you started no matter what kind of photography you’re doing. However, being familiar with your camera and how to use its settings for real estate photography is another.
It is always best to shoot RAW for high-quality images. Many photographers prefer using around 100 to 320 ISO instead of Auto. This ensures that your photo does not have grain. You can also use f/8 as your aperture setting for when your lens is used at its widest focal length. Once these are all set, you can adjust your shutter speed to expose correctly.
When shooting, check the histogram to see if you have good exposure. What you can do is set a base exposure and then bracket in one stop increments.
If you have flash, then use it to fill in where lights are needed. This can be handy, especially if you’re shooting interiors. This allows you to balance the light while having the view from outside be seen. You can also use multiple lights to fill in the scene. If you’re using a flash, bounce it off the wall or ceiling for diffused light.
Use your camera settings depending on what you’re shooting. Adjust if necessary in order to achieve the look that you’re aiming for.
HDR Real Estate Photography
High Dynamic Range (HDR) imaging is a staple when it comes to shooting real estate. HDR images are made by shooting three to five exposures that are spaced either one or two stops apart. Then, you have to merge all images into one using an editing program. This allows you to create a photo with a dynamic range of light to dark.
In shooting HDR, follow this basic technique:
- Turn on all the lights in the room and make sure that your camera’s flash is turned off.
- Set your camera’s ISO to 400 and to aperture priority.
- Point your camera to the part of the room with the average brightness and make sure you’re far from the darkest and lightest points of the room.
- Take note of the shutter speed that it displays.
- Switch to manual mode and change the shutter speed to the one you noted.
- Set to Auto Exposure Bracketing mode and set the EV spacing to +/- 2 EV.
- Change your camera to continuous shooting mode and mount it on your tripod.
- Frame the shoot, check your focusing, and press the shutter button.
- After shooting, merge the photos through your program of choice.
HDR is a classic style for when shooting real estate, especially interiors. However, there are limitations. For a beginner, it is best to start playing around with HDR first and be comfortable with its limitations and your camera’s limitations.
Using Drones for Real Estate Photography
Drones have changed the landscape of photography everywhere. This has allowed for aerial shots quite easily. With a camera drone, it is now easier to shoot dramatic landscapes and even sweeping shots of structures or fly-around photos or video of a home. This adds to the salability of any property.
Real Estate Photo Editing Outsourcing
Once a creative image has been shot, the real work has just begun. Editing images for real estate takes a lot of work. This is something that businesses should take seriously, as this makes or breaks your sale. Photos create a positive impression of the property.
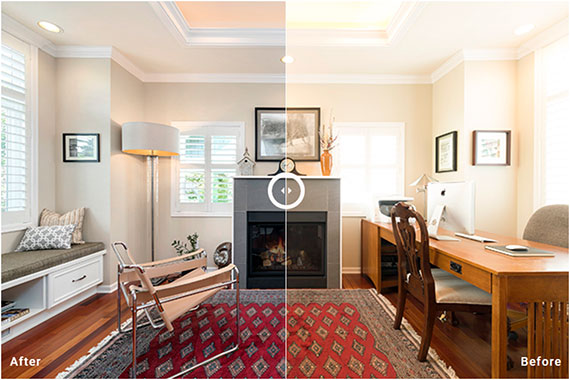
Outsourcing the photo editing and retouching can help in ensuring the experts are working on the photos. This allows you to get high quality images and saves you time and costs as well.
Like This Article?
Don't Miss The Next One!
Join over 100,000 photographers of all experience levels who receive our free photography tips and articles to stay current:


Great to see someone else is interested in real estate photos, not many people are.
Thanks for the article.