Every new camera model that hits the market these days, seems to pack a new feature. However, even with so many features built-in, a camera can sometimes produce undesired results. It becomes essential for you to take control over the camera for better results. Hence, an understanding of a few basic camera settings is by far the best way to start creating better images. Photographer Mike Browne explains about the 5 camera controls that will help you revolutionize your photography:
1. Manual Exposure
“You camera doesn’t know how much light is falling on it. It only knows how much light is reflected by it.”
The reflective light meter the camera is not 100% accurate. They are programmed to meter the scene to 18% grey and thus fail reproduce pure whites and blacks. Cameras are thus not so reliable with auto-exposure; specially in difficult lighting situations. So, you need to take control over the exposure with manual settings. You can do so with the help of the exposure triangle.
- Aperture is the opening in your lens that controls how much of the light goes into the camera. Open it up to let a huge amount of light in, and narrow it down to cut the amount of light passing through.
- Shutter speed determines the duration of time the sensor is exposed to light. If there’s abundant ambient light, use a faster shutter speed. This exposes the sensor for a very small amount of time. If the ambient light is low, slowing down the shutter speed will let greater amount of light to pass through to the sensor by exposing it for a longer period of time.
- ISO setting determines the sensitivity of the sensor towards light. When you use lower ISO values, you tell the camera not to amplify the signals much. This is idle for well lit subjects. But, if the amount of light is low, increasing the ISO value tells the camera to amplify the signals thereby increasing sensitivity towards light.
You can thus manually change the settings in your camera by playing around with these three variables. Adjust these settings until the meter in your camera points to zero. This indicates that your exposure is okay. But, as soon as the lighting gets challenging, like in case of backlit subjects, of snowy mountains, the meter will again be fooled.
Like Browne demonstrates, even with manual exposure, when the camera meter pointed to zero, indicating perfect exposure, the white wall appeared grey. To make whites appear as pure whites, simply overexpose the scene by adjusting any of the three pillars of the exposure triangle. Similarly, if the blacks don’t appear as black, simply underexpose the scene a bit.
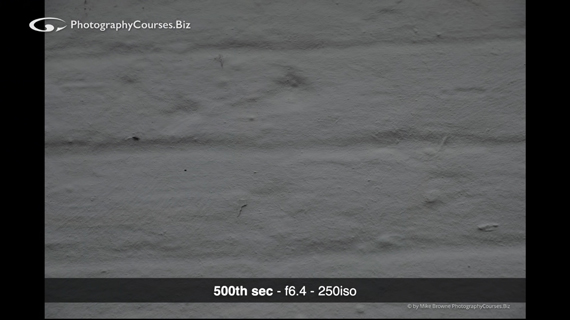
White wall appears grey even when the camera’s meter indicates correct exposure
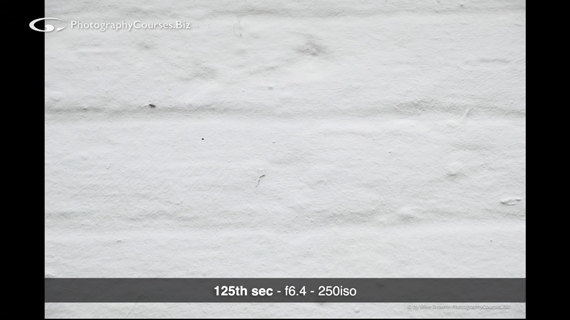
Wall appears white after overexposing by 2 stops
“If you just follow what the light meter says, it’s the same as shooting on auto.”
2. Histogram
“A histogram isn’t really a camera control. It’s a feature, but it’s probably the most useful feature they every put on a camera ever.”
If you’ve not yet learnt how to read a histogram, now is a good time to do so. Understanding the histogram means that you’ll never have to worry about your exposure ever again.
If you use the camera in auto exposure mode and you realize that the image is a bit under or over exposed, simply refer to the particular histogram. If the histogram is crunched up more towards the left, it means that you have to let more light in. Similarly, if it is more towards the right, it means that you can cut down some amount of light entering the camera. When doing so, ensure that the histogram doesn’t clip the shadows and the highlights. Once clipped, the information is lost; and you don’t want that to happen.
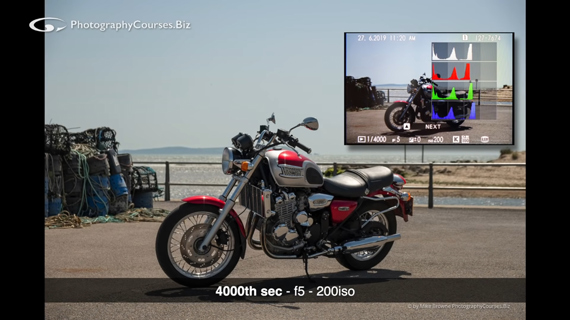
Underexposed motorcycle with data in the histogram more towards the left
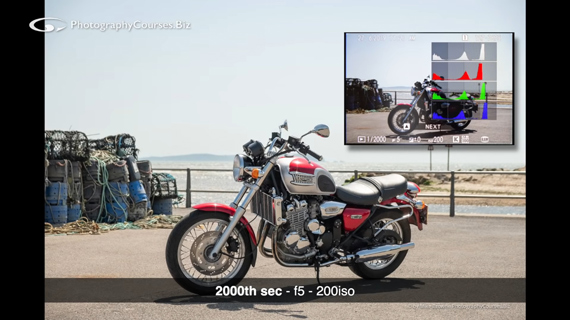
Notice the slight shift in histogram towards the right. The motorcycle is now properly exposed.
Note: While it is good to have more of the data towards the middle of the histogram, it is not always necessary. For instance, if you’re shooting a silhouette, you will have lots of data on the right (back light), the left (silhouette), and almost no data in the middle.
3. Semi-Auto Modes
Once you are confident with setting your exposure manually, you can use your semi-auto modes for the sake of efficiency. You don’t have to shoot in manual all the time. If you’re in a situation where you don’t have the time to set all the parameters, semi-auto modes are the way to go. Make use of the camera’s aperture priority (A or Av) mode, shutter priority (S or Tv) mode, and the program (P) mode. And if you feel that the camera is making some wrong decisions for you, then you can always step in.
When working with shutter priority mode, you can select the shutter speed, and the camera will take care of the rest. Similarly, when working with aperture priority mode, you can select the aperture, and the camera will take care of the other parameters. And with P mode, it takes care of both the aperture as well as the shutter speed. The advantage of using semi-auto modes is that it allows you to focus more on the creative side of photography, while the camera handles the technical aspects.
“Semi-auto modes takes a pile of work away from you.”
4. Exposure Compensation
“Exposure compensation allows you to use semi-auto modes and still lets you control the exposure.”
Imagine that you’re using a semi-automatic mode in a contrasty lighting condition. After you take an image and refer to the histogram, you realize that the image is darker than it should be. This usually happens as the camera tends to use the settings that put most of the data in the center of the histogram. In such cases, you can use the exposure compensation setting and set it to +1 for instance, to overexpose by 1-stop. This way, you can control the exposure of the camera even when you are using it in semi-auto mode.
5. Auto Focus Area and Focus Modes
Have you ever noticed after taking a photo that the wrong area in the image is in focus? This usually happens when you let the camera decided where it should focus. Remember that the camera does not recognize who your subject is. It usually focuses on the closest thing, or on a high contrast area. Therefore, it is quite essential that you take control over where the camera focuses. You can usually do so by using the single point AF area, and placing the focus point over your subject. Be sure to go through your camera manual to understand and practice with the various focus areas.
Similarly, there’s a plethora of auto focus modes in your camera to choose from.
- AF-S or auto focus single servo mode focuses on the subject only once. When in this mode, if the distance between the camera and the subject changes after the focus is locked, you’ll need to lock the focus again. Otherwise, the image will be out of focus. This is perfect for landscapes or for subjects that are not moving around much.
- AF-C of auto focus continuous mode focuses on the subject continuously as long as you hold the focus button in your camera. If the camera to subject distance changes, the camera will automatically refocus to have the subject in sharp focus. This is useful for scenarios in which the subject is continuously moving, like in sports and wildlife.
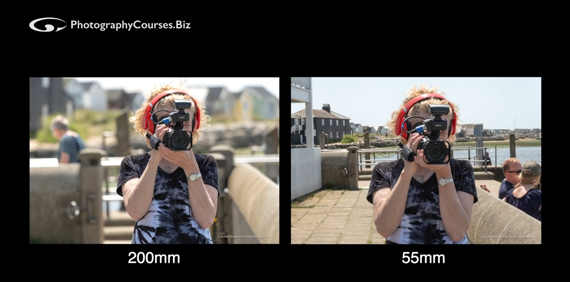
Bonus Control: Focal Length
Focal length doesn’t only allow you to get a close up of distant objects. It has other implications as well. Wider lenses have the tendency to exaggerate features. For instance, anything closer to a wide lens appears elongated, and anything that’s far appears real tiny. They also have a greater depth of field and have a greater area in focus every time. On the contrary, telephoto lenses have a shallower depth of field, and thus create a beautiful separation between the background and the subject.
Creative aspect of photography comes second to your ability of taking control over your camera. Your creative vision will not matter much if you are not acquainted with your camera. You simply will not be able to capitalize on your creative vision. Therefore, spend some time getting to know your gear, and master these controls first.
Like This Article?
Don't Miss The Next One!
Join over 100,000 photographers of all experience levels who receive our free photography tips and articles to stay current:


Thanks for finally writing about > 5 Camera Settings to Master First
< Liked it!
Most informative and with the examples of the various settings it all makes more sense.
Thank you go for your time.
Amazing Info. I Always Suggest your Blog to My beginners Photographer Friends .
Thank-you so much for sharing valuable content