Most of the time photographers opt for composites for creative purposes, but sometimes they’re a necessity. Whatever the case may be, when shooting for a composite image, it’s essential that the different scenes have consistent lighting. Photographer Robert Hall explains the process of photographing a composite using flash to easily execute the post-production process in Photoshop:
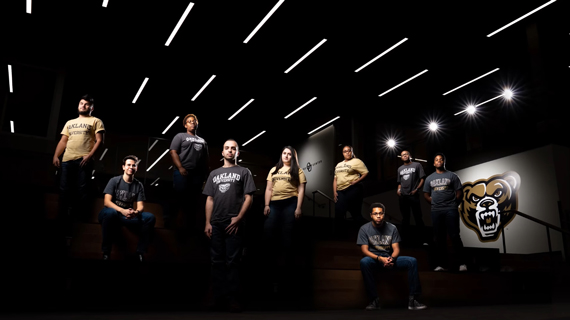
Hall needed to take an image of nine students standing separately in a wide-open space. If he’d used nine separate lights, it would’ve been really hard on the subjects. Further, the light spillage would have made the light stands appear all over the photo. He chose to use the composite technique to photograph the following image:
Steps to Create Composites
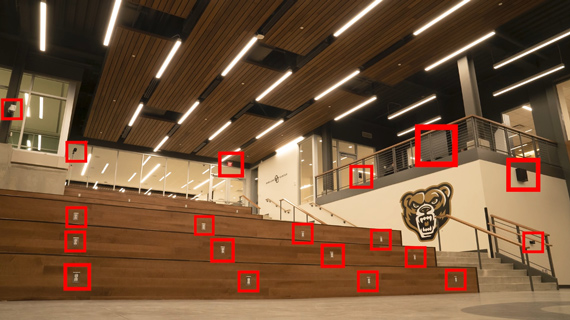
Align the Images
Working with composites can get tiring if you have to correct everything in post. It’s a good idea to have as many things correct in-camera as possible. One variable to consider is the alignment of the images. Hall suggests the following tips to ensure proper alignment:
- Keep your camera still. Use a tripod and do not change it’s position. It alsl helps to use a remote shutter release to fire the camera without shaking it.
- Turn off any in-body stabilization in the camera and optical stabilization in the lens. Otherwise, the system will try to compensate for shake that doesn’t exist. This can cause the images to be misaligned.
- To make sure the camera doesn’t hunt for focus after every frame, use manual focus mode. Hall focuses the images once on the closest subject and sets the camera to manual focus mode.
Remove Distractions
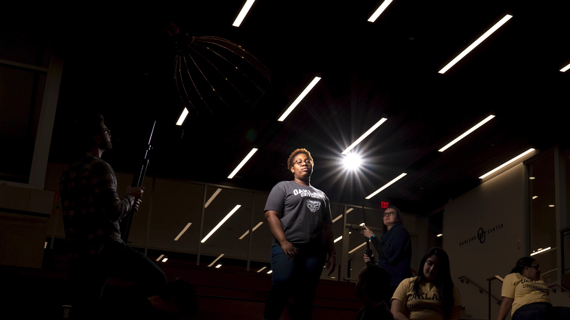
The room in which Hall was supposed to photograph had a lot of distracting elements. To prevent them from appearing in the final image, he underexposed the image and made the students pop using flash. Here’s how he did it:
- To cut out most of the ambient light while still maintaining a greater depth of field, he set the aperture to f/8.
- A shutter speed of 1/250 second allowed him to cut out all of the ambient light.
- An ISO setting of 400 made the image bright enough without making the distractions visible.
Photographing the Group
Once Hall was happy with the settings, he positioned the students, making sure each was unobstructed. To light the subjects, he used a Glow EZ Lock Deep Parabolic soft-box with a grid. This ensured that he got a tight beam of light on the subjects without any spillage. He also used another eVOLV 200 with a honeycomb grid and a snoot for the rear light. Two assistants helped to carry these lights around from student to student after every shot.
“I always make sure to have the light above the subjects and pointing downward. That way, I keep the light consistent on every subject as well as cast all downward shadows. This means the shadows are going to hit the ground rather than all over the background.”
He then photographed all the students individually in the position they were assigned. In the process, he made sure to take multiple images of every student with different poses and lighting setups. Once done with each student, he instructed them to move to the side so that he didn’t have to work around them.
After Hall was done photographing the students, he used the key light to illuminate the other important aspects of the space, like the mascot and the sign at the top.
To make the image appear more natural, Hall placed his rear lights up at the ledge and took some shots to make the viewers feel comfortable about the rear lighting that the students had in their images.
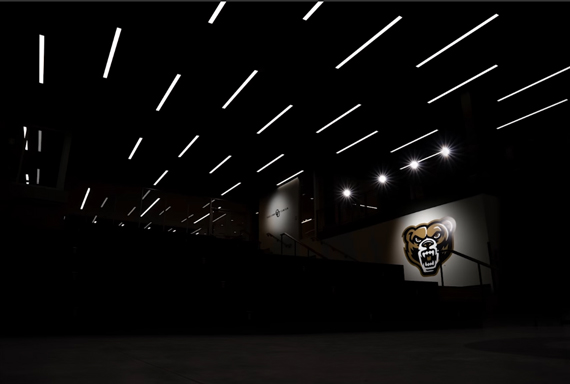
And finally, Hall took an image of the empty space just to have an empty slate to work with during post-production.
Post Processing a Composite Image
Hall used Lightroom to adjust the exposure settings on his images them moved to Photoshop to blend them together. Here’s how he did it:
- To make sure the ambience of the space looked the same in all the images, he adjusted the global adjustments uniformly. This made the exposure and the colors appear the same in all the images.
- When it came to adjusting the exposure on the individual students, he did it locally by using the brush tool. In the process, he made sure that all the students were illuminated uniformly.
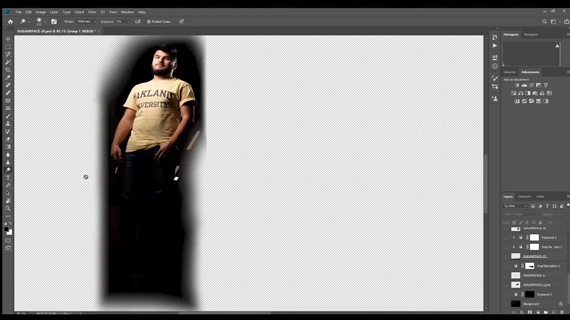
- In Photoshop, he brought in all the images of the individual students to his empty slate (the picture of the empty room). For each layer, he retained the image of the students and some area around them. He did the same for the golden grizzly, the sign, and the four rear lights at the ledge.
- Once all the elements were in place and he was happy with the result, he did some final global adjustments like contrast and sharpening.
This technique comes in handy when you need to completely change the look of a space.
Like This Article?
Don't Miss The Next One!
Join over 100,000 photographers of all experience levels who receive our free photography tips and articles to stay current:


Excellent video.