Have you been using Lightroom but feeling like you’re not efficient or solid with your image editing? Ben Jacobson from Framed Network wants to share seven tricks he uses in Adobe Lightroom. These tips should increase your workflow and image quality overall:
1. The Fader
The Fader takes your presets and lets you dial down the settings if they appear too strong for that particular image. It’s a plugin from Capture Monkey. After downloading the plugin, go to Lightroom, click File, and scroll down to Plug-in Manager. Click ‘Add’ and find ‘TheFader.lrplugin’ file in your downloads. Restart Lightroom and the plugin will now be installed. Again, click File and scroll to Plug-in Extras and The Fader will be at the bottom. Once you click it, The Fader toolbar opens and allows you to choose one of your saved presets. Below there, you can change the preset opacity and you will notice the effect on your image.
2. Auto Advance Culling
When dealing with a large selection of images, you can press the ‘X’ key to reject one and the ‘~’ key to approve another. The selection moves to the next picture after hitting either key so that you can quickly sort through them.
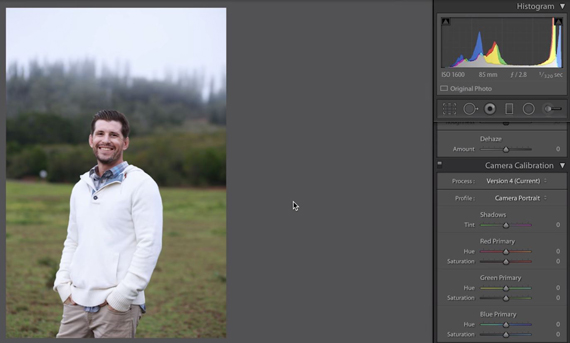
3. Camera Calibration
If your colors don’t resemble what you envisioned when taking the picture, move into the Develop module. On the right side, scroll down to the Camera Calibration section. Under ‘Profile,’ you can choose between six options to see what works best for you. In this case, Jacobson selects ‘Camera Portrait’ for his landscape portrait and the colors pop more.
4. Target Adjustment Tool
In the Develop module under the Tone Curve section, the Target Adjustment Tool is the small double circle to the left of the graph. Click it and move your mouse to an area of your image that needs a tone adjustment.
As an example, Jacobson chooses his subject’s dark pants and clicks on them while dragging upward. This tool modifies the entire tone curve for that particular tone by dragging your mouse up or down. There is also a Target Adjustment Tool in the Hue/Saturation/Luminance section below Tone Curve so that you can target specific color tones.
5. Match Total Exposure
If you want to increase or decrease the exposure for a group of images, you can first adjust one and then match that exposure to the rest. To do so, select that adjusted image and the rest that you want to change and click Settings on your top toolbar. Scroll down to ‘Match Total Exposures’ and this setting will automatically match all of your selected images.
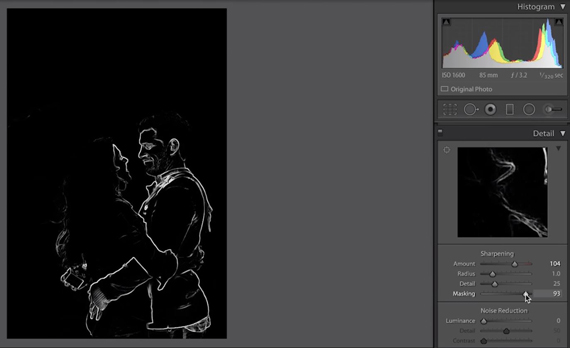
6. Alt Precision View
To view Sharpening adjustments, hold down the Alt/Option key while moving the Sharpening amount left or right. This will temporarily change your image to black and white so that you can more accurately view the changes you are making. This also works for Masking and will create a negative of your image. As you scroll left or right, the details will be revealed likewise. Lastly, this works for Exposure too so that you can view under or over-exposed areas of your image by holding that button down while making an adjustment.
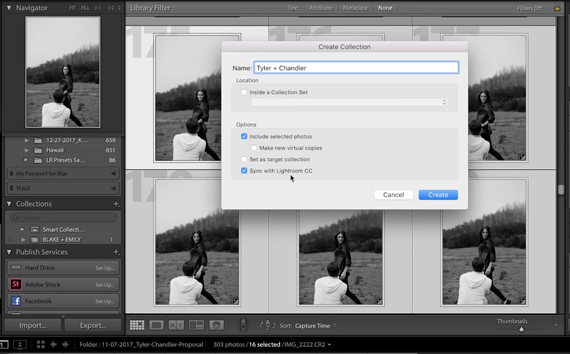
7. Client Proofing
First, make sure you have Lightroom Mobile set up. Once you have your edited images selected, navigate to the Library module. On the left side under Collections, click the plus sign and then ‘Create Collection’. Here, you can rename your collection and then select ‘Sync with Lightroom CC’ and ‘Create’. At the top right, if you click the ‘Make Public’ button, Lightroom will generate a URL that you can share with your client. Now, you have the option to select more photos and simply drag and drop them into your collection on the left side.
Did you already know any of these tricks? If not, put them to good use and continue learning more to improve your Lightroom skills!
Like This Article?
Don't Miss The Next One!
Join over 100,000 photographers of all experience levels who receive our free photography tips and articles to stay current:


Leave a Reply