Scott Kelby, the author of many digital photography books says, “If your photos aren’t sharp then the rest doesn’t matter.” Key to any image is its sharpness, and in order to get those photos pin sharp you need to follow some basic guidelines.

Photo by Mike Monaghan
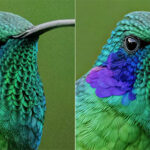
There’s nothing worse than looking at a portrait photo and seeing that the eyes are out of focus with a perfectly sharp nose. The eyes are the windows to the soul and their sharpness is critical to a good image. There are times when we want slightly out of focus images or parts of images out of focus. But, mostly we want crisp and clear images. Here are some steps for sharper images:
1. Pin sharp starts with a tripod
Every professional photographer, and many amateurs, will tell you that a tripod is an essential part of your gear if you want sharp images. Of course it’s not always possible to use one, but, when you can, use one. It stabilizes your camera and stops camera shake from unsteady hands. A good, sturdy tripod costs money, but it’s a basic part of your kit and fundamental to sharp images. Many photographers also opt for small flexible tripods that can be wrapped around objects and work in virtually any situation.
2. Cable Release or Remote
Don’t press the shutter; use a cable release. A cable release is a cable that goes to a connection on your camera. By pressing the cable release you don’t transfer any movement from your hand to the camera. The same can be done with a wireless remote.
3. Self-Timer
If you have forgotten to bring your cable release or your compact camera doesn’t allow its use, use the self-timer. All cameras, including compacts, have this feature. Although you still press the shutter, there is a time delay of 2 to 10 seconds, allowing camera shake to subside before the shutter is activated. Still, you need to press the shutter button gently to limit any transferred shake.
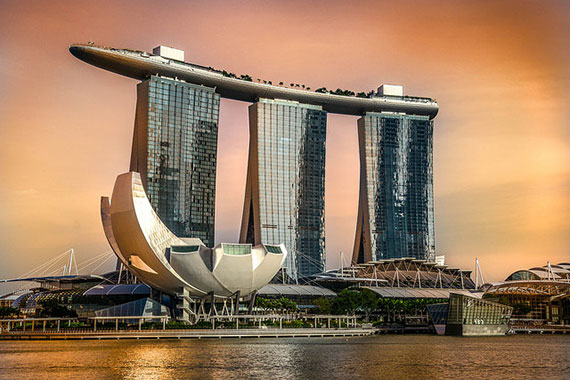
Photo by Michaela Loheit; ISO 100, f/8.0, 1/640-second exposure.
4. Mirror lock-up
This feature is something only for digital SLR camera owners. When the shutter is depressed, a mirror, which is in between your sensor and the viewfinder, pops up to allow light to pass and hit your sensor. This micro movement can affect your final image so what manufactures have added is a mirror lock-up. It locks the mirror in position once you have composed your image. Although you can no longer see the image through the viewfinder it prevents the micro movement from affecting your image. Use it if you are fanatical about sharpness.
5. Use your lens’s sharpest aperture
All lenses have a sweet spot. They are sharpest at this aperture–usually two stops below fully open. Unfortunately, this applies only to DSLRs. You should be able to tell by looking at your images and finding which images are usually the sharpest. Check the EXIF data by right clicking on your image on the computer and seeing what aperture it was taken at. Then shoot at this aperture whenever you can.
6. ISO
Avoid increasing your ISO as this causes your image sharpness to degrade. Instead, shoot on a tripod. Shooting on higher ISOs adds noise to the images, which is the reason for images lacking in sharpness.

Photo by wbeem; ISO 100, f/3.5, 1/40-second exposure.
7. Turn off image stabilization
When using a tripod, if you have a lens or camera that has image stabilization or vibration reduction, you will probably want to turn it off. There are tiny motors inside the lens which stabilize the image but also contribute to lack of sharpness through vibration. They are great for low light/handheld situations like weddings, but when you’re using a tripod, turn it off.
These are a just a few tips for getting sharper images. No single one will improve your sharpness, but used together they will improve your overall sharpness in an image.
About the Author:
Wayne Turner has been teaching photography for 25 years and has written three books on photography. He has produced 21 Steps to Perfect Photos; a program of learner-based training using outcomes based education.
Like This Article?
Don't Miss The Next One!
Join over 100,000 photographers of all experience levels who receive our free photography tips and articles to stay current:


“Tack sharp” is like the rule of thirds: some people regard it as essential to even consider whether or not it’s a good picture, others find it a rule well worth breaking. Obviously, if sharpness were the absolute rule, there would be no market for “soft focus” filters, of which several grades and DIY methods exist. I remember a few years ago (when film was still king), a friend of mine that owned a camera store sold a long-time client a new SLR. And later, he sold her a duto filter because the camera was taking pictures that were TOO sharp–especially of her relatives of more “advanced years.”
I suppose I could agree with you,
…but then we’d BOTH be wrong.
Hi Wayne,
Love your articles, I’m a complete newbie to photography and have just bought a Pentax k7,
could you recommend a book for beginners to simplify getting the most out of this piece of sophisticated equipment so I can start using it instead of just admiring it.
Kind Regards.
Ralph.
You can’t state to always turn off VR when on a tripod. Check the lens manual. Some specifically state to leave it on when the lens is mounted on a tripod. Some say to turn it off. It also depends if you are using a gymbal head, and doing panning shots. Again, check the lens manual for information on the different types of settings for the VR.
Good point Sunit. We use this all the time when shooting video on our DSLRs.
You can’t always know if the image is sharp just by looking through the viewfinder or using the live view mode as they’re really small; so you’ll have to rely on the focus points lighting up when when your image is focused.
You can press the zoom-in button when in live view mode and the camera zooms into that rectangular box. This is probably something that you might know already, but it helps me a lot. I’m not sure if it works in all SLRs though, but my 1100D does it.
Unless your photographing fireworks, NONE of the things this person listed is true. It just takes good lighting period.
Your photos must be terrible!
Hi Wilfred – Great tip about using a tripod as a monopod. Not many people think to do this but it works very well in those tight situations where you can’t open up a tripod. Any tripod can be used as a monopod and they are actual more stable because they have a broader base than a monopod although they are still bulky.
I’m a digital photography fan myself. I agree with what was posted. One thing I can add is the use of a monopod or a unipod. The tripod is great where there is ample space or when we get to set-up the stage or a small studio. But the unipod keeps a steady shot too in tight areas. Another tip is, while we dont have a monopod, slim tripods can double as a unipod by just folding the legs together to form just one leg where the photographer can mount his camera and get a steady shot as mentioned.
If you asked me what piece of equipment I would choose after my camera and a lens, it would have to be my tripod. It’s an essential piece of gear. When you buy one, make sure that it is the best you can possibly afford.
Really good tips… I never knew how to use my camera in order to get ‘that’ picture. Maybe now I will try this tips! Thank you. kiss, ana
I am a bit of a newbie in the photography world, but I did just invest in my first tripod. I got one of the adjustable ones as mentioned and shown in the photo at the bottom of the post. I couldn’t be happier with it! Its like having a third hand. You can set those things up any where, and the size makes it really convient to take along. I don’t leave home without it.