One of the biggest reasons smartphone photos have improved so dramatically over the last few years is something called computational photography. Instead of relying purely on optics like a traditional camera, your phone uses software, AI, and depth mapping to simulate effects that would normally require larger sensors and expensive lenses.
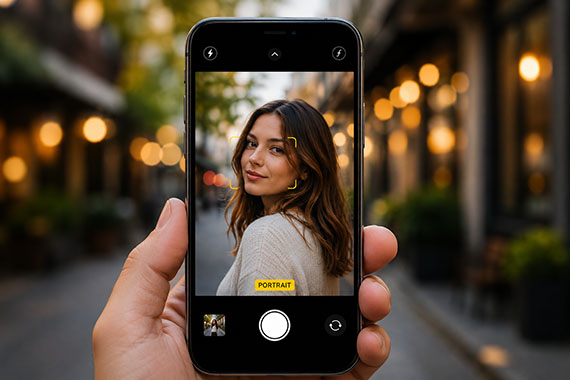
One of the most popular examples is fake background blur, often called Portrait Mode. While modern phones can produce surprisingly impressive results, they still make mistakes. Hair gets cut off, glasses blur strangely, and edges sometimes look unnatural. Understanding how your phone creates this effect can help you get dramatically better results.
Related: only a little while left for the Smartphone Photography Guide 🌱 Spring Sale
Why Phones Need “Fake” Background Blur
Traditional cameras create natural background blur, also known as shallow depth of field, because they use physically larger sensors and wide-aperture lenses. Smartphones, on the other hand, have tiny sensors and tiny lenses. That means nearly everything tends to stay in focus naturally.
To imitate the look of a DSLR or mirrorless camera, phones rely on software to artificially blur parts of the image.
Instead of true optical blur, your phone analyzes the scene and tries to determine:
- What is the subject
- What is the background
- How far objects are from the camera
- Which areas should stay sharp
Once it estimates depth, it selectively applies blur to parts of the image. The result can look surprisingly realistic, at least at first glance.
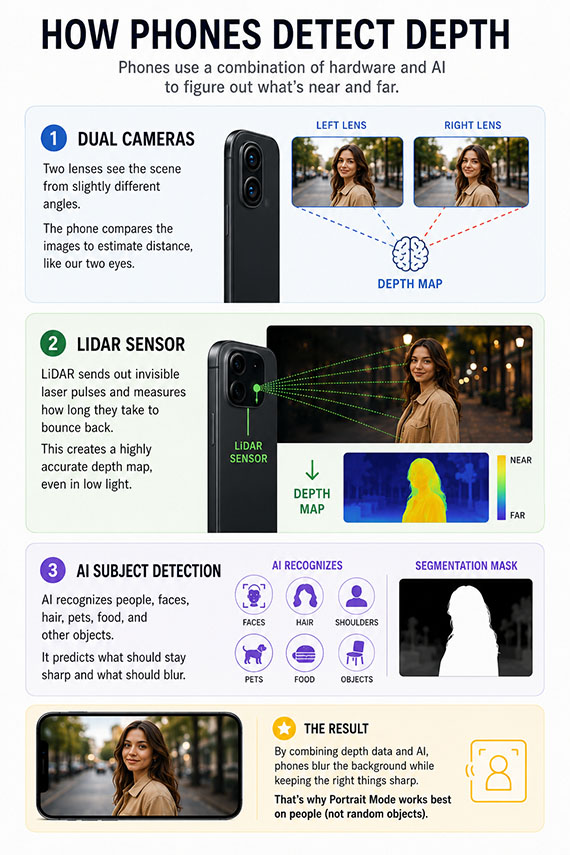
How Phones Detect Depth
Different phones use different techniques to estimate depth and separate subjects from backgrounds.
Dual cameras allow many phones to compare information from two lenses positioned slightly apart from each other. Because each lens sees the scene from a slightly different angle, the phone can estimate distance similarly to human eyesight.
LiDAR sensors are used in some premium smartphones to actively measure distance by bouncing light off objects. This creates a more accurate depth map and helps Portrait Mode perform better in difficult lighting.
AI subject detection also plays a major role. Modern phones are trained to recognize faces, hair, shoulders, pets, food, and common objects. The phone then predicts what should remain sharp.
This is why phones are usually much better at blurring backgrounds behind people than random objects.
Why Fake Blur Sometimes Looks Weird
Despite huge improvements, fake blur still has limitations. The biggest problem is edge detection.
Your phone has to decide exactly where the subject ends and the background begins. Complex edges confuse the software, including hair, fur, glasses, transparent objects, fences, leaves, branches, and motion blur.
This often creates the “cutout” look where subjects appear artificially separated from the scene.
Another issue is blur consistency. Real lenses create blur gradually and naturally depending on distance. Phones sometimes apply blur too evenly, making images feel synthetic.
How to Make Smartphone Blur Look Better
The good news is that technique still matters. A few small adjustments can make Portrait Mode look far more convincing.
Increase subject separation. One of the easiest ways to improve fake blur is to create more physical distance between your subject and the background. If your subject stands directly against a wall, the phone struggles to create convincing separation. But if the background is farther away, the software has a much easier time.
Keep edges simple. Busy edges are the enemy of Portrait Mode. Loose hair blowing in the wind, tree branches crossing behind a subject, or complex overlapping shapes often confuse the software. Cleaner outlines generally produce cleaner blur.
Use better lighting. Portrait Mode performs far better in good light. In dim conditions, the phone has less detail to analyze, which increases edge errors and unnatural blur artifacts. Bright, soft light helps the phone separate subjects more accurately.
Don’t overdo the blur. Many phones allow you to adjust blur intensity after taking the photo. One of the biggest mistakes is cranking the blur effect too high. Extreme blur often looks fake instantly. A subtle amount of blur usually looks far more natural and professional.
Get closer to your subject. Phones simulate shallow depth of field more convincingly when the subject fills a larger portion of the frame. Stepping closer improves subject detection and strengthens the illusion of optical depth.
Use real lens compression when possible. Many phones automatically switch to a telephoto lens in Portrait Mode. This helps create more flattering perspective and natural-looking separation. If your phone offers 2x or 3x portrait options, they often produce better-looking blur than the standard wide lens.
The Future of Smartphone Blur
Phones are getting dramatically better at simulating optical effects. AI-generated depth maps, advanced segmentation, and computational relighting continue improving every year.
Some newer phones can even create adjustable focus effects after the image is captured.
But despite all the technology, real optics still have advantages. Large-sensor cameras produce natural blur with realistic transitions and fine detail that software still struggles to fully replicate.
That said, smartphones have become incredibly capable creative tools, especially when you understand how their tricks actually work.
Final Thoughts
Portrait Mode is essentially an illusion powered by AI, depth estimation, and software blur. Once you understand that, you can work with the technology instead of fighting it.
Good lighting, clean subject separation, realistic blur levels, and thoughtful composition can dramatically improve your smartphone portraits.
And in many cases, the difference between fake-looking blur and professional-looking blur comes down less to the phone and more to how you use it.
For Further Training:
The Spring Sale 🌱 on the Smartphone Photography Guide is wrapping up soon, and it’s a great chance to finally unlock what your phone camera can really do.
The guide walks through real, usable techniques—manual controls, motion blur, low-light shooting, and creative effects—so you’re not just relying on auto mode and luck. If this post helped, the guide goes much deeper.
Deal ending soon: Smartphone Photography Guide 🌱 Spring Sale
Like This Article?
Don't Miss The Next One!
Join over 100,000 photographers of all experience levels who receive our free photography tips and articles to stay current:


Leave a Reply