As the air turns crisp and leaves begin to transform into fiery shades of red, orange, and gold, autumn offers some of the most breathtaking scenes a photographer can capture. Whether you’re shooting in the woods, at a local park, or along a scenic road, a few thoughtful techniques can help you make the most of the season’s palette.
Related note: only a little while left for the Photo Adventure Cheat Sheets 🍂 Autumn Sale
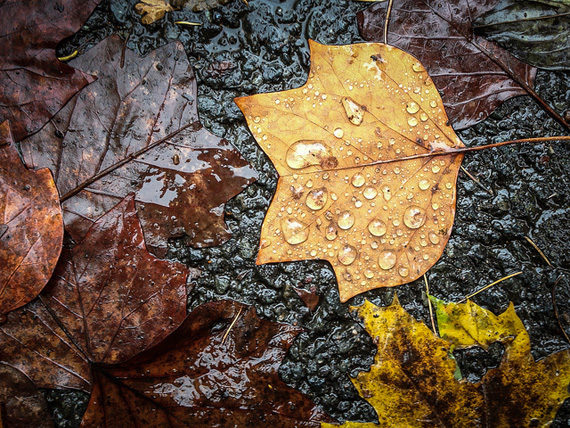
Photo by Balbidur; ISO 50, f/2.4, 1/20-second exposure.
1. Plan for Peak Color — and Micro-Windows of Light
Professional landscape photographers know that timing is everything. Don’t rely on luck — research peak foliage forecasts for your region, and scout locations in advance. Because colors can shift dramatically in just a few days, scheduling multiple sessions over a 1–2 week window increases your chances of catching optimal conditions.
Equally critical is micro-timing with light. Autumn’s lower sun angle means golden hour lasts longer, and the color temperature is warmer — perfect for enhancing reds and oranges. Arrive early and work fast: the window where mist, frost, or backlight align with peak color can be as short as 10 minutes.
Pro Tip: Use apps like PhotoPills or The Photographer’s Ephemeris to map the sun’s exact path and position your compositions before the light peaks.
2. Master Polarization and Control Your Reflections
A polarizing filter isn’t just a “nice to have” in autumn — it’s essential. It allows you to dial in the level of reflectivity on leaves, water, or wet ground, cutting glare and revealing saturation that’s often invisible to the naked eye. But over-polarization can flatten skies or cause uneven tones at wide focal lengths.
Rotate your polarizer while looking through the viewfinder or EVF to fine-tune the effect. On overcast or wet days, this is especially powerful — saturated leaves + subdued highlights = painterly results.
Advanced Tip: Stack a polarizer with a soft ND grad filter to balance skies against dark, shadowy foregrounds. The effect can mimic the look of medium-format dynamic range in-camera.
3. Shape the Scene with Color Theory
Great autumn photography often hinges on color contrast and harmony. Think in terms of color theory:
- Complementary Contrast: Fiery reds and oranges stand out against a deep blue sky — classic and bold.
- Analogous Harmony: Golds, yellows, and soft greens create serene, timeless landscapes.
- Accented Neutrals: A bright leaf against muted tones of fog or earth can produce minimalist, editorial-grade images.
Position these relationships deliberately within your frame. Professional photographers often scout a single tree, turn, or reflection and wait for the perfect light to complete the composition.
4. Use Depth and Layers to Build Dimension
Autumn is an inherently textural season — mist, backlit leaves, long shadows, and layered forests. To make your photos feel immersive:
- Use a longer focal length to compress layers of color in distant hillsides.
- Incorporate foreground elements like grasses, branches, or stones to create depth.
- In foggy conditions, lean into atmospheric perspective — cooler, desaturated backgrounds recede while warm tones in the foreground pop.
For extra dimensionality, bracket exposures and blend manually in post to control highlight roll-off and midtone separation.
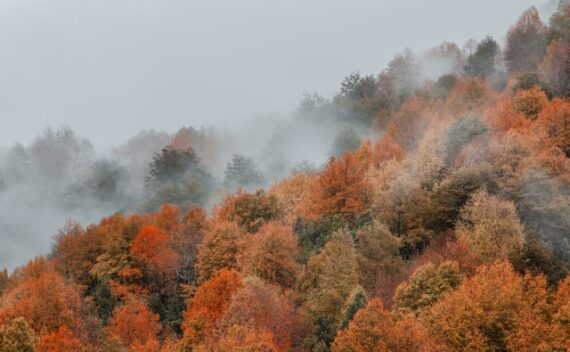
Photo captured by Chris Stenger
5. Leverage Weather for Drama
Some of the best autumn images aren’t taken under clear skies. Rain, fog, and overcast light can add a cinematic quality:
- Fog: Creates mood, depth, and separation. Look for backlit fog early in the morning.
- Rain: Intensifies saturation, especially on fallen leaves. Use your polarizer to control shine.
- Wind: Motion blur with a slower shutter can create dynamic, painterly effects.
A small weather window can produce more compelling results than an entire week of “perfect” sunshine.
6. Expose for Color — Not Just for Light
Autumn hues are rich, but they can easily clip or muddy if exposure isn’t precise. Consider:
- Expose to Protect Highlights: Especially with backlit foliage. Warm colors can blow out fast.
- Use RGB Histogram: R channel clipping is common in fall reds and oranges. Monitor carefully.
- Shoot RAW: Non-negotiable. It allows you to recover highlight detail and fine-tune color temperature later.
Pro Tip: Manually setting white balance to 5500K–6500K often retains richer, more natural reds than auto WB, which tends to neutralize them.
7. Break Out Specialty Lenses
Professionals often go beyond the standard zoom kit during autumn. Consider:
- Tilt-shift lenses to control plane of focus and create painterly depth.
- Macro lenses for intricate leaf textures, veins, and dewdrops.
- Telephotos (200mm+) to isolate trees or compress hillsides into striking patterns.
- Fast primes for shallow depth of field and creamy background blur in portrait sessions.
8. Refine with Intentional Post-Processing
Autumn post-production isn’t about cranking up saturation — it’s about refinement. Key adjustments to master:
- HSL Panel: Selective color tweaks can make specific hues stand out without pushing the entire image.
- Luminance Masking: Brighten leaves without lifting shadows globally.
- Color Grading: Subtle warm midtones and cool shadows often give autumn photos a cinematic feel.
- Local Contrast: A touch of clarity or Dehaze can make fog or mist more pronounced.
For commercial work, consider building a consistent color palette or LUT across a series for a cohesive seasonal collection.
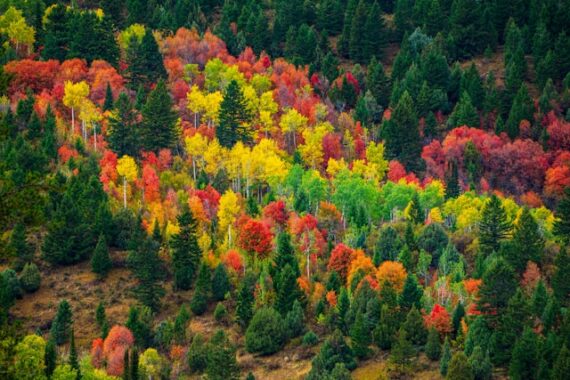
Photo captured by Alex Lemoing
9. Create Series, Not Just Single Shots
Pros don’t just hunt for “the shot” — they build visual stories. Think in terms of sequences:
- Wide establishing shot of a valley at peak color
- Medium framing of a single tree or trail
- Close-up or macro details of leaves and textures
- Portrait or human element for scale
This approach is invaluable for editorial submissions, galleries, or cohesive client sets.
10. Respect the Ephemeral Nature of the Season
Autumn color peaks are brief. Returning to the same location at different times of day or over consecutive weeks can yield dramatically different results. By combining planning, technical control, and creative vision, you can transform this short season into a portfolio-defining opportunity.
Bottom line: Autumn rewards photographers who pay attention to the subtleties of light, color, and timing. It’s a season where artistry and technical skill intersect. Don’t just capture the colors — craft images that feel like fall.
📸 Bonus tip: Keep a color journal — noting temperature, light direction, and foliage stage — to anticipate future peak conditions at your favorite locations.
For Further Training:
For help remembering the camera settings for difficult situations like this, a set of Photography Adventure Cheat Sheets are designed to help. They are currently 80% off for an Autumn Sale 🍂 which ends soon if you want to check them out.

New! Cheat Sheets for Your Photography Adventures (see how they work)
The perfect companion for any photographer. Print one out whenever you need it. Whether you’re going on vacation or seeking out a specific photography adventure, these cheat sheets can provide you with the knowledge and inspiration you need to create your best work yet.
Deal ending soon: Photo Adventure Cheat Sheets 🍂 Autumn Sale
Like This Article?
Don't Miss The Next One!
Join over 100,000 photographers of all experience levels who receive our free photography tips and articles to stay current:


The application of colour theory and colour harmony to photography, especially in the autumn is, is important and should be included.
Very useful tips. Morning is better because the air is always cleaner, and there is less dust, smog, etc. Or, after a rain as previously mentioned. Thanks for sharing it
This is post is very interesting tips. I would like to share something here. Use Different Perspectives : With most of the landscapes, the inspiration for decision comes from your perspective as you move on the scene. When we think of locations to photograph fall color it is not recommended to photograph flat areas or simply from a hill. What better a place with versatile prospects . It is an advantage to have the ability to be on top of something and to have different layout options.
Saturate a little red and yellow
When disclose in Light room it is advisable to increase the intensity and saturation of these colors representing the fall as well.
With the brush of local settings you can “paint” with light and color the areas you want to highlight, as a particular leaf, a tree, a person who appears on the scene, wet roofs of buildings in a city that appear in a panoramic photography, etc.You can check out the tutorial on developing an autumn photo with Light room to learn how to use the local brush.
This article is riddled with errors. For example: “Be sure to use a tripod to help keep the scene in perfect focus.”
For the information of the author, a tripod is used to hold the camera steady to prevent blur caused by camera motion. It is only relative to focus when shooting macro and that is because of the very shallow depth of field.
Another example: “If the surface is misty instead of reflective, take some shots anyway.” The mist is not on the surface but above the surface. It does not prevent the photographer from shooting reflections. I have several shots of reflections in the water with misty over it.
While not an error, the use of the term “large f-stop for greater depth of field…” is certainly a strange way of saying, “Use a small aperture… ”
There is some good advice in the article but one of the most important aspects of autumn colour photography is missing. . The application of colour theory and colour harmony to photography, especially in the autumn is, is important and should be included. For example red against green or blue such as a red maple in front of a blue lake or between a couple of coniferous trees or the gold of aspen or tamarack against a blue sky make for very pleasing colour contrast or harmonies. Too many colours included in the same photo however become chaotic and scream in a cacophony of colour. These are basics to autumn colour photos. the article is incomplete. I can’t help thinking it was churned out as fast as possible in order to promote Topaz Restyle.
I think the rest of us knew exactly what was meant by “focus.” Color theory is practical in a studio, letting nature do its thing is reality,more delightfully surprising to the eye and does not have that “contrived” .ook. Loved the article anwill review this Fall before going out this to take pictures.
Maybe somewhat overthinking this. If you think of photography as a science, you may have a point. I prefer to think of it as an art form, which like all art forms, requires enterpritation. It would be pretty difficult to misinterpret the advice given in this article. Picking fault only detracts from the joy of Autumn photography.
A polarizer can also decrease reflections off leaves, giving more vibrant colors. (Even non-shiny leaves can reflect the sky, washing out color.) Try both with and without the filter, or at least with it in different orientations, to see what gives the effect you like best.
Autumn is my favorite time of the year for many reasons, especially photography. Good reminder about white balance – fall days often have fast-moving clouds passing high overhead, constantly changing the lighting – sometimes right in the middle of a shot!
Excellent site! Will definately be linking back to here!! Thanks so much for the tips!! Cant wait till next fall!! :)
xx Miss Understood~PhotographyIML
nice artiicle…wish it came a lil earlier too
nice one, will hopefully go out tmrw morning
Perhaps next autumn you might run similar articles a tad earlier in the month—or even in September.
Jan