Short lighting, by definition, refers to when the main light illuminates the side of the face that is turned away from the camera. This lets light fall on the narrow side of the face leaving a shadow on the broad side of the face, which is facing the camera. The actual position of the light or lights will depend on the style and mood of the portrait anticipated.

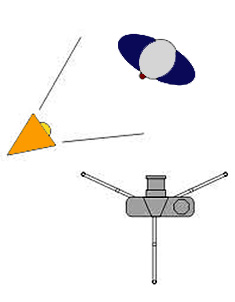
Short Lighting Diagram
The positioning of lights when shooting portrait photographs is by no means an exact science. There are many variables which affect the final outcome. These include: the model’s facial features, the exact position of the head, the position of the camera, and the position of the lights.
Positioning of the light in relation to the subject and camera
Starting point
Start by placing the subject in the center of an imaginary circle. Place the light and the camera on the circle perimeter so that a ninety degree angle is formed when you draw a line from the camera to the subject and from the subject to the light. At all times the subject, light, and camera remain within one quadrant of the circle. Set both the light and the camera to the subject’s eye level. When the subject faces the camera directly, you will have half the face lit and the other half in shadow. In effect, this is side lighting.

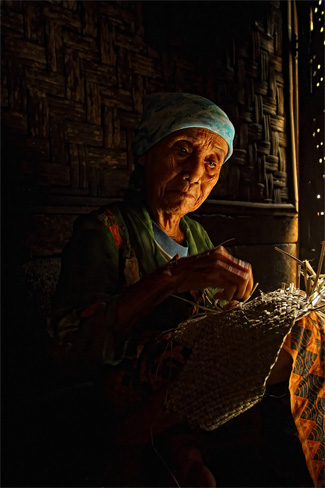
Photo captured by PictureSocial photographer Kustiyah
Short lighting
When the set-up has been achieved, ask the subject to turn his or her head to camera right, or subject left, which exposes the broad side of the face to the camera and the narrow side of the face to the light. This is how the term short lighting is derived (the short side of the face is closer to the key light). This exercise is best done with a constant light.
This can be your studio flash’s model light or a light similar to a redhead (used in television). This will allow you to see the effect of the light position on your subject immediately. Using a flash only will mean lots of trial and error, which is enormously time consuming.
How does short lighting affect the portrait?
- Face appears slim when the shadow is on the broad side
- Adds character to portraits
- Suits masculine portraits through exploitation of texture
The effect of short lighting technique will depend on:
- The facial features of your subject
- The horizontal angle of the light
- The vertical angle of the light (how high or low the light is in relation to the subject)
- The exact position of the face (especially for Rembrandt lighting where the nose shadow must meet the shadow on the broad side of the face to create the famous Rembrandt Triangle)
- The distance of the light from the subject
- The quality (hard, soft)
- The amount of fill
- The position of the fill
Pay attention to each shot
Short light requires precise attention to detail when shooting portraits. It is easy to change the lighting mode to broad lighting by accidentally moving the key light in relation to the subject, but even more so, by the subject subtly changing poses. It only takes a small movement in the wrong direction to affect the desired outcome.

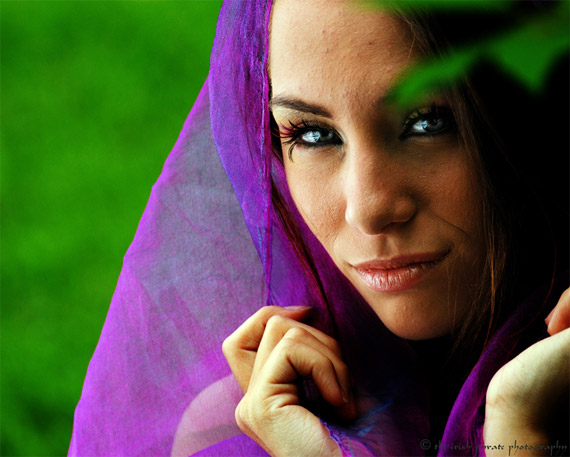
“Charlene 6” captured by PictureSocial photographer Daniel L
Short lighting must be compared to other lighting techniques
Exposing the key light to the narrow side of the face is one of many lighting techniques which should also be studied. These include:
- Rembrandt
- Butterfly
- Beauty
- Broad
- High key
- Low key
This will help you make the best choice for your particular portrait needs.
About the Author:
Rob Gray from FacetMedia teaches television production as well as photography bringing over forty years of experience.
Like This Article?
Don't Miss The Next One!
Join over 100,000 photographers of all experience levels who receive our free photography tips and articles to stay current:


Thank you. This is the best I have seen it explained. I’m going to practice this technique with my new strobe light on my clients.
Nice article, I have heard the term short lighting explained many different ways. I always explain it was the light hits to short side of the face, or the part of the face that is furthest away from the lens. In regards to Bryan’s comment, you can use short lighting and still not have wrinkles. The amount of wrinkles is more dependent on how soft the lighting is. Soft lighting shows fewer wrinkles. You could have short soft lighting with no wrinkles. Hard and soft lighting is dependent on the size of the light source. When you think about lighting on a cloudy day the light is soft because the source is huge, the entire sky. Even with soft lighting you could still turn the subject to provide short lighting. Here is a sample of short lighting from a recent wedding. This is a clean sample of short lighting. In order to achieve this I used bounce flash pointed in a direction the create a large light source. By putting the lens on the opposite side of the lighting direction I achieved a short lit photo with soft lighting. https://www.kolodnyphoto.com/south-florida-wedding-photography/jeff-kolodny-photography-2
Dear Rob,
I really appreciate you taking your time to teach us photographers so many important things.
Allow me though a small commentary: when the subject turns his/her head to the left(toward the camera), wouldn’t he or she be showing the narrow side of the face to the camera and the broad side of the face to the light, instead of “exposes the broad side of the face to the camera and the narrow side of the face to the light” as you write above?
Maybe I am missing something here, but I would like to have an explanation from you, please. Thank you in advance for your answer.
Kind Regards,
Cesar Barroso
Side lighting a person who has skin blemishes, such as in “Charlene 6”, accentuates the blemishes, or in other cases, wrinkles. If the point of the photo is to emphasize these, fine, but that is not usually the case.
In response to Howard, and I mean absolutely no disrespect, but in my opinion the purpose of side-lighting a portrait is to make a portrait that is side-lit. You’re absolutely correct about side-lighting tending to accentuate wrinkles or maybe blemishes (not sure about the blemishes). But portraits are about achieving the desired artistic end result, lighting being among the first considerations. If an unblemished subject is more important than a well crafted image, then break out the software, you’re going to anyway.