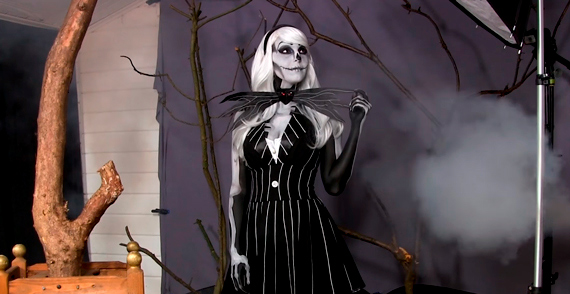
Have you ever wanted to do a spooky shoot in your home studio, but weren’t quite sure how to go about it? What better way to prepare for Halloween than to learn how to turn your home studio into a sinister forest with a little bit of lighting magic and some smoke to really create atmosphere.
Gavin Hoey shows how you can easily use dark, stretched out fabric pinned to the wall as a backdrop, some branches and twigs from the garden, a couple of speed lights, and a model to create a menacing masterpiece:
Hoey uses a Flashpoint eVOLV 200 and two Flashpoint speed lights to effectively light the model. For the background, he uses the Flashpoint eVOLV 200 on a boom arm up high behind the model, and shining on to the backdrop. This creates a good silhouette of the model and the branches, and then he adds a speed light at lowest power to create a rim lighting effect on the model. To give extra spooky atmosphere, he sets his white balance to custom, at 3,500K. This makes the light a cold, blue color, such as you might find in a scary forest at night.
For his key light, he uses another speed light with a 38″ softbox on. He angles this light away from the background, so it’s just hitting the model from the side. He does this so that he doesn’t lose the silhouette effect of the twigs and branches. Hoey also adds an orange gel to the key light, which makes the model’s skin less blue, but has no effect on the blue-ish background light.
Hoey used these settings on his Olympus E-M1 Mark II to create these photos:
- Aperture: f/4
- Shutter Speed: 1/250 second
- ISO: 200
He decided to add some smoke from a smoke machine to make the images more ghostly. His tips for using a smoke machine include getting everything set up and ready to shoot beforehand, then to add a small amount of smoke at a time.
Hoey wasn’t quite satisfied with the amount of smoke in the images, so in post-processing, he shows how to add smoke to an image in Photoshop.
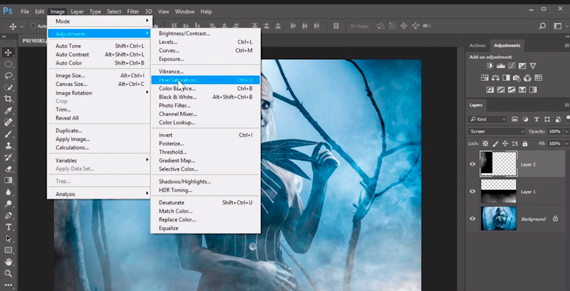
He also shows how to use the screen blend mode to seamlessly blend the smoke with the background, and how to change the color of the smoke using the hue/saturation adjustment so that it blends in with the smoke already in the image.
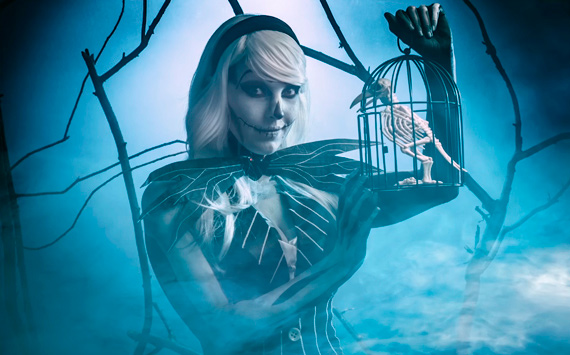
This is a really fun, simple shoot that you can do yourself. The post processing tips walk you through adding the smoke textures, and colorizing them so that they blend in. You can get really creative with shoots like these and make it as eerie as you like.
Like This Article?
Don't Miss The Next One!
Join over 100,000 photographers of all experience levels who receive our free photography tips and articles to stay current:


Leave a Reply