Photography is an intricate art form that relies on the harmonious synergy of its essential components to produce the perfect shot. One of the most fundamental and critical concepts that every budding photographer should understand is the Exposure Triangle. It forms the foundation of photography, bringing together three vital settings – Aperture, Shutter Speed, and ISO. The relationship among these elements influences not only the exposure of your photograph, but also its overall aesthetic, including depth of field, motion blur or noise, and other characteristics.
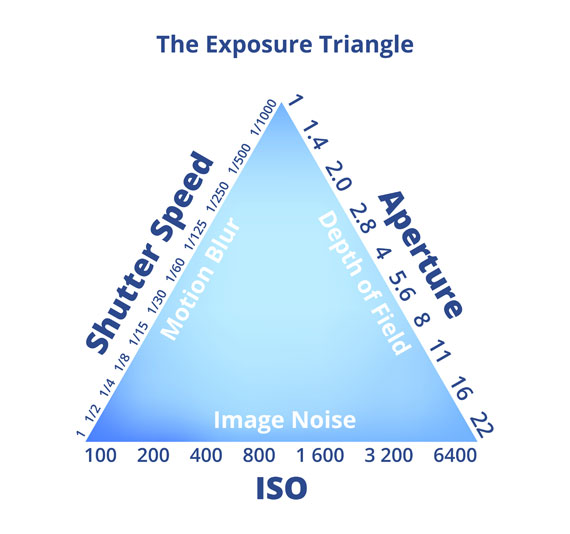
Think of the exposure triangle as a scale, with each corner representing aperture, shutter speed, and ISO. These elements need to balance for you to achieve a correctly exposed image. Changing one element requires adjusting at least one of the others to maintain the right exposure. The beauty of the triangle is in this interdependence; mastering it allows you to take creative control over your photographs.
1. Aperture (f-stop)
Aperture refers to the size of the lens opening that allows light to enter the camera. It’s measured in f-stops; the smaller the number, the larger the opening and vice versa. A larger opening (e.g., f/1.8) allows more light to enter, ideal for low light situations. A smaller opening (e.g., f/16) lets in less light, suitable for brighter conditions.
The aperture also affects the depth of field or the extent of the scene that appears sharp. A larger aperture results in a shallow depth of field (focused subject, blurred background), making it perfect for portraits. In contrast, a smaller aperture offers a greater depth of field (the entire scene is in focus), ideal for landscape photography.
2. Shutter Speed
The shutter speed controls the duration for which the camera’s sensor is exposed to light. It is typically measured in fractions of a second. A faster shutter speed (e.g., 1/1000) means less light hits the sensor, ideal for freezing fast-moving subjects like athletes or wildlife. Conversely, a slower shutter speed (e.g., 1/30) lets in more light, which could introduce motion blur into your image, an effect often used for creative purposes such as night trails or waterfalls.
3. ISO
ISO measures the sensitivity of your camera’s sensor to light. Lower ISO values (e.g., 100 or 200) mean lower sensitivity to light and thus less “noise” or grain. These values are great for shooting in bright conditions. Higher ISO values (e.g., 1600 or 3200) increase the sensor’s sensitivity to light, allowing you to shoot in darker situations, but at the cost of adding noise to your image.
Balancing the Triangle
The real challenge, and art, lies in understanding how to balance these three elements to achieve the desired photographic outcome. For instance, in a low-light setting, you may need to open your aperture to let in more light (large f-stop) and increase your ISO to increase the sensor’s sensitivity. However, this could create a shallower depth of field and add noise to your image. If you want everything in focus, you’ll need to adjust your shutter speed to compensate, which could introduce motion blur.
In essence, the exposure triangle is a balancing act, a compromise between these three settings depending on your creative vision. Mastering it is key to taking your photography skills to the next level, moving beyond auto settings to fully command your camera’s potential.
With practice and patience, you’ll be able to make the exposure triangle second nature, and from there, the world of creative photography truly opens up. Here is a photography triangle cheat sheet to help.
Example:
Imagine you’re shooting a fast-moving subject in bright daylight conditions, say, a skateboarder in a park.
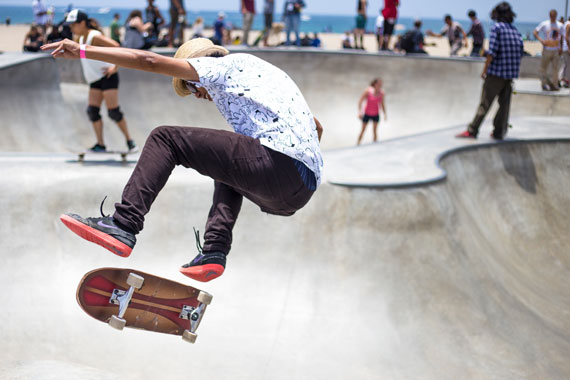
Captured by Kirk Morales
Firstly, let’s consider aperture. You want the skateboarder in sharp focus with a blurred background to draw attention to your subject. Thus, you would opt for a larger aperture, like f/2.8.
For shutter speed, considering the fast movement of your subject, you’ll need a quick shutter speed to freeze the action, say 1/1000th of a second.
Finally, because it’s a bright day, you can keep your ISO low, like 100, reducing the likelihood of noise.
Remember, these settings are starting points. Depending on the actual light conditions, you might need to adjust these settings to get the perfect exposure.
Exercise:
Try to take three different types of photos – a portrait with a blurred background, a landscape with everything in focus, and a night scene with as little noise as possible.
- Portrait with a Blurred Background: Use a large aperture (small f-number) to create a shallow depth of field. This will isolate your subject from the background. Keep your ISO as low as possible and adjust your shutter speed to get the correct exposure.
- Landscape with Everything in Focus: Use a small aperture (large f-number) to get a large depth of field. Set your ISO to a low value for less noise. Depending on the light, you might need a slower shutter speed to let in enough light. Use a tripod to prevent camera shake if the shutter speed is slow.
- Night Scene with as Little Noise as Possible: Here’s where the trade-off comes in. You’ll need a higher ISO to shoot in low light, but that could introduce noise. Try to keep your ISO as low as possible while still getting a good exposure. Open your aperture to let more light in, and don’t be afraid to use a slower shutter speed. Using a tripod can help keep your image sharp.
In all these exercises, the key is to experiment. Tweak your settings, review the outcome, and tweak again until you achieve the desired effect. With practice, you’ll understand how changes in one aspect of the exposure triangle need to be balanced by adjustments in the other two.
Like This Article?
Don't Miss The Next One!
Join over 100,000 photographers of all experience levels who receive our free photography tips and articles to stay current:


Leave a Reply