Have you ever come across a photo you captured didn’t evoke the emotion you felt at the time? Whether the look you envisioned was lost in translation from eye to camera, or you simply want to alter its mood, in this tutorial we will look at the unique toning effects within Topaz ReStyle.
Moody Atmosphere
Learn how to infuse your image with a moody atmosphere using ReStyle’s available tools.
Finding a Harmonious Pairing Between Effect and Image
Before we start this tutorial, it is important to realize that some images work better than others in ReStyle. Certain images fair well with a multitude of presets, while others are more difficult to transform.
Think of it this way—pretend you’re remodeling your home and the walls need to be painted. The walls are navy, but you want to paint them eggshell white. Painting a lighter value of paint on top of a darker value will not work. The darker paint will show through and the end result will not be eggshell white, but tainted by the darker color underneath.
A similar idea goes for ReStyle. Think of ReStyle’s effects as color that stains the existing tones in your image. Lighter to medium valued tones will be more sustainable to a successful color change, whereas darker, deeply saturated colors are harder to alter.
Light Effects vs. Dark Effects
Darker images work better with darker based effects. For instance, you could change the shadows in a night scene to dark blue or dark purple using ReStyle’s Night Collection.
Images with lighter colors are more suited towards lighter effects. Although, just like a white wall can be painted darker, lighter tones in an image can be altered to a darker color if deemed necessary. At that point it becomes an issue of, “does this look fake?” or, “does this even look good?”.
To find a harmonious pairing between your image and an effect, pay attention to each preset and the colors it contains. It takes practice to know how to match images with certain effects, but the more you use ReStyle, the more developed your eye will become.
(via topazlabs.com)
Creating a Moody Atmosphere
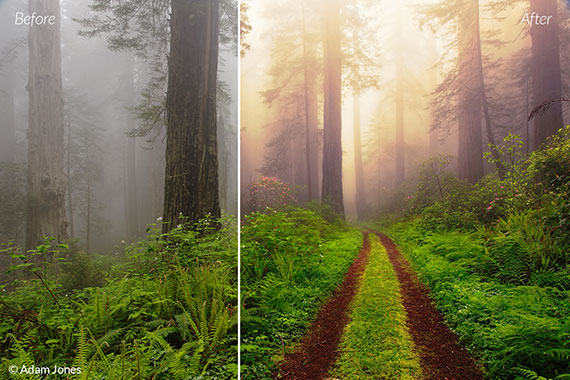
For this demo I’ll be working with this image by Adam Jones Photography that was captured at Redwood National Park in California.

This image is perfect for an injection of moody atmosphere. The tone enriched fog is susceptible to color staining and while the scene is already mysterious, a dose of ReStyle will help to give it more character.
Here are some different moody atmospheres I was able to come up with:

How to Add a Moody Atmosphere to Your Image:
1. Open your image in a host editor that supports layers. For this demo I’ll be using Photoshop.
2. Duplicate your background layer (ctrl/cmd + J).
3. Open ReStyle from the Filter menu.
4. From the collections on the left side, select the Moody collection and browse through its list of effects.

5. If you wish to turn off the preset previews, go to Menu-> Preferences and then uncheck ‘Show preset pop-up previews’. You’ll also have the choice to select how many items per row you want to have in grid-view mode. (If working on a smaller screen, I recommend a number of 3 or 4.)

6. You might notice that there are a lot of presets to scroll through. To make the search process faster, click on the grid icon within the Presets toolbar to access grid-view mode.

7. As you are browsing through different styles in grid-view mode, take snapshots of potential looks that you think might work. To take a snapshot, click on the camera icon beneath the preset. This will save that effect to your snapshots folder for future compare and contrast.
8. Click on the magnifying glass beneath a preset to discover similar looks. Another way to discover similar looks is to click on a color within a preset.
9. While browsing through different effects, keep in mind that the opacity of the effect can be reduced. For instance, the Monarch Red Stain effect appears overly strong with its vibrant and deeply saturated warm values. Let’s try this effect on our image.

10. Click on the Monarch Red Stain effect. This will return you back to the home screen.
11. Press the spacebar to toggle between the original image and the edited one.
12. Access the opacity slider on the right side of the interface within the RESTYLE toolbar.

13. Reduce the opacity of the effect to around 50% or so. Here is what this image looks like with a reduced opacity:

14. Optional: select another effect from your Snapshots folder, or go back into grid-view mode to select another effect.
15. Once you’ve selected a new effect and reduced its opacity as desired, expand the BASIC module to access your basic adjustments in tone, color and detail. Since this Monarch Stain effect I chose darkened this image, I increased the midtones and shadow sliders just a tad to brighten it and then increased the structure slider for added depth.

16. The trail is a bit too red for my taste. Try selectively reducing part of the effect you chose with masking. Expand the MASKS tool within the RESTYLE module to brush out part of the effect from certain areas of your image.

17. Note that there are two masking tools in ReStyle; one pertains to the ReStyle module and the other to the Basic module. Be sure to select the one directly underneath the ReStyle module.
18. Choose the Edge Aware brush for a more precise outline.
19. Decrease the strength slider to around 0.50 for a more natural transition. If the strength is set to 1.00, this will completely remove the effect.
20. Brush over your image where you wish to partially remove the effect. If you go too far, simply switch to the REVEAL brush, which will brush the effect back in.

21. Once you are finished masking, compare the before and after in a split-screen view:

22. One finished, press the OK button to save the image back to your host editor. Or you can press the Reset button in the bottom right corner to start over.
Don’t Stop Just Yet
With hundreds of presets to chose from in ReStyle, you might find that there are many effects that work well with your image. That’s what’s so fun about the process! You may discover an even better look the second, third or even fourth time around.
Here are some other moody atmospheres I created. Which you do like the most?
Forest Fire

Tuscany Memories

Tangerine Gauze

Darken Goldenrod Sunset (hard light)

A special thanks to Adam Jones, whose image was demoed in this tutorial. Check out his photography here: www.adamjonesphoto.com
I hope that this tutorial has provided some new insights on methods for creating a moody atmosphere as well as learning how to excel at discovering the right look.
Learn more here: Topaz ReStyle for Post-Processing
Like This Article?
Don't Miss The Next One!
Join over 100,000 photographers of all experience levels who receive our free photography tips and articles to stay current:


Leave a Reply