The key to great studio photography is in well-planned and well-executed lighting. It not only creates dynamic portraits, but it can dictate the style, mood, and tone of a photograph. This video seminar takes us through the steps to create dramatic high-key and low-key portrait lighting:
High-Key Lighting
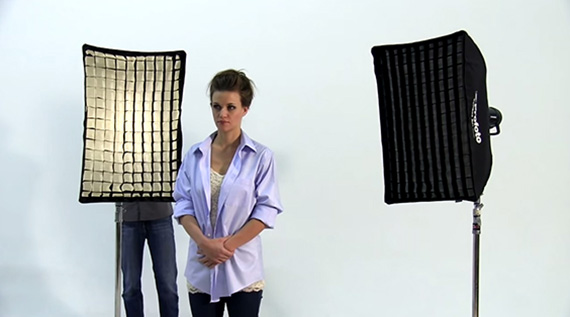
A high-key lighting set up is a photographic style which creates overall bright pictures, many times with white backgrounds. There is less contrast between the darker and lighter areas of the image. This type of set up works particularly well for cheerful, playful photos. It’s also great for photographing children. The basic arrangement consists of two fill lights, one key light and a background (accent) light.
- Start off by creating the sculpting light; the bold highlights that will fall on the side of your subject’s face and shoulders. Wallace uses two Profoto B1 500watt flashes, with 2×3” soft boxes with 53-grids. The grids help to ensure soft, direction light on the subject, without light spill into the lens.
- A Profoto Air Remote can be used with any camera to trigger the flashes, and makes things easier in multiple flash set ups. The air remote allows lights to be put on different channels, thus groups of lights can be controlled and triggered separately. Besides changing the power settings on flash, the air remote allows this to be done from afar, increasing them by tenth of a stop or full stop increments.
- The fill lights need to be positioned behind and off to the side of the subject. The power output of these flashes should be at about f6. A modeling light can be used to see exactly where the light will fall.
Lighting Setup
- Meter your subject. Mark Wallace uses a L358 Sekonic light meter connected to the air remote (you can use a pocket wizard or sync cable). The great thing about this particular product is that it will wait for the flash to be fired to meter it.
- Wallace suggests metering your fill lights to around f/8. Meter off your subject’s cheek and around the area. Increase the output of power on your lights accordingly. Metering will also ensure your subject is centered. If one side of your subject is revealing a higher number, you know you will have to do some shifting.
- Place your remote on the camera to trigger the flashes. Try a few test shots and trouble shoot as you go along.
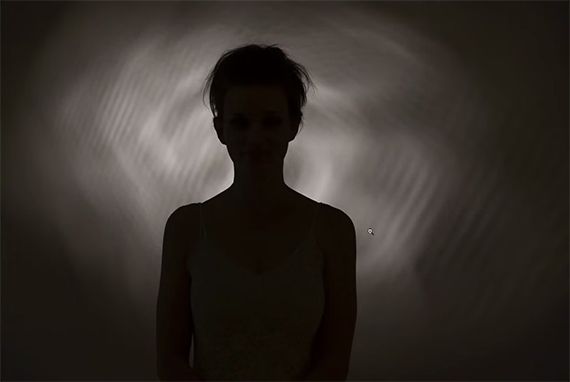
- The result is a silhouette with some highlights along your subject’s face and shoulders.
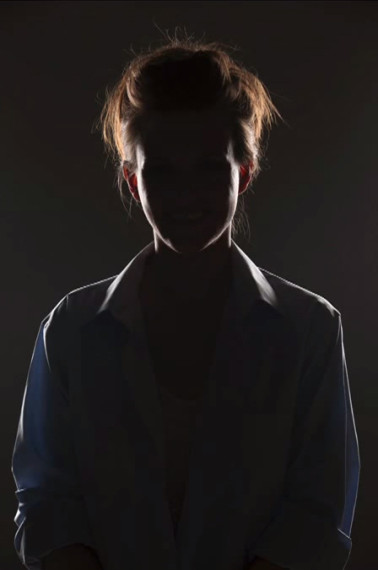
Silhouette with Highlights
- Next, add your key light. Wallace uses a Profoto Deep Silver XL parabolic umbrella to create bright, even light, while adding some pleasant specular highlights. Because the umbrella is so large it can be placed behind you; the light will wrap around you.
- You want the power output at about 9. Continue to meter the light. If you use a parabolic umbrella, be sure to meter the light with you still standing in front as that is how you will be photographing it.
- Take a few shots. You may notice that your background appears grey, and the light may be quite uneven. Eliminate the grey by adding another background or access light. Wallace uses another B1 head light.
- Set this flash to group B, with power set to about 8. Place it as close as possible to your subject and elevate it, directing the light beam to the background wall behind your subject. A reflector on the light source will restrict the light so it does not cast background shadows from the soft boxes.
- The background should meter at around f/9 or 10. Make sure the light is not too bright, as it may bounce from the background into the lens and lower the contrast of your images.
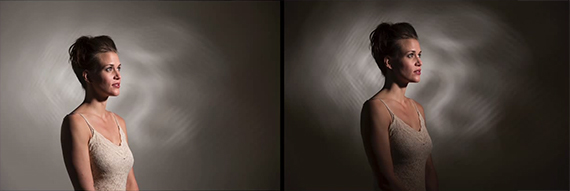
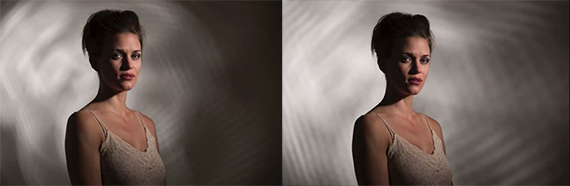
- Your images should reveal a subject with beautiful even lighting, sculpting highlights, and a clean, bright, white background.
- Add the final touches to make your photos pop. In Lightroom or your editor of choice, pull up the vibrance, increase the saturation of any particular color, and add a bit of clarity. Make sure the skin tones do not appear too red. If they do, take down the saturation of the orange and reds.
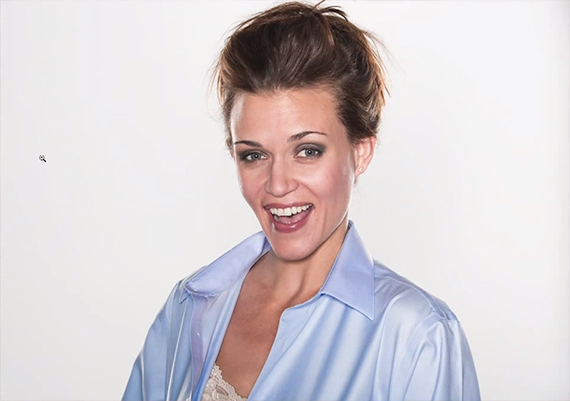
High Key Portrait
** When photographing children, swap the 2×3” soft boxes for 4×6”, or consider a strip box. Or simply lower your current soft boxes.
Low Key Lighting
A low-key set up creates dark and moody lighting. There is a high ratio of contrast between the light and dark of an image. It’s great for portraiture that creates mystery and intrigue too. This particular arrangement consists of one background shaping light, and one key light.
- Start by creating a gobo. It’s a cut-out pattern sheet that will create light shapes on your background. It’s made out of Cinefoil, which is essentially thick, black opaque aluminum foil able to withstand high temperatures. Take a sheet and slice some holes into it. Get creative and wild—create small slices, spiraled slices, holes or zig-zags. Then attach the sheet to a basic grip head.
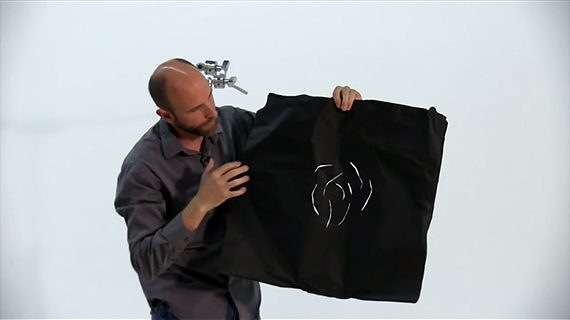
Gobo with Pattern Cut Out
- Set up your light so that it will shine through the sliced cinefoil and onto a background. Wallace uses a basic Profoto B1 head. The light will probably spill over the cinefoil and onto the background. Use a reflector and a ten degree grid to focus the light, diminishing spill.
- With the flash on highest power, snap a few test shots. See what type of light pattern is created on your background.
- Place your subject in the frame. Center the background shapes or place them wherever you desire. A few tests shots will ultimately have your subject appear as a silhouette.
Test Shot with Gobo
- Next, illuminate your subject. Wallace uses another B1. Use a grid to focus the light on your subject. The background light is set at an aperture value of f/5, thus the key light should meter the same amount. The background light can be set to group A, while the key light set to group B.
Low Key Lighting
- Play with your lighting. Try changing the distance of the light from the gobo and the direction the beam goes through it to create a huge variety of patterns.
Experiment with the Background Light
- For post-production, de-saturate your image. Don’t lose all the skin tones but get that monochromatic feel that is popular in such dynamic, contrast filled photos. Increase the level of the blacks, add contrast and a bit of clarity.
Remember to get creative and always persevere! Keep trying until you get that perfect shot.
“You might have some blunders along the way because that’s just how it is in real life. You don’t normally set things up and it works. And so along the way we are going to make mistakes. It’s not a bad thing, it’s just how it happens.”
Like This Article?
Don't Miss The Next One!
Join over 100,000 photographers of all experience levels who receive our free photography tips and articles to stay current:


If you are using flashes instead of strobes how do you determine their f-value?