The quality and direction of light determines how a subject appears in a final image. Hence it’s essential for photographers to understand the nature and behavior of light. This becomes even more important when it comes to studio portraits because of the variety of lights used in the process. Since studio lighting can be a bit overwhelming for beginners, Mark Wallace from Adorama shares his knowledge to help you understand studio lighting setups:
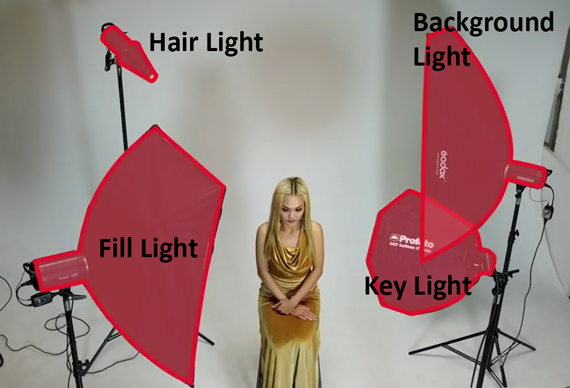
Wallace shares a basic studio lighting setup, which consists of the following lights:
- Key light
- Fill light
- Hair light
- Background light
These four lights are used in almost every studio lighting setup. So, understanding this setup can help you in moving on to more complex lighting techniques.
Key Light
The key light is also called as the main light and is the cornerstone of any lighting setup. Metering begins with this light. The other lights are placed in relation to the key light, and they are also metered in relation to the key light. Remember that there can only be one key light in any kind of lighting setup.
Fill Light
When the subject is illuminated with a key light, shadows are formed. The fill light, as the name suggests, fills in the shadows. It’s usually placed in the opposite direction of the key light for that purpose. While it can be powered up to completely remove the shadows, it is suggested that it be used to gently fill up the shadows to add some depth to the photograph. For this reason, the fill light is usually metered equal to or lower than the key light. Unlike key light, you can have more than one fill light. If you have a limited budget, reflectors can be used to act as fill lights.
Hair Light
The hair light provides highlight to the subject’s hair. It is also known as a separation light when it’s used to separate the subject from the background, and a kicker light when it’s used to add highlight on the subject on places other than the hair. This light is metered equal to or brighter than the key light. You can have more than one hair light in your setup.
Background Light
The background light is used to add light to the background, and if the background is large, multiple background lights can be used. It’s metered equal to or less powerful than the key light.
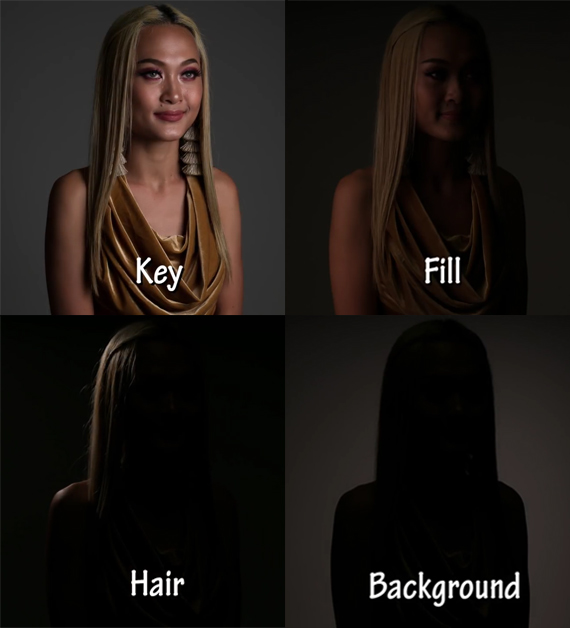
Effects of different lighting on the subject
How to Get Consistent Results Using Studio Lighting
As a professional photographer, it’s essential that you’re able to replicate the results, meaning that you should be able to take photographs in multiple sessions and get consistent results. For this purpose, Wallace explains the concept of light ratios.
Light ratio is about understanding how to meter other lights in relation to the key light. To get the consistent results, Wallace explains that it is not the values at which the lights are metered that should be remembered (e.g., key light at f/8, hair light at f/10), but the relationship between the lights that is more important.
For instance, Wallace shares the following scenario:
| Light | Metered Value |
| Key light | f/8 |
| Fill light | f/5.6 |
| Hair light | f/9 |
| Background light | f/8 |
Instead of making notes of these absolute values, relative light ratios can be noted in the following manner by referring to the key light as the base (i.e., zero).
| Light | Metered Value | Relative Value |
| Key light | f/8 | 0 |
| Fill light | f/5.6 | -1 |
| Hair light | f/9 | +0.3 |
| Background light | f/8 | -1.3 |
Here, the “relative value” is the difference in exposure from the key light. For instance, the -1 value in “fill light” means that the fill light is powered one full stop less than the key light, which is the difference between f/8 and f/5.6. This method makes good sense because if the value of the key light changes, the other lights can be adjusted by referring to the relative values quite conveniently. As discussed by Wallace, if the key light is now metered at f/5.6, the fill light will now be at f/4, the hair light at f/6.3, and the background light at f/3.5. These values can be easily calculated using a light meter.
Now you have an understanding of how you can create consistent results no matter where you are or what gear you’re using. Just make a note of your lighting diagrams in your notebook with the relationships between the different lights, and you’re all set to go.
Like This Article?
Don't Miss The Next One!
Join over 100,000 photographers of all experience levels who receive our free photography tips and articles to stay current:


Leave a Reply