The first thing someone notices when they look at any image is the way it has been composed. It’s not the technical aspects that people pay attention to at first, but on how the elements in the photograph are arranged. This is why composition can either make or break a photo. Fine art photographer Serge Ramelli takes us to the beautiful El Matador beach to share some tips on composition and on editing a landscape photo by using presets:
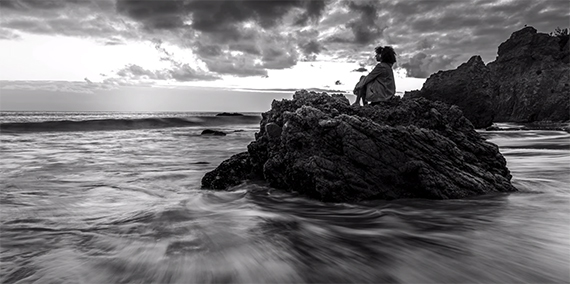
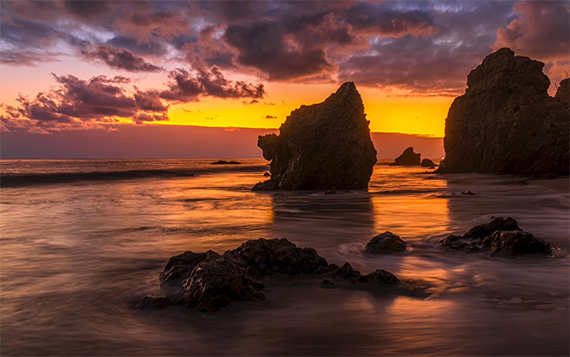
Ramelli sets off to the beach with a goal to take a magical photo of the beach. For that, his important tip is to find a good foreground element. Sand, which is very common on the beach, is not a good element to be placed at the foreground. Have a little walk around the beach to find some interesting foreground elements. Be prepared mentally and physically (with your dress up) to step into the water. Also, bring a sturdy tripod with you to use in the water.
Rocks on the beach are good elements to be placed in the foreground. While choosing a rock, be sure to pay attention to the sand around it. Disturbances in the sand from people walking on it make the sand less pleasing to look at, so choose a rock that’s closer to the water. Sand around such rocks tends to be much smoother, thanks to the constant movement of the water, and the reflection off of the shiny surface can act as a visual element in the foreground.
Make sure that the rock doesn’t fill too much of the frame. If it does, move back a little but be sure not to include the sand. After you’re satisfied with the composition and lighting you can take long exposure photos to capture the movement of the water, the clouds, and the colorful sky during sunset.
Next, let’s head on to Lightroom where Ramelli discusses his workflow to edit his photos taken on the beach.
Tips to Edit Beach Photos
Once you have imported your photograph into Lightroom for editing, the first step is to cull the photos that you don’t like. Here are some basic steps that you can follow to sort out photos you feel are worthy of your time:
- Go through the photos and rate them according to your liking.
- If you find yourself struggling to select one image from a series of similar images, select them all and press N followed by Shift + Tab so that you can have a clear view of those photos without any distraction.
- Once you’ve gone through the photos and have given them a rating, use the filter function to clear out any photos you haven’t rated and start working on the rated photographs.
Once the photos are sorted out, Ramelli uses his presets to edit the photos. He also uses a Loupedeck photo editing console to make his workflow even faster. As he demonstrates in the video, he has assigned the buttons on the console to his different presets which are applied to the photo on the press of a button. But if you want to do it manually in Lightroom, you can do so and load up the preset from the window at the left.

Ramelli shares the following tips for retouching landscape photos in Lightroom:
- When applying a preset, make sure that the photo doesn’t look artificial and overdone. If a preset tries to add colors that didn’t exist in reality, then the result will look fake. If you don’t have good colors in your photo, go black and white.
- Applying a preset doesn’t necessarily mean that the editing process is over. It just makes your workflow faster and gives an idea of what the photo will finally look like. You can fine tune the photograph by adjusting the sliders on the right side of the window in Lightroom.
- In landscape photos, make sure that the horizon is straight. For beach photos, you can refer to the sea level at the horizon to determine whether it is straight or not. If it’s not, use the angle tool in Lightroom to straighten the horizon.
- If you’re not satisfied with some elements in the frame, crop the photo. When cropping an image, you can use the rule of thirds to make the composition even better.
- Make sure that the details in the highlights aren’t blown out. Press Alt (Option in Mac) and slide the “highlights” slider. Anything that’s visible as a white patch is the area where the details have been lost. Reduce the highlight to regain some details.
- Experiment with white balance. You don’t know at which balance setting the colors will really pop naturally.
- While editing photos, be sure to give it a rest for some time and have a look at your edit. We tend to lose a sense of contrast and vibrance when we’re too much into editing. By taking a break, you’ll notice if you have overdone anything. Also, moving back and forth between black and white and color photos is a great way to have fresh eyes.
There you have it, a complete guide on how to take and edit photographs of the beach.
Like This Article?
Don't Miss The Next One!
Join over 100,000 photographers of all experience levels who receive our free photography tips and articles to stay current:


Leave a Reply