In portrait lighting you can use one, two, or even three or more lights to create different effects, but if you’re a beginner, how do you know where to start? This short video by photographer Daniel Norton gives some great pointers:
Key Light
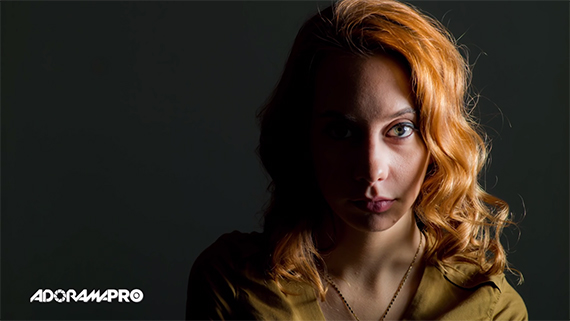
In portrait lighting, we usually start with a key light. This on its own can create a number of dramatic effects. If these effects are what you’re looking for, then you’re set–no further lighting needed. The photo on the right below demonstrates a single light portrait using just a beauty dish with a grid. The shadows are deep on one side of the model’s face and there is little separation between her and the background. (Though to be honest, Norton only showed a few options of what is possible with just a single key light.)
Key Light
Hair Light
If, however, you want your subject to stand out from the background, you’ll need to add in a hair light. Dark-haired models can especially look like they’re being virtually sucked into the abyss of the background without hair light. In the photo on the below right, you can see how the use of a hair light not only helps the model to stand out clearly from the background, but also adds some additional drama to the photo. You can also help to separate your subject from the background by pointing your second light at the lower part of the background.

Key Light and Hair Light
If you choose to use a hair light, make sure it is tightly focused just on the area you want to light. Using a grid or snoot also helps to prevent any light leakage on the backdrop or lens flares in the camera. Here Norton is using a Prophoto Acute 2400 with a grid for the hair light and a Profoto B1 for his second light when he lights the background.
Fill Light
The third light you can add in is called the fill light. This light is generally much softer than the key light or hair light and is used to fill in any harsh shadows one might be experiencing from directional light. It allows you to get all the detail your shot has to offer. You can, of course, increase the contrast later in post-production if you’re looking for the drama of deep shadows, but the detail’s always there if you need it. Keep in mind, you’ll want your fill light to be super diffused. Here Norton is using a big silk with another Prophoto Acute 2400 shooting through it.

In the picture above, Norton opts to light his background with his second light and use his third light for fill. The beauty dish is still the key light. You can, of course, use reflectors for your fill, but may need to adjust your camera settings a little.
Other Equipment
If you’re on a tight budget, Norton’s equipment is probably not for you. Still, he gets some awesome shots with it:
- Nikon D4s
- Zeiss 85 f/1.4 lens for Nikon
- Pocket Wizard Plus 3 (He actually used a Pocket Wizard Multi-Max but they’ve been discontinued.)
In the end, how many lights you choose to use really depends on your subject and the look you’re going for. If you have a specific look in mind, your best bet is to study the shot and the light closely and see where your light needs to come from, where you want your shadows to be, etc. If you don’t have a specific shot in mind, then just about anything goes; play around until you get a shot that works for you.
Like This Article?
Don't Miss The Next One!
Join over 100,000 photographers of all experience levels who receive our free photography tips and articles to stay current:


Leave a Reply