Aurora borealis, commonly known as the Northern Lights, is a pretty incredible phenomenon that displays the real beauty of nature. The light display is especially cool if you’re a photographer (whether you’re an amateur enthusiast or a pro), as it provides a perfect scene for an excellent shot. Here, Stockholm based photographer Micael Widell shares 10 quick tips on how to take photographs of the Northern Lights:
1. Location and Timing
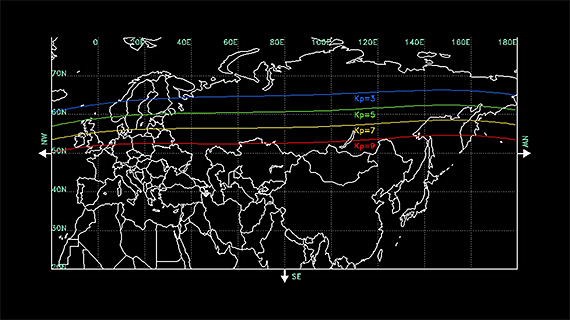
The Northern Lights are basically high-energy solar particles ejected from the sun but captured by the earth’s magnetic fields. Since the magnetic fields are located on the poles, your location from the North Pole is essential. For instance, if you are in Europe, the farthest place from the poles you can observe this phenomenon is Germany (though it rarely happens). Regarding timing, it normally occurs a few times during the winter but not quite often, so it’s essential to download an aurora map to be more accurate. Once you have identified the location, try to find a higher point that allows you to have a wide view of the horizon; say, the top of a mountain.
2. Clothes
The farther north you are, the colder it’s going to be so you should prepare some warm clothing. In fact, your vantage point could be absolutely freezing and you’ll probably be standing still for a couple of hours before you even get to see the lights. Grab yourself some warm boots and thick clothes. Don’t forget your gloves too, but make sure that they’re not too thick for you to operate the camera.
3. What to Bring
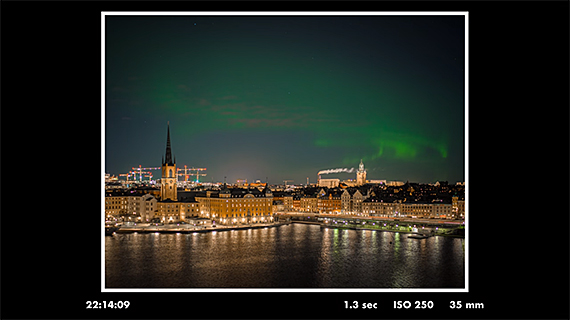
There are mainly two items that you need to have with you; the rest are just add-ons. First, you need a good, sturdy tripod. This will allow you to perform long, steady exposures. Secondly, you need a wide-angle lens. This should be roughly 35 mm or less. The wide-angle lens will enable you to capture a larger area of the sky.
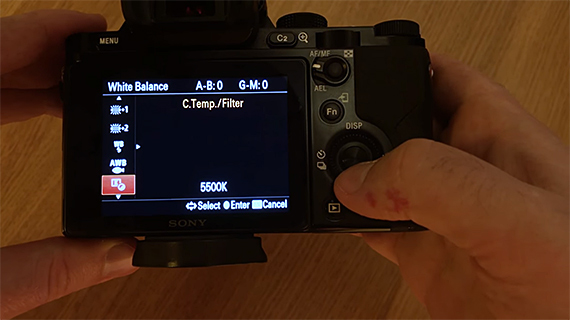
4. White Balance
The secret to capturing natural and colorful photographs of the sky is in the white balance. To really capture the greens of the Northern Lights, using the default camera settings may not give the best results. However, you can manually set the white balance yourself beginning with 5500K and even lower values. Note that it is essential to set the white balance while on the scene rather than doing it at home.
5. Self-Timer
Keeping the camera steady is vital in taking a clear shot of the Northern Lights. You can set the timer for 2 seconds for better results. However, for those with remote control, you can safely take the shot away from the camera without disturbing the tripod.
6. ISO
The picture quality depends on the ISO. As a rule of thumb, set the ISO as high as possible (but not so high that you might get some grain on your photos). However, these values depend on the type of camera you are using, but the range should be between 800 and 1000.
7. Aperture
Auroras are not that bright; therefore, to allow maximum light exposure, set the aperture as high as possible (which of course translates to a lower f value). Also, more importantly, remember to set the focus to infinity, because you will be taking photos of the sky.
8. Shutter Speed
Auroras and clouds are always dynamic (meaning they are always moving). A faster shutter speed means that your camera captures a sharper image. For instance, a shutter speed of more than 5 seconds might capture less and smear contours compared to a shutter speed of 1.2 seconds which captures more distinctive contours.
9. Where to Look
This is quite straightforward. Look to the north, and that is where you will find the Northern Lights. The best time to observe the Northern Lights is in the evening as you’ll notice some faint green patches of “clouds.” If you see this, start preparing your camera.
10. Try a Timelapse
A timelapse is basically a series of photos taken in a sequence that can be played as a movie. If you have never made a timelapse before, this is your chance.
As you can see, the above tips might seem easy, but if you apply them, you will definitely experience a new level of expertise in Northern Lights photography. But hey, remember to take other photos of the landscape as well, before or after photographing the Northern Lights.
For further training: The Night Sky Photography Chapters
Like This Article?
Don't Miss The Next One!
Join over 100,000 photographers of all experience levels who receive our free photography tips and articles to stay current:


Leave a Reply