Have you ever caught yourself staring at a photograph, wondering how the artist behind the scenes could have possibly created the image? If so, you’re not alone. Most of the time, the magicians behind these stunning shots won’t reveal their secrets. However, the folks from UNPLUG productions took the time to show curious fans just how they turned some everyday objects into extraordinary compositions.
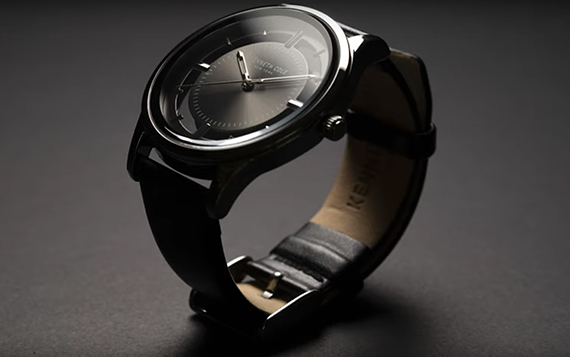
The product featured in this tutorial, a basic watch, may seem dull on its own. However, with a little bit of extra effort and creative compositing, the end result actually proves to be quite captivating. And once you’ve read the steps and strategies that happened outside the frame, you’ll really be able to truly appreciate the artistry that goes into “ordinary” commercial photography.
STEP 1: Photographing Ink
On their own, watches aren’t the most fascinating of subjects. To give it more of a visual punch, the production team opted to pair their product with some smoky, surreal ink photography.
To do this, the team purchased a small translucent pet container – the kind you might use to house frogs, hermit crabs, or insects. After filling it with some water, they placed the tank on a simple white foam core backdrop with two continuous lights. The first light source was placed overhead, to give the entire scene some base exposure. The second source was aimed to the side.
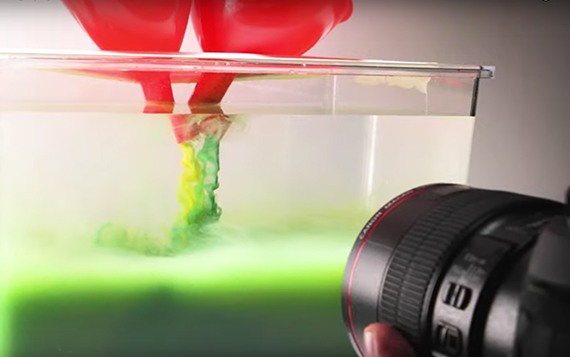
Once the scene was set, an assistant began to pour acrylic paint through a funnel into the tank. Working at a slow but consistent pace, the pigment would billow out into amorphous clouds as the paint particles mingled with the water.
From there, getting the right shot was a matter of pure luck. Shooting at a high frame rate ultimately worked to their advantage, allowing the editor to pick out the most interesting shapes from several frames to create a final product.
STEP 2: Repeat, Repeat, Repeat
If you think the team stopped after their first ink attempt, think again. They experimented with a variety of colors several times, ensuring that they got the best possible set of images to work with later on. Between colors, the tank, water, and funnel needed to be thoroughly cleaned to prevent cross contamination.
STEP 3: Photographing the Watch
Once the ink was out of the way, the photographer mounted his camera to a tripod to keep it stationary. After switching the white backdrop out for black foam core, he carefully positioned the watch face-up.
Using the same continuous light sources used previously, the team shot their first frame. But unlike the previous shoot, the photographer began to move the supplemental light while keeping the camera and watch perfectly in place. This allowed the team to highlight and expose certain details such as the watch hands, the wrist band, and the logo.
STEP 4: Creating a Watch Composite
After grabbing all of the necessary photographs, it was time to start editing. Because the watch never moved and the field of view never shifted, all of the exposures could easily be layered on top of one another to create a final composite. Essentially, this allowed the editor to pick and choose the best features from each exposure.
Using a soft brush, they brushed through layer masks to include the most desirable details while maintaining a sense of realism. Once thoroughly exposed, the images were flattened down into a single file.
STEP 5: Putting Everything Together
Finally, with the watch complete, the team could marry the product shot with the ink images. Though choosing the “right” shots was a matter of preference over anything else, they did make sure to choose images with some natural lines that would allow the watch to be incorporated in more easily.
Using the lasso tool, they copied the watch and pasted it into their selected ink exposures. Using a layer mask, the wristband was painted away, giving the watch the illusion of being engulfed in smoke. Then, a segment from another ink image was placed on top of the watch to further create a sense of realism. To make the cuts as precise as possible, the lasso tool was used to clean up the edges of the ink and the watch.
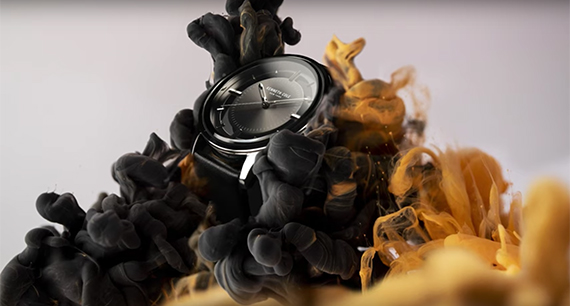
The final result? A watch picture that can wow an audience.
Like This Article?
Don't Miss The Next One!
Join over 100,000 photographers of all experience levels who receive our free photography tips and articles to stay current:


Leave a Reply