Most beginning photographers deal with darkly lit sunsets in the same way: toss open the aperture and try to balance all the light onscreen, from the darkest shadows to the sunlit sky. But, as Mark Wallace point out, that’s not really the best way to do it. Watch what he does instead:
The result of what most beginner photographers might do looks like a standard city sunset. To let in a lot of light, you might crank you ISO up to 800 in Aperture Priority mode and get something like this:

Instead of doing that, Wallace suggests opting for a longer exposure to smooth everything out. It might sound counterintuitive to some, but the idea is to close the aperture down to f/16 and reduce the ISO as much as possible. Now with a one-second exposure, a tripod is necessary to keep things in focus. The result is a bit smoother, but still not exceptional:

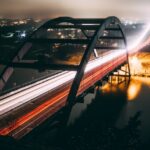
His last bit of advice is to add a six-stop neutral density filter, enabling a 60-second exposure. ND filters are useful for more than just bright light—they enable photographers to completely change almost any scene. To justify this, he waits about a half-hour for the sun to go down even more, creating a stronger glow. It looks like this:

As you can see, it’s a much more attractive picture—the river and clouds are better suited to a smoother flow than a sharp, quick exposure.
Like This Article?
Don't Miss The Next One!
Join over 100,000 photographers of all experience levels who receive our free photography tips and articles to stay current:


Leave a Reply