While most of the photographers today shoot digital, the charm for film photography is still alive. There are quite a number of photographers who prefer to shoot on film and develop their images by themselves. James Stevenson has a complete guide to developing a black and white film:
The entire process can be broken down into three main steps:
- The exposed film goes into a light tight tank.
- Three chemicals are used. Developer brings out the image on the film. A stop bath stops the development so that the film is not over-developed. A fixer makes the film insensitive to light so that it can be taken out of the tank.
- Finally, the film is rinsed to clear off any residual chemicals and is hung to dry.
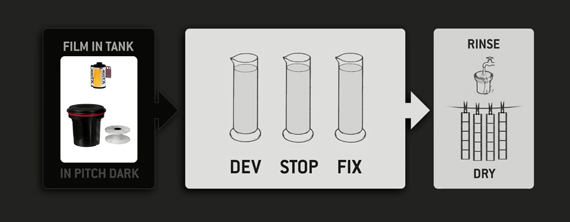
Three basic steps in developing film
Equipment Needed to Develop Film
- developing tank
- two 600ml beakers, one 150ml or 200ml beaker, and one 45ml or 50ml beaker
- a thermometer for measuring the temperature of the chemicals
- hooks for hanging and drying the film
- a small soft sponge
- scissors
- a dark bag if you don’t have a dark room
- developer
- stop bath
- fixer
How to Develop Film
- Load the film from the canister to the developing tank. The first step is to get the film from the light tight canister into the light tight developing tank. This process should be done in a completely dark situation, as even a little amount of light will damage the film. If you don’t have a room that can be sealed off entirely from any kind of light, use a dark bag. If you have no experience with loading film from the canister into the developing tank, Stevenson has an elaborate practical explanation on how to do it. Be sure to follow the video closely to watch and learn. During the process, be sure to handle the film only on its edges to avoid any fingerprints on the film.

- Prepare the chemicals. All three chemicals (developer, stopper, and fixer) come as concentrates and need to be diluted with water. To get the mix measurements and ratios right, Stevenson recommends an app called Massive Dev Chart Timer and going through the instructions on the packaging. When you enter the developer brand, film, and film size, the app can give you the measurements and timer. If you don’t want to use the app, you can use its web version as well and get your chemicals ready.
- Use the developer. Once you’ve prepared the chemicals, start by pouring the developer first into the developing tank. Be sure to start the timing as soon as you pour the developer in. Then agitate the mixture every alternate minute to ensure that the film comes in contact with fresh chemicals to get even developing. If you’re really aggressive with your agitation process, you can get more pronounced film grain. If you’re not a fan of grain, agitate it gently.
- Use the stop bath. Once you’re at the end of the developing process, drain the developer from the tank and pour the stop bath in the tank to stop any reactions from happening. Again, start the timer for a minute and agitate the mixture in the tank for the entire minute. At the end of the process, drain the tank by pouring the chemical safely down the drain.
- Use the fixer. The final chemical, fixer, makes sure that the film is no longer sensitive to light. Pour the diluted fixer in the developing tank and agitate it constantly for the first minute and ten seconds every minute after that for the next four minutes. Fixers can be reused for about 10 to 15 batches of film. So, you can store the used fixer for future use once you’re done.
- Rinse the film. The Dev Chart app instructs to rinse the film for 10 minutes and 30 seconds. Stevenson recommends that you do this by dunking the film in clear water in the tank for the first minute and then keeping it under running tap water for the next three to four minutes. While rinsing is in process, you can clear your workspace, your hands, and the other equipment that you used throughout the development process.
- Dry the film. The final step is to take the film out to hang dry. To avoid any kind of water spots being left on the film, especially in hard water areas, Stevenson recommends using a Photo Flow drop mixed with water after the rinsing process. Finally, take the film out of the reel and use a hanger to hang the film. Be careful to clip the hanger on the edge of the film, as the hanger punches a hole on the film. You can then use a weighted clip at the other end of the film to prevent it from rolling up. Finally, use a soft sponge dipped in the Photo Flow mixture to softly run down the film on both sides. This also helps to avoid water spots. Leave it to dry for a couple of hours. When the film is fully dry, you can cut it and store it in archive sleeves.
Was this video tutorial able to rejuvenate the film photographer in you?
Like This Article?
Don't Miss The Next One!
Join over 100,000 photographers of all experience levels who receive our free photography tips and articles to stay current:


Leave a Reply