I wrote this article for my darkroom photography students and for others who want to shoot photos at night using film but have no idea how to do it. I know that few people these days are creating images with film and the ones that are, are either very savvy or are totally lost. Taking pictures with film is very different than using a digital camera. With film, you want to expose properly so you end up with very good negatives to print.
Night Photography with Film
The information included here is what I normally do when I expose film at night or indoors with very little light. I do this to capture enough light and end up with very good negatives. Nowadays not many people know that film has a greater capability to capture light than digital sensors. What I mean by that is that the range of tones is greater in film when exposed properly. So, to capture enough light on film and have the range you are looking for, you have to do it well.
A digital camera helps you to create an image with an extended range by creating multiple images using HDR photography, and then stitching them together in Photoshop. This means that you have to take many steps to obtain the same range of tones than you can obtain in one well exposed negative. With the number of apps and editing programs out there, your options are unlimited! I appreciate that. But, even with all these advantages, many people with very expensive cameras are unfamiliar with the fundamentals of photography and will have just “nice” images on their Facebook wall. Film gives you a deeper understanding of the multiple processes that go into making a solid print suitable for framing. These instructions are designed to help you render consistent high quality negatives.
One of the difficulties for many photographers who use film is exposing it correctly at night. Shutters are different in every camera, so you have to do your own testing to get good results. You have to expose the film correctly and make sure that you expose for the shadows and develop for the highlights. This has been the motto of many great photographers for many years. Film can capture great detail in the shadows and highlights, but if you do not control the developing process, the highlights will end up as white patches with no detail. By controlling the developing process you control the highlights. This will give you images with great tonality.
How to Shoot Photos at Night
Since film cameras will not record everything you do in the field, bring a notebook to document everything you do in the camera. Also, bring a tripod, cable release, flashlight and lots and lots of patience. Patience is probably the most important part in the process of using film. Also, don’t just shoot willy nilly; be selective of what you photograph. Remember that a roll of film is only 24 or 36 exposures; make everyone count as if it was the last photo you were ever going to create. This will make you a very good, or better yet, a great photographer.
First of all, film does not respond to artificial light the same way as digital camera sensors. I suggest that if you want a type of film that responds to all types of light, you use panchromatic film. What is panchromatic you ask? Panchromatic film is a normal black-and-white film sensitive to light of all visible colors (electromagnetic wavelengths between 400 nm and 700 nm). There are other types of film, for example, orthochromatic film, which is not sensitive to all waves (colors) of light.
If you’re interested in knowing more about panchromatic film, here is a link with more information: https://en.wikipedia.org/wiki/Panchromatic_film
I strongly recommend Ilford films. I use Ilford HP5 most of the time as it has very little grain (if you expose it correctly). The second film that I recommend is Kodak Tri-X; this is a legendary film. A little too grainy for my taste, but a great film nevertheless.

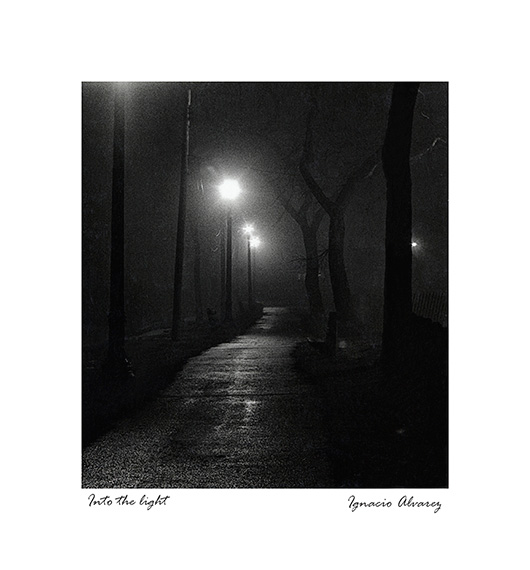
Chicago at Night
Before you have the film in the camera, make sure everything is in working order: Apertures, shutter speeds and light meter. Since we are trying to expose film correctly, do not set the ASA in the camera to 400, which is what the film is rated. This number will give you okay negatives but not very good negatives. So, set your ASA to 200 and follow the light meter! What I mean by this, is to make sure that you do not over or under expose each shot. Of course, you do not have to do this all the time, only when you want very good negatives! Some students overexposed their negatives on top of the ASA sensitivity compensation and then want to under develop the roll based on something they read on the internet! Wrong! Develop the film normally, at the correct time. You want one stop of over exposure in your negatives, otherwise, if you under-develop, you undo this compensation and will screw up the rest of the images in the roll which were properly exposed.
So the camera is set, the film is in, everything is working correctly. You are ready to go and expose film. But, when shooting film at night it actually loses speed and the actual film speed or ASA is not valid. So, you must take that into account and compensate for Reciprocity Failure or ‘reciprocity law’ (what happens to film at night, or indoors with artificial light and very long exposure).
Go to a dark (and safe) area of your street, it doesn’t matter what you photograph; your concern right now is on learning before creating. Set your camera in the tripod, screw in the cable release, and set the ASA in the dial as high as it will go. Older cameras can go to 1600 or 3200 ASA; set it there. Now set your lens to the biggest aperture—let’s say f/2.8. Look at your light meter and read the shutter speed. What is it? If you are in a very dark place, your light meter will probably give you a long exposure even with the ASA at 1600. Let’s assume that the correct time that you read in the light meter is 2 seconds. If you had 1600 ASA film in the camera this will be half okay, but you don’t have that. Remember, we are shooting with Ilford HP5 400 at 200 ASA. Copy this sample chart in your notebook so you remember it for next time:

Equivalent Exposures
Of course you are not going to have the same aperture and shutter speeds as in this sample, this chart is simply a calculation reference. Start cutting the ASA in half, each time you cut the ASA in half that corresponds to one full stop of exposure, so just double the shutter speed and the exposure time will be correct.
So, with the film that you have in the camera your exposure is 16 seconds but, this is before compensating for reciprocity failure or a different aperture of the lens. I know that using the lens fully open is a good idea but maybe you want to use a smaller aperture, let’s say f/8. The chart is correct for the film with the ASA you have in the camera, but not for an aperture of f/8. For that aperture, keep adjusting. Please notice that now that we found the correct exposure for 200 ASA film, we keep that ASA and change the aperture of the lens only! Since we are cutting the amount of light in half every time we close the aperture of the lens, we double the exposure time to compensate. ALL these combinations will give us exactly the same amount of light in the film; this is called reciprocal exposures.

Can you imagine an exposure of 256 seconds? And this is without compensating for reciprocity failure.
So, what is reciprocity? Why is it necessary to compensate the exposure on film? Before we continue with the chart, let me tell you about the Reciprocity Law or the Schwarzschild Effect.
Reciprocity Failure
For most photographic materials, reciprocity is valid with good accuracy over a range of values of exposure duration, but becomes increasingly inaccurate as we depart from this range. As the light level decreases out of range, the increase in duration, and hence of total exposure, required to produce an equivalent response becomes higher than the formula states. For example, at half the light required for a normal exposure, the duration must be more than doubled for the same result. Multipliers used to correct for this effect are called reciprocity factors.

Long Exposure
At very low light levels, film is less responsive. Light can be considered to be a stream of discrete photons, and a light-sensitive emulsion is composed of discrete light-sensitive grains, usually silver halide crystals. Each grain must absorb a certain number of photons in order for the light-driven reaction to occur and the latent image to form. In particular, if the surface of the silver halide crystal has a cluster of approximately four or more reduced silver atoms, resulting from absorption of a sufficient number of photons (usually a few dozen photons are required), it is rendered developable. At low light levels, i.e. few photons per unit time, photons impinge upon each grain relatively infrequently; if the four photons required arrive over a long enough interval, the partial change due to the first one or two is not stable enough to survive before enough photons arrive to make a permanent latent image center.
This breakdown in the usual tradeoff between aperture and shutter speed is known as reciprocity failure. Each different film type has a different response at low light levels. Some films are very susceptible to reciprocity failure, and others much less so. Some films that are very light sensitive at normal illumination levels and normal exposure times lose much of their sensitivity at low light levels, becoming effectively “slow” films for long exposures. Conversely some films that are “slow” under normal exposure duration retain their light sensitivity better at low light levels.
Another example: For a given film, if a light meter indicates a required EV of 5 and the photographer sets the aperture to f/11, then ordinarily a 4-second exposure would be required; a reciprocity correction factor of 1.5 would require the exposure to be extended to 6 seconds for the same result. Reciprocity failure generally becomes significant at exposures of longer than about 1 second for film, and above 30 seconds for paper.
Reciprocity also breaks down at extremely high levels of illumination with very short exposures. This is a concern for scientific and technical photography, but rarely to general photographers, as exposures significantly shorter than a millisecond are only required for subjects such as explosions and particle physics experiments, or when taking high-speed motion pictures with very high shutter speeds (1/10,000 of a second or faster).
Finally, here is an additional chart where I use 100 ASA film at a very small aperture of the lens and compensate for reciprocity accordingly. Remember, the longer you expose film the more it loses speed, this is why I compensate to such percentages.

100 ASA film at a very small aperture
Since they did not want people in the picture (below) and this lobby is busy 24 hours a day, I ended up using a small aperture on a Linhoff medium format camera and shot the picture exposing it for 32 minutes after reciprocity correction.

Hilton Towers lobby Hotel on Michigan Ave. Kodak Film 25 ASA shot at 12 ASA
Film photography is a lot more than just a push a button and hope for the best. Can you get beautiful images with digital? Of course! Can you use your digital camera and do the same extra-long exposures? Absolutely! But compare digital to film; nothing will beat the thrill of seeing your first print that you carefully composed, developed, tested, and exposed as it slowly appears in a developer tray.
About the Author:
Ignacio Alvarez is a photography instructor at City Colleges of Chicago.
Like This Article?
Don't Miss The Next One!
Join over 100,000 photographers of all experience levels who receive our free photography tips and articles to stay current:


really simple question here: what shutter speed would I set on my camera, if I need to expose for 4 seconds, for example? Would I select “4”, equating to 1/4? I’m unclear on the relationship between the setting on my camera, and the actual time I expose for using a release cable.
If as JNK says that it is good practice to half the box speed, how is the reciprocity calculation affected, if indeed it is? I will be shooting with black and white film this week at night. I have bought a Ilford D3200 film. Someone has mentioned that I should shoot at 1600. The calculation for reciprocity is 1.33 for the D3200.
Sorry, but no photographer uses 3200 iso film to take pictures at night. My picture of the Hilton Towers Hotel lobby was shot using Kodak Panatomic-X film. this film speed is 32! and I use it at 16 ISO!
Seting a film at half of box speed is good and common practise, as film manufacturers usually exaggerate their film’s capacities a bit. Since film generally can handle overexposure a lot better than underexposure, setting it one stop under box speed will increae the amount of light and will also increase the shadow detail, which is particularly important with low light images.
THANK YOU Ignacio, for reminding me that photography is as much a technical art as it is a visual art.
After years of using my daughters hand me down digitals I tried to shoot long exposures to capture the fireflies as a source for another artistic venture……failed miserably. Pulled out my old Pentax and loaded the film I had…I know..but it’s what I have…Fuji Superia 400..I used to shoot Ilford decades ago and actually serviced them as a customer in north Toronto 35 years ago…got the mug. I will have to re read this a few more times to try to get the wealth of knowledge into this 68 year old brain.
Thanks VERY MUCH and take care
Robert
There is a small mistake in this: exposure would be 128s, not 256. Obviously you know what you are doing but the explanation is wrong :)
Yeah this makes no sense. Math is off. You wouldn’t arrive at 256 seconds.
Hi, great article.
Can you explain why do I have to set the ASA to 200 if I have a 400 ASA film? Why the extra step?
I also am confused on this.
Hello, my friend! Kodak and other film companies rate film sensitivity at an average ISO, but only professional films include a more precise ISO rating, often provided on a sheet inside the box. With that in mind, it’s generally beneficial to expose film to at least 50% more light than recommended, as this helps capture more detail in the shadows.
You might have heard the phrase, “Expose for the shadows and develop for the highlights.” This approach means that giving the film slightly more exposure than the light meter suggests helps retain shadow detail. During development, you then adjust to control the brightness of the highlights. This technique requires experimentation to determine the right development time and agitation method to get the results you want.
This so useful, thank you for sharing. I am off to Venice next week, and i will have my 5d mk4, but also my Pentax 645n and a handful of HP5, Delta 400……..with a huge learning curve coming my way!!! .
Thanks for the article; it brings back familiar recollections of what I had learned about shooting film long before digital cameras were available. Reciprocity is an important concept; your article wasn’t about color photography which also has its own reciprocity issues, but it did a good job of explaining how it impacts black and white photography. A film that I really liked that isn’t available any more was Microdol-X because it could be developed in a dilute solution over more time to decrease the grain. For that film, correct exposure was really critical because decreasing grain in the dilute developer also decreased contrast.
I think that you mean Panatomic-X, Microdol X is a developer by Kodak. Sorry.
Does it matter if the exposure is set using the camera’ s in-built meter or by using my handheld Lunasix meter? Should the Lunasix be used in reflective or incident mode?
Thank you for the question friend. You can use the cameras light meter and make adjustments on the exposure especially you need to compensate for reciprocity failure. Sometimes I use the lightmeter in the camera if I forget to bring my Sekonic meter which will be reflective metering of the scene. Using the Sekonic meter I measure incident light 100% of the time. It is also a good idea to have your light meter check by an expert to make sure is working perfectly.
I’d use the camera’s built-in light meter until I’m familiar enough with it to trust its readings fully. Of course, you can also use a handheld light meter. Handheld meters typically measure reflected light rather than incident light. Incident metering, which is often used in portrait photography, measures light falling directly on the subject and is ideal in controlled settings.
In panoramic or landscape photography, however, lighting is less controllable, making incident readings impractical. Instead, reflected light readings are usually more effective, as they account for the natural lighting conditions across the scene.
Really enjoyed the article. Makes sense. My first photograph ever was in 1969, night photo in B & W of the city light from the hillside we lived on. Your Union Station Chicago is amazing. Had no idea! Gave that photo a lot of philosophical thought for days. Thanks for the exercise.
B.Rgds., B
You are welcome Bryan, and if you want to share your philosophical thoughts about my photo of Union Station, just email me at ialvarez@ccc.edu.
Thank you.
Just wanted to thank you for taking the time to explain this. Just starting my journey with film and still trying to figure out how to metre at night without a light metre.
Friend, all working cameras have a light meter, if yours is not working, you will only be guessing. Have the batteries changed and check to see if the light meter works, if it doesn’t, send it out for repair.