When you use a DSLR camera for the first time, it’s natural to be intimated by the sheer number of buttons and options. The manual might seem too thick to read and you’re likely to flick to auto mode. It might take you some time to make the most out of your DSLR, but you don’t have to wait too long to understand the basics. This infographic sums up all you need to know to get started:

DSLR Camera Ultimate Guide (Click image to see full size.)
Infographic kindly provided by 10HighTech.
Shooting Modes
You should begin with the shooting modes. You will most likely find them on a circular dial where you will see options such as Auto, A-Dep, M, Av, Tv, P, etc.
Priority Modes
Av or A (Aperture Priority)
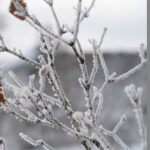
Aperture changes the depth of field and it is measured in f-stops. For instance, f/22 indicates smaller aperture as compared to f/2. A small aperture is used for shooting a large depth of field, such as shooting a mountain from a distance. A large aperture is used for a small depth of field, such as shooting a small insect or a flower.
Tv or S (Shutter Priority)
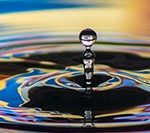
Shutter speed indicates the amount of time the shutter remains open to capture the light. If you choose a longer shutter speed, more light will pass to the sensor. A short shutter speed is useful when you want to freeze a fast moving subject. A long shutter speed adds a sense of movement and blurs moving subjects.
P (Program)
In this mode, you set either the aperture or shutter and the camera adjusts the other one accordingly to maintain a technically correct exposure.
Manual Mode
You can have complete control over the exposure, shutter speed and aperture.
ISO
ISO is an indication of the sensitivity of the sensor of your camera to the light. It is measured from ISO 100 to ISO 6400. ISO 100 is the lower sensitivity and 6400 is the higher. Shooting with higher sensitivity, such as ISO 6400 or ISO 3200, is useful in low light conditions. During a bright sunny day, shooting with low ISO, such as ISO 100 or 200, can be done.
Exposure Triangle
There are three factors that influence the exposure, ISO, shutter speed, and aperture. You have to adjust the settings to achieve the right balance. For instance, say you’re currently shooting with the following settings:
- ISO: 400
- Aperture: f/8
- Shutter Speed: 1/10 of a second
Now, if you want to reduce the depth of field to shoot a smaller object and increase the aperture, you change the aperture to f/4. You will increase the amount of light entering the camera by a factor of 4.
To balance the exposure, you can do the following:
- Reduce the shutter speed by a factor of 4 (i.e., 1/40 of a second).
- Reduce ISO by a factor of 4 (i.e., ISO 100).
- Reduce shutter speed by a factor of 2 and reduce ISO by a factor of 2 as well.
Metering Modes
While using the automatic exposure calculation, the camera tries to calculate the average exposure. It is called metering. It assesses the entire scene and sets an exposure so that all the tones in the frame average to 18% grey which is called middle grey.
Average
The camera assesses all the tones from corner to corner and averages it to 18% grey.
Center-Weighted
The camera ignores the corners of the image and weighs the exposure reading in the center to cover 80% of the area approximately.
Spot Metering
The camera uses a very small area of the screen, such as a circle in the center to make the assessment.
Exposure Compensation
You will most likely find a +/- button near the shutter. You can use this button to adjust the meter reading of the camera to compensate for the exposure. For instance, if you are shooting a very bright scene and the camera averages it to 18% grey, the result will be darker than what you expected it to be. You can compensate for it positively and get a brighter image as a result.
Focus
DSLR cameras offer a range of autofocus modes. You must understand about the two most important ones, AF-S and AF-C.
AF-S (Autofocus Single)
It is used while shooting stationary objects.
AF-C (Autofocus Continuous)
It is used while shooting moving objects.
Focus Point
When you shoot with a DSLR, you will find a number of dots on the screen. After half-pressing, the shutter, one of these points will turn red which is the active focus point.
White Balance
The white balance impacts the color tones of the photographs. These are the common presets for white balance.
Tungsten
It is used for shooting indoors, such as with incandescent lights.
Fluorescent
While shooting indoors, it compensates for the blue-green hues from fluorescent lights.
Daylight
It is used under bright light conditions, such as sunny days.
Flash
It adds a little warmth to the image.
Cloudy
It adds warmth to daylight images shot during cloudy days.
Shade
It adds a little warmth to images shot in shaded areas.
You can set the white balance manually and determine the right color balance.
File Size and Type
You can choose to save the captured images as RAW files or JPEG files. JPEG files are compressed and processed by the camera. RAW files are stored without processing and compressing. They contain a lot of raw data that can be used to improve the image during post-processing.
That’s the basics to get you started. Using manual mode will help you gain a much better understanding of your camera and how it works.

Like This Article?
Don't Miss The Next One!
Join over 100,000 photographers of all experience levels who receive our free photography tips and articles to stay current:


Leave a Reply