When you’re just starting out with photography, you stumble across many technical terms. Failure to understand the basic photography terms can later create big hurdles. It’s essential that you understand your ABCs well before venturing out. Vincent Ledvina from Apalapse explains some of the most used photography terms that every photographer must know:
Aperture and Related Terms
Aperture refers to the size of the opening in the lens through which light enters the camera. A larger opening allows more light to pass through, while a smaller aperture allows less light to pass through. The size of aperture is measured in terms of an f-number or f-stop. Smaller f-numbers, like f/1.2, represent a larger aperture, while larger f-numbers, like f/11, represent a smaller aperture.
Changing f-numbers also affects depth of field. Depth of field determines how much of the total area in the frame is in focus from front to back. A wider aperture (smaller f-number) means that less of the area will be in focus (shallow depth of field) while a narrow aperture (larger f-number) means that greater area of the frame will be in focus (greater depth of field).
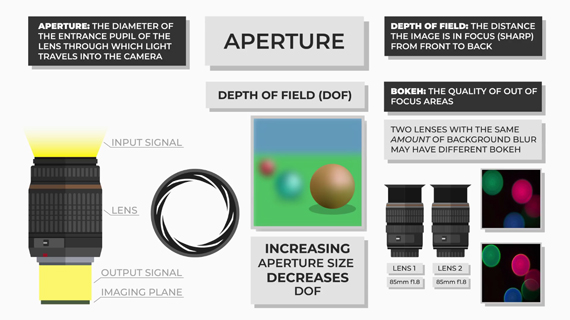
You can use a shallow depth of field for a sharply focused subjecting and a blurred background. The blurred out background is referred to as bokeh and helps in isolating the subject. On the other hand, by setting the lens to have a greater depth of field, you can get more of the image in focus.
You may think that setting two different lenses to the same f-value should let equal amount of light to pass through. While you’re theoretically correct, light amount varies in practice due to the difference in materials used. There’s another parameter called the t-stop, which is a measure of the amount of light transmitted through a lens into the camera. Cinema lenses are usually characterized by t-stops instead of f-stops.
Shutter Speed
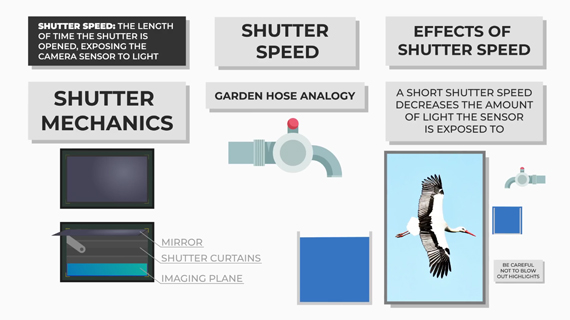
Shutter speed is the amount of time the shutter exposes the sensor to light. It is measured in fractions of second. For instance 1/1000 of a second means that the sensor is exposed to light for a very short duration. So, only a tiny amount of light will reach the sensor. A faster shutter speed is useful when you have sufficient ambient light and when you’re taking action shots.
On the contrary, a shutter speed of around 1/2 a second or 2 seconds exposes the sensor to light for a longer duration. A slower shutter speed is useful when shooting in low light conditions or taking long exposure shots creatively.
Exposure Triangle
Exposure is the amount of light per unit area reaching the sensor. Shutter speed and aperture together affect exposure, as they physically control the amount of light reaching the sensor.
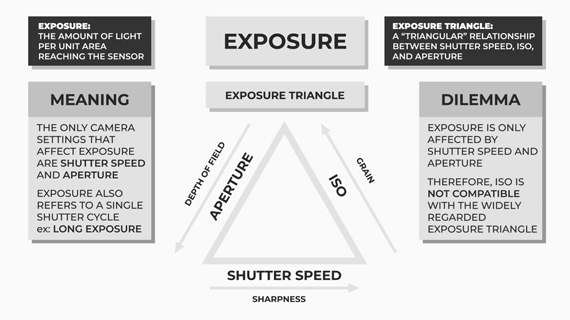
The exposure triangle is the relationship between three basic pillars of photography: aperture, shutter speed, and ISO. By making adjustments to these three parameters, you can affect exposure.
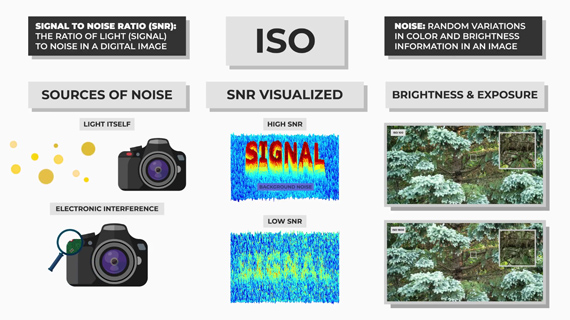
Now that you understand the concept of aperture and shutter speed, let’s move on to ISO. While most understand ISO as the sensor’s sensitivity to light, it actually has to do with the amplification of sensor data after an image has been taken. A higher ISO amplifies the sensor data more and results in a brighter image. Keep in mind that while higher ISO allows you to use faster shutter speeds in low light conditions, it also introduces more noise to the image.
Along with noise, a higher ISO image also shows variations in color and brightness information. This happens due to a difference in the signal to noise ratio (SNR), which is the ratio of light to noise in a digital image. A high SNR value results in a crisper image with very low background noise, whereas an image with a low SNR value contains information that is barely recognizable from the background noise.
You may wonder about the source of the noise. It may come from the light itself or even from the electronic interference.
By understanding the concept of SNR, you can take photographs that are optimized for SNR and have the least background noise. In general terms, it is also know as the expose to the right method. To use this method, select your aperture and shutter speed to expose for the brightest highlights so that no signal is lost. If highlights are unreasonable to expose for (like when shooting into the sun), allow only minimal clipping to occur. And if some shadow regions are too dark to contain any information, you can bracket images using multiple shots to create a final high dynamic range (HDR) image.
File Formats (RAW and JPEG)
Your camera allows you to save photos in two formats: RAW and JPEG.
Ledvina suggests that you immediately switch the format to RAW in your camera settings. RAW files save all the data captured by the sensor in a lossless format and allow great flexibility for post-processing. RAW files take up a lot of space and also require special software like Adobe Camera RAW, Lightroom, or Photoshop to open and edit.
JPEG files, on the other hand, are processed by the camera and are less flexible. However, JPEG files take up less space and also come in handy if you want to quickly share images to social media.

Shooting Mode
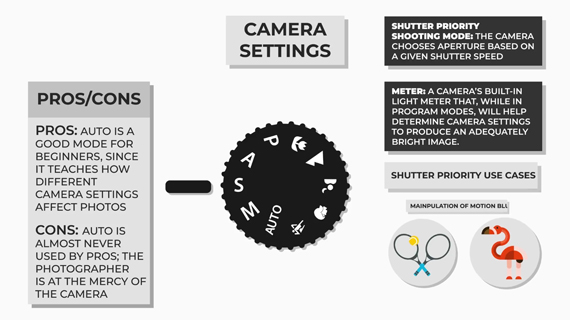
When starting out, many beginners choose to shoot on auto mode. This mode automatically determines which aperture, shutter speed, and ISO to use ; all you have to do is compose and release the shutter. Try to move out of this mode as quickly as possible.

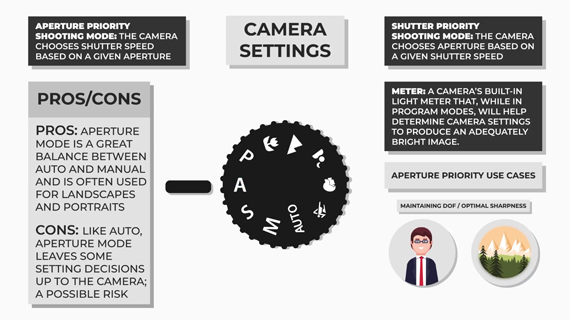
Shutter priority mode, denoted by S or Tv on the camera mode dial, is a semi-auto mode. It allows you to choose the shutter speed, and the camera selects the other parameters automatically. If you’re out taking action photos, this mode can come in handy. Just choose your shutter speed to avoid motion blur and the camera will assist you with the rest. Wildlife and sports photographers use this mode quite frequently.
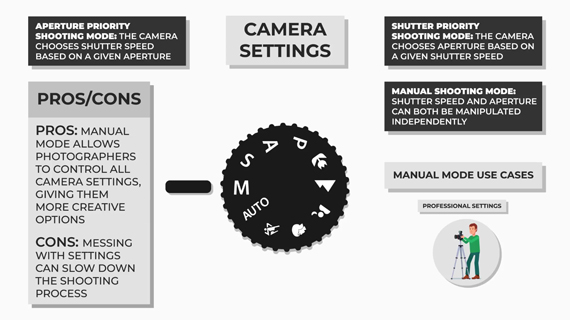
Aperture priority mode, denoted by A on the camera mode dial, is another semi-auto mode. It allows you to have control over the depth of field by letting you choose the aperture value while the camera takes care of the rest.
Manual mode, denoted by M on the camera mode dial, gives the photographer complete control. In this mode, you can adjust aperture, shutter speed, and ISO independently for total creative control. Continuously fiddling with the camera settings can slow you down, but it teaches you how each of the camera settings affects your photo.
The terms discussed in this article are a part of the foundation that you will need to develop your photography.
Like This Article?
Don't Miss The Next One!
Join over 100,000 photographers of all experience levels who receive our free photography tips and articles to stay current:


I like you write up but you state that a Pro will never use Shutter or Aperture Modes that not true pro will use manual mode Most of the time. But we do Shelter and aperture Modes even know we are using these mode we still can control every aspect of the camera. Like everything you do you need to understand your camera and what it can do.
Camors today are smarter than they used to be.
So it can think faster then you can. And certain types of photography situation these mode come and handy..
Yes many will disagree but this is my thoughts and I am sticking to it lol
Great explanations reinforced by the “visuals”! Your voice is fine!