If you studied photography in school, you no doubt learned the classic three-point lighting method for portraits. But if you’re self-taught, this enormously useful technique may not yet be in your repertoire. If you fall in the latter category, never fear. Music photographer PJ Pantelis has created this simple, step-by-step tutorial to have you lighting in layers in no time:
In a nutshell, three-point lighting consists of using three different lights—a key light, rim light, and fill light—to illuminate a subject, while at the same time controlling where (and if) the shadows fall. It’s usually done in-studio with lighting elements, but it can also be done outside.
The Three Lights
The Key Light
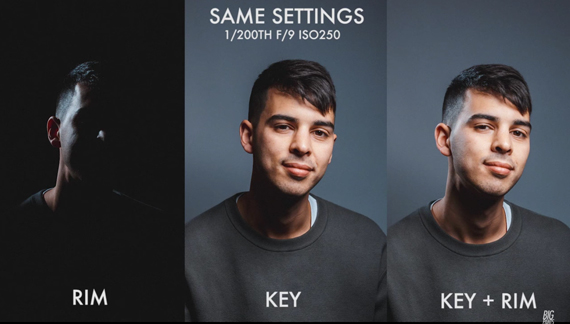
This is your subject’s main illumination. It determines where the shadows lie, as well as being the primary exposure source. In the studio, this light is usually placed above the subject and off at an angle in front. When working with natural light, the sun is usually used as the key light. Though most beginners see the key light in terms of where it lights up their subject, a more advanced photographer will think of it in terms of the shadows it creates.
The Rim Light
Quite simply, the rim light separates the subject from the background, essentially adding depth to the image. It does this by lighting the subject from behind and focusing on illuminating its outline (i.e. the rim of an object or the hair). It’s generally much less powerful than the key light and often only used for highlighting, although when used alone it can provide some creative, low-key effects. (See the image below.) Outdoors the sun could be considered rim light if it’s being used as backlight.
The Fill Light
The fill light controls the depth of the shadows created by the key light. In other words, it lights the places the key light doesn’t hit. It’s generally placed on the side opposite of the key and lower down (about the level of the subject’s face if using a lamp to create the fill). For this light you can use a light, a reflector, or even a piece of white card. Using a reflector or white card tends to create a softer, subtler effect than using a lamp.
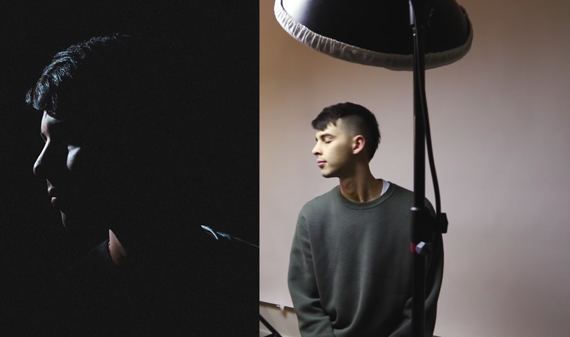
What Pantelis’ shot looks like with only the rim light. The light is positioned pretty much opposite the beauty dish you see in the photo.
The main benefit to thinking in terms of the three-point setup is that it allows you to build up your lighting layer by layer, adding in each light as you see fit. And if you prefer the darker, low-key effect, not to worry. The three-point technique is not a dogma, and you can mix and match any of the elements to get the look you’re going for. (Some folks really like the rim-light only look, for example.) It all depends on your preferred style. The more shadows you leave in, the higher the drama in the resulting image.
Gear List
- Canon EOS 5D Mark III
- Sigma 35mm F1.4 ART DG HSM Lens
- Godox ES400P 400W 8000mAh ES Series Strobe (Key Light)
- YONGNUO YN560 iv (Rim Light)
- PocketWizard Plus X Transceiver

While the gear list is always helpful, Pantelis insists it’s not about your gear, but the technique and building up the look you’re going for layer by layer. Outside with natural light or in-studio, mastering the principles behind this technique can really make a difference in your photography.
What are some of the more creative ways you’ve used the three-point lighting system?
Like This Article?
Don't Miss The Next One!
Join over 100,000 photographers of all experience levels who receive our free photography tips and articles to stay current:


Leave a Reply