Today’s tutorial kindly comes to us from Gim Liu, author of the new book After Dark Photography (readers outside the US can also get the book here).
In this chapter, you are taught how to create a photo where the movements of vehicles are displayed as streaks of light. In short, you will be using the lights of passing vehicles to create colorful light trails of the paths they took. This is achieved by them driving past you while your camera is taking a long exposure photo. An important note is that it does not have to be multiple vehicles it can just be a singular one.
An in-depth step-by-step guide is provided for you to follow which steers you through the entire process. This is done through applying the after dark photography formula seen in chapter 4 to provide a firm understanding. Each step you need to take within all four of the stages is outlined in order to explain all aspects that are involved to create the photo. To maximize your understanding, a running example of a bus light trail is given alongside the instructions you are following.
At the end of every step and throughout the entire process, my example is illustrated in green italics which are sometimes accompanied by a photo and/or a diagram. The running example can always be found after your instructions have been given for that particular step.
With all the above being known, it is time to bring an idea to life!
Stage 1 – Plan
(A) Decide what kind of photo you want to create or capture.
Firstly, you must choose what kind of photo you want to capture which in this case are vehicle light trails.
For the example I aimed to capture the light trails of a large vehicle driving past.
(B) Location – choose where you will take the photo.
Secondly, you must decide on the location. You preferably want to choose somewhere that has an interesting background, one that has detail and decorative features as this will make the photo more captivating. Also, if possible you should choose somewhere that has a considerable amount of moving vehicles.
The location I chose for the example was just before a tunnel and at a set of traffic lights.
(C) Equipment – gather all necessary equipment that is needed for the shot.
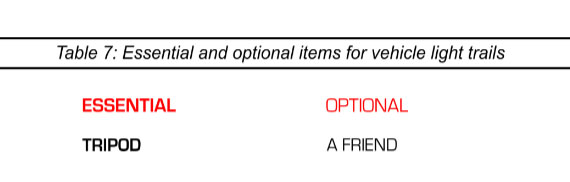
Lastly, you need to get together all the equipment needed to create the photo. For this particular shot, you will only need a tripod. Table 7 illustrates this.
I used a tripod to capture the example photo which is all that is needed for this type of shot and I was with a friend.
Stage 2 – Set up
(A) Positioning – If you are going to be in the shot, decide where you will stand OR decide where your camera must be placed so it can capture what is intended. After that, place the tripod down so the camera can sit on top and be aimed at the chosen frame. Next, put the camera on top of the tripod, turn it on and line up the frame as necessary.
Firstly, you must decide where you will position the camera in order to capture the light trails of vehicles driving past. Once decided, place your tripod down so your camera can be put on top and aimed at where the vehicles will be driving past your frame. Put your camera on top of your tripod, turn it on and, if needed, zoom in or out so you can see the entire area of your chosen frame.
Then, look through the viewfinder on your camera to check the following three things: (1) Nothing is in the shot that you don’t want such as anything that is obstructing or getting in the way of the frame (2) The frame is reasonably straight (3) The camera is positioned exactly in the centre by taking into consideration where the vehicles will enter and exit the frame.
It is important at this point to make a mental note for the execute stage of what your frame looks like and where exactly the vehicles will enter into your frame.
The tunnel where the vehicle light trails were captured for the example photo was approximately fifteen metres away from the camera. My chosen frame was so that the vehicle would enter from the left of the photo and exit at the top.
(B) Camera settings – set the ISO, aperture, shutter speed and select the self timer.
Secondly, the camera settings need to be set. When making the camera settings for this type of photo you must use your own initiative in order to find the precise settings that are needed. This is because the settings needed solely depend on the amount of light there is at your location. Nevertheless, advice is given in order for you to find the right settings for your shot.
First, put your camera into manual mode. This allows you to set the ISO, aperture and shutter speed as you want them. Second, set the ISO to 100 (standard ISO used for most long exposures). Third, you need to set the aperture. For this shot you will need to play around with the aperture to find which aperture number works best for the lighting at your location. If your location is at a reasonably lit road as most are, to start with try your aperture set at 5 and this can be adjusted later if needed. If your location is not at a reasonably lit road, to start with try your aperture set at 3.5 and this can be adjusted later if needed. Fourth, set the shutter speed to 5 seconds. Fifth, set your camera to self timer/remote mode.
All of these settings can be adjusted accordingly when taking test shots at the final step in this stage and also in stage 4. The settings provided should be used as a starting point. Your camera screen should look something like Figure 29 with your aperture number being 3.5 or 5 depending on your choice.
Figure 29: On screen camera settings for vehicle light trails
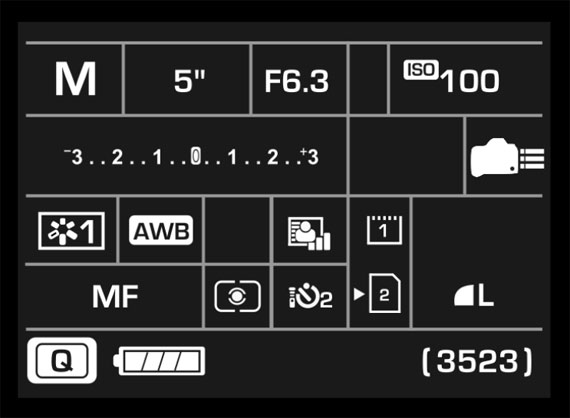
These are the settings that I used and this is how my camera screen appeared when all settings were made. Aperture 6.3 worked best for me at this location.
(C) Focus – Use your camera’s autofocus to focus on the central area of the frame or the general area of where the action will occur. After this has been achieved, turn your camera onto manual focus.
Thirdly, you need to get your camera in focus. Ensure the autofocus function is turned on, this is usually a switch labelled ‘AF’ on the side of your camera lens. After that, use the autofocus function to focus on the centre of the frame. This can be accomplished by looking through the viewfinder on your camera and pressing the autofocus button. While doing this you will see autofocus points appear. When you see the autofocus points appear roughly in the middle of the frame you are ready. Then, turn your camera onto manual focus to lock the focus you made.
Figure 30 shows how the autofocus points appeared on my camera;
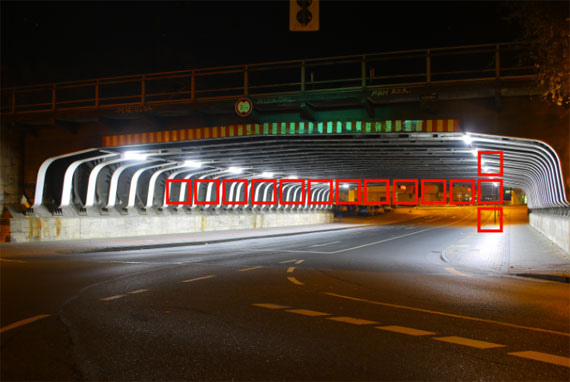
Figure 30: Vehicle light trails autofocus points
(D) Take test shots – with positioning decided on, the focus made and the initial camera settings set, test shots need to be taken to determine everything is ready. Take several test shots adjusting (B) and/or (C) until you get a photo that looks suitable.
Lastly, to finish the set up stage you need to take some test shots. This will make you become aware that everything is set and in place for you to move onto the next stage. The test shots are to determine that your camera is in focus and to establish the camera settings are producing a photo that is not too light or too dark. While you are taking test shots, don’t worry too much about any passing vehicles.
After viewing your test shot, if it is needed, adjust the focus and take another, repeat readjusting until you get a photo that is clear. Also, if it is needed, adjust the aperture from the initial camera settings provided and take another, repeat readjusting until you get a photo that is not too light or too dark. When adjusting the initial camera settings provided, between each test shot, increase or decrease the aperture only by 1 until you get a photo that is suitable.
Once you get a photo that is suitable and is in focus, you are ready to move onto the execute stage.
Originally I had my camera settings set at ISO 100, aperture 4 and shutter speed 4 seconds. However I changed them slightly to ISO 100, aperture 6.3 and shutter speed 5 seconds. The aperture was changed because the test photo was a bit too light. The shutter speed was changed because I wanted to make sure I captured a long light streak. This is how my test shot looked that provided me with the recognition I was ready to move onto the execute stage. You should aim to get a photo that has the same lighting as mine shown in Figure 31;
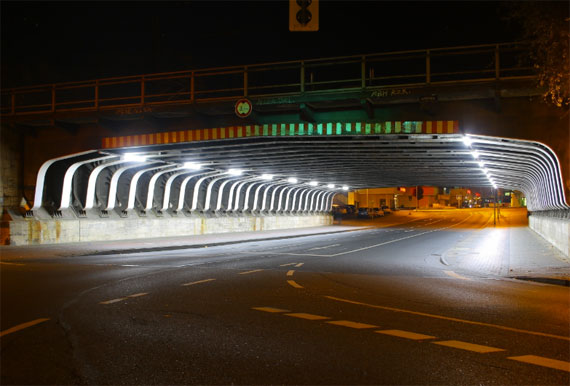
Figure 31: Appropriate looking vehicle light trails test shot to proceed
Stage 3 – Execute
(A) Just before the moment you want to capture, set off the self timer OR set off the self timer then go to your position OR go to your position then press the button on the remote to trigger your camera to take the photo.
Having sorted out all the necessary aspects in relation to your camera at stage 2, you are ready to capture the light trails of a vehicle driving past at your location. As you need to set off the self timer just before the moment you want to capture, this step heavily relies on anticipation!
There are two important things that need to be taken into consideration. The first is that the self timer takes a few seconds before the camera starts taking the photo after pressing the button. The second is that the self timer must be pressed just before the moving vehicle comes into your frame. So, when the moving vehicle is approximately one or two meters away from entering your frame, press the button to set off the self timer.
As I positioned myself at a set of traffic lights this helped me anticipate when to execute the shot. The first vehicle in line was a bus, so I waited for the traffic light to turn green then when it was about one or two metres away from coming into my frame I set off the self timer.
(B) Either wait for the camera to capture the photo or perform the action needed to create the photo.
Once you hear the sound the camera makes when it is taking a photo, simply wait until the photo has finished being taken before moving onto analysing in stage 4.
I waited the five second duration as I set the shutter speed to five seconds.
Stage 4 – Analyse
(A) Examine photo – once the camera has finished taking the photo, look at the screen to see what you have captured.
After the camera has finished taking the photo, you must examine it. This allows you to recognise any mistakes that you can correct in your next attempts. It also allows you to notice any adjustments that need to be made to the camera settings. It is totally optional but you can take more than one photo before examining and analysing.
After analysing my photo I was happy with the focus and lighting, it was just a matter of capturing light streaks that I was satisfied with.
(B) Make adjustments – after analysing your photo, make adjustments if any are necessary. You may need to adjust (A) and/or (B) and/or (C) from stage 2.
After examining your photo/s it should become apparent if any adjustments need to be made. Any adjustments needed to be made could be a combination of the following:
(1) Frame – you may need to readjust the frame position.
(2) Focus – the photo/s taken might be blurry and you may have to refocus.
(3) Brightness – the photo/s you took might be too bright or too dark.
If they are too bright, to make the photo darker you can either increase the aperture or decrease the shutter speed. I would recommend that you increase the aperture because if you decrease the shutter speed you run the risk of cutting the light trail short.
If they are too dark, to make the photo brighter you can either decrease the aperture or increase the shutter speed or increase the ISO. I would recommend that you decrease the aperture if possible. If this is not possible then increase the shutter speed slightly. After repeating the execution, if you find your photo is still not bright enough, then increase the ISO and try not to go above ISO 400.
After adjusting my camera settings slightly when I took my test shots, I did not need to make any further adjustments. All I needed to do was capture vehicle light streaks that I was satisfied with.
(C) Repeat stage 3 (execute) and stage 4 (analyse) until you are satisfied with the photo.
Simply repeat the execution from stage three and analysis from stage four until you capture a photo that you are pleased with.
After 23 attempts I captured a photo that I was satisfied with. As I knew buses drove past my location, I waited until a bus came before taking a photo. The reason for this was because large vehicles produce light trails that are more interesting than ordinary cars or smaller vehicles. Figure 32 my final vehicle light trails photo;
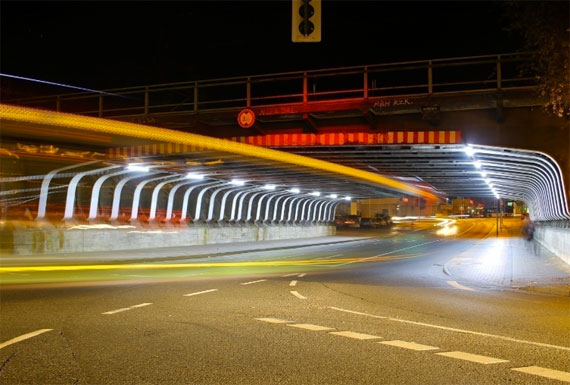
Figure 32: Final vehicle light trails example photo
Conclusion to chapter
Similarly to light painting words, learning how to take vehicle light trail photos is also very beneficial to your ability to take other types of long exposure photos. Both are similar in the way that they are not too complex to take and do not involve too much consideration. They were intentionally put first to learn because they are great starting points due to the simplicity and straightforwardness of them.
From this, valuable skills and knowledge will be gained which gives you a solid foundation to move forward onto more complicated procedures. What separates capturing vehicle light trials from light painting words is that you never know what kind of photo you are going to get. The unknown outcome of this photo type makes the undertaking of it a fascinating prospect. Be sure to venture into this photo type and you will produce stunning photos!
Before this chapter comes to a final conclusion you are being left with seven valuable tips. These tips will help you when moving forward and assist in taking better photos. They will also improve your overall efficiency when undertaking vehicle light trail photos in the future.
- Aim to capture the light trails of large vehicles. They produce interesting light trails with different colours compared to an ordinary car.
- Try to capture the light trails of a vehicle that is driving around a corner or curve in the road. The light trail produced will be far more impressive than if the vehicle is just driving in a straight line.
- Before taking a photo, try to visualise how/where the vehicle will enter, move and exit (if at all] your frame.
- When capturing the light trails of motor vehicles, choose a location that has a sufficient amount of them passing by. You do not want to be waiting several minutes between shots.
- The background adds extra interest to the photo. Choose somewhere that has a bit of detail in the background such as the bridge in the example photo given in this chapter.
- Choose a location where light trails in different directions will be produced. Examples include a location where multiple roads merge together, a location where you get vehicles driving in opposite directions, a roundabout where multiple vehicles will create circular shaped trails and interesting patterns as they enter/ exit/ drive through.
- If you use your own vehicle, you have full control over the light trails created!
About the Author:
Gimagery is an internationally known, multitalented professional photographer based in the UK. Although his extensive portfolio comprises of hospitality, commercial, travel, landscape and architectural photography, he is a long exposure specialist and has established himself as an expert in his field. As a renowned photographer he has been featured by some of the biggest entities in the photography industry such as Digital Photography Review, Light Stalking, Photographycourse Net, The Photo Argus, PhotoWhoa and PictureCorrect.
Having attracted a considerable following, he became best known for his artistic creativity by using techniques that result in producing unique images that intrigue and captivate. His supporters have become accustomed to his trademark use of light sources to create the illusion/impression of movement in his photos and bringing static objects to life. He is the pioneer of two long exposure photo types he created which are outlining and trajectory.
In the photography world, Gimagery’s greatest desire and ambition is simply to inspire creativity. This aim is facilitated by enlightening readers of his articles and clientele of his one-to-one experience packages to the discipline of long exposure photography. They receive expert knowledge and are left fully equipped with the skills to create eye-catching images. Taught with the reputable and self-developed after dark photography formula, he ensures an in-depth theoretical and practical understanding of the process is acquired. Readers and clients appreciate his comprehensive systematic approach, easy-to-understand writing and teaching style along with the ability to give explanation on complex and often confusing aspects of photography.
You can see his work on his Instagram @gimagery_ and he offers photography services along with fine prints on his website gimagery.net.
For Further Training:
A Beginner’s Guide to After Dark Photography enlightens you to the discipline of long exposure photography in a way that has never been done before. It provides in-depth step-by-step guides with interactive running examples on how to take five different types of long exposure photos; light painting words, vehicle light trails, steel wool, outlining and trajectory.
Readers outside the United States can find the book here. The six main objectives of the book are; introduce what to expect, provide a firm understanding of the theory and practical side to the entire process, prepare you for all aspects in relation to camera and photography equipment, outline safety measures and precautions, get you to apply all knowledge acquired whilst following individual guides to successfully take the photos and to equip you with knowledge and skills to further explore this discipline.
Found here: After Dark Photography Book
Like This Article?
Don't Miss The Next One!
Join over 100,000 photographers of all experience levels who receive our free photography tips and articles to stay current:


