Today’s tutorial kindly comes to us from Gim Liu, author of the new book After Dark Photography (readers outside the US can also get the book here).
In this lesson, you are taught how to create a photo where the motion of hot embers from steel wool flying through the air are displayed as streaks of light. In short, you will be using steel wool to set on fire and spin around whilst outdoors in a dark environment. While your camera is taking a long exposure photo, it will capture orange/gold streaks of light created by the glowing hot steel wool embers that fly out.
Caution: It is extremely important that you do not attempt any steel wool photos without reading, understanding and following the safety measures and precautions outlined below. Furthermore, proceed at your own risk.
Without any further ado, let’s move onto the bit where all the magic happens!
Stage 1 – Plan
(A) Decide what kind of photo you want to create or capture.
AND
(B) Location – choose where you will take the photo.
These two steps of the planning stage have been put together because they are closely linked when taking this type of photo. The end result is greatly determined by where you take it. In order to create an interesting steel wool photo, the background is as important as capturing the steel wool being spun.
The main consideration for choosing your location should be that the spot is in total darkness or has very low levels of artificial light. In addition, you want to choose a location where the backdrop will enhance the attractiveness of your photo and make it more interesting.
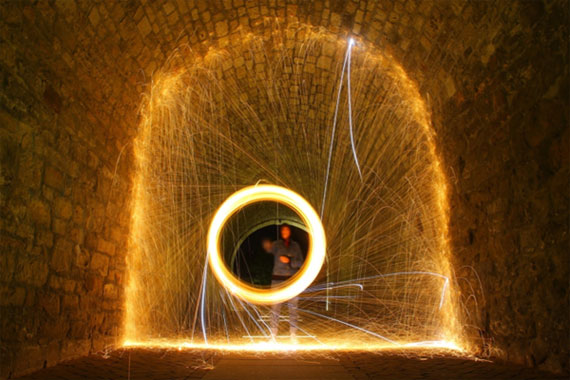
For the example, I chose to create a steel wool photo inside a tunnel.
(C) Equipment – gather all necessary equipment that is needed for the shot.
Lastly, you need to get together all the equipment needed to create the photo. For this particular shot, you will need all of the essential items in Table 8 and some or all of the optional items. These items are needed in addition to the different pieces of clothing and safety equipment stated in chapter 5.
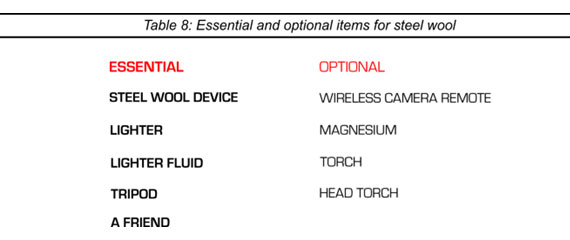
I used all five essential items with a torch and magnesium from the optional items to create the example photo.
Stage 2 – Set up
(A) Positioning – If you are going to be in the shot, decide where you will stand OR decide where your camera must be placed so it can capture what is intended. After that, place the tripod down so the camera can sit on top and be aimed at the chosen frame. Next, put the camera on top of the tripod, turn it on and line up the frame as necessary.
Firstly, you must decide where to position yourself to spin up the steel wool. This should be at a minimum distance of six metres away from the camera. Once your position is chosen, remember this place or put something on the floor to mark it.
After that, place your tripod down (about six metres away) so your camera can be put on top and aimed at this position. Put your camera on top of your tripod, turn it on and, if needed, zoom out so you can see the entire area where you will spin up the steel wool. It is important to consider that when spinning the steel wool it will fly outwards and upwards so leave enough space in the frame to see this.
Then, look through the viewfinder on your camera to check the following three things: (1) Nothing is in the shot that you don’t want such as anything that is obstructing or getting in the way of the frame (2) The frame is reasonably straight (3) The camera is positioned exactly in the centre taking into consideration where you will stand.
My chosen position to spin the steel wool was approximately six meters away from the camera.
(B) Camera settings – set the ISO, aperture, shutter speed and select the self timer.
Secondly, the camera settings need to be set. When making the camera settings for this type of photo you must use your own initiative in order to find the precise settings that are needed. This is because the settings needed solely depend on the amount of light there is at your location. Nevertheless, advice is given in order for you to find the right settings for your shot.
First, put your camera into manual mode. This allows you to set the ISO, aperture and shutter speed as you want them. Second, set the ISO to 100 (standard ISO used for most long exposures). Third, set the aperture to 3.5 or the lowest aperture that your camera allows if your location is in near to total darkness. If your location does have some light, try your aperture at 8. Be aware that for this shot you will need to play around with the aperture to find which aperture number works best for the lighting at your location. Fourth, set the shutter speed to 10 seconds. Fifth, set your camera to self timer/remote mode.
All of these settings can be adjusted accordingly when taking test shots at the final step in this stage and also in stage 4. The settings given here should be used as a starting point. Your camera screen should look something like Figure 33 with your aperture number possibly being 3.5 instead of 8 depending on your choice.
Figure 33: On screen camera settings for steel wool
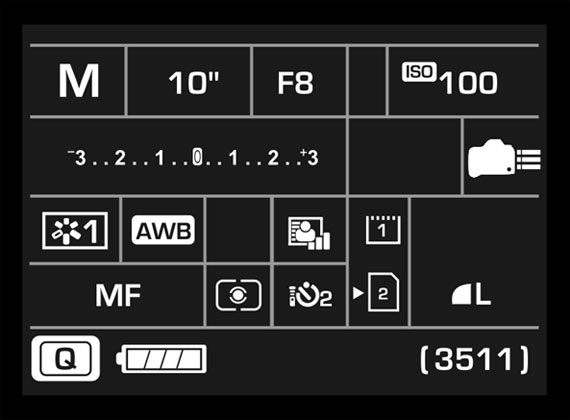
These are the settings that I used and this is how my camera screen appeared when all settings were made.
(C) Focus – Use your camera’s autofocus to focus on the central area of the frame or the general area of where the action will occur. After this has been achieved, turn your camera onto manual focus.
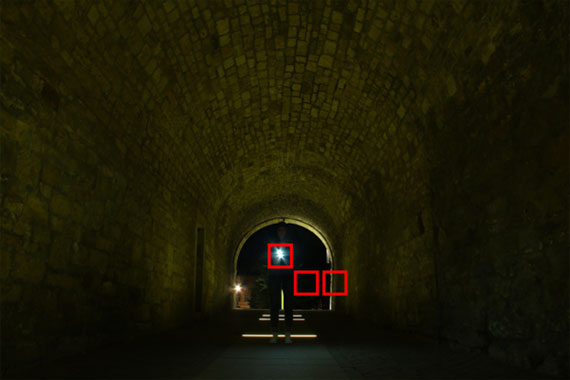
Thirdly, you need to get your camera in focus. Ensure the autofocus function is turned on, this is usually a switch labelled ‘AF’ on the side of your camera lens. Now, tell your friend to stand in the chosen position where the steel wool will be spun with a torch and point it at the camera. After that, use the autofocus button to focus on the light of the torch. This can be accomplished by looking through the viewfinder on your camera and pressing the autofocus button. While doing this you will see autofocus points appear. Once the autofocus points appear on and around the torch light you are ready. Then, turn your camera onto manual focus to lock the focus you made.
Figure 34 shows how the autofocus points appeared on my camera by using this technique;
Figure 34: Steel wool autofocus points
(D) Take test shots – with positioning decided on, the focus made and the initial camera settings set, test shots need to be taken to determine everything is ready. Take several test shots adjusting (B) and/or (C) until you get a photo that looks suitable.
Lastly, to finish the set up stage you need to take some test shots. This will make you become aware that everything is set and in place for you to move onto the next stage. The test shots are to determine that your camera is in focus and to establish the camera settings are producing a photo that is not too light and is rather dark. For each test shot ask your friend to move the torch in a circular motion for the entire duration of the photo.
After viewing your test shot, if the photo is not clear, simply adjust the focus until you get a photo that is clear. However, if the autofocus points appeared on and around the torch light when you made the initial focus this should not be a problem and won’t need adjusting. Additionally, if the photo is too light or too dark, adjust the aperture from the initial camera settings provided until you get a photo that is not too light and is rather dark.
Before moving on to the execute stage you should get a photo that is in focus and appears rather dark. The reason why you need the photo to appear rather dark is because once you perform the execution the light given off from the steel wool will make your photo significantly lighter. It is important to note that when adjusting the camera settings, it will only be the aperture that needs increasing or decreasing slightly.
This is how my test shot looked that provided me with the recognition I was ready to move onto the execute stage. You should aim to get a photo that has the same darkness as
Figure 35;
Figure 35: Appropriate looking steel wool test shot to proceed

Stage 3 – Execute
(A) Just before the moment you want to capture, set off the self timer OR set off the self timer then go to your position OR go to your position then press the button on the remote to trigger your camera to take the photo.
Having sorted out all the necessary aspects in relation to your camera at stage 2, you must prepare to spin up the steel wool. There are five necessary parts to this preparation:
- The person who will perform the execution must go to the chosen position with the steel wool device.
- Cover the toilet paper that the steel wool is wrapped in with lighter fluid and light it.
- Once alight, let it burn for approximately one minute. Twist and turn the steel wool device so the whole area burns.
- After one minute of letting it burn, swing it in a circular motion to test if the steel wool flies out of the whisk. If it doesn’t fly out yet, wait for it to burn enough so that steel wool flies out and, if needed, relight and/or cover it in lighter fluid again.
- Wait until you successfully test that the steel wool is flying out of the whisk before taking the photo. When the test is successful, stop and tell your friend to set off the self timer.
(B) Either wait for the camera to capture the photo or perform the action needed to create the photo.
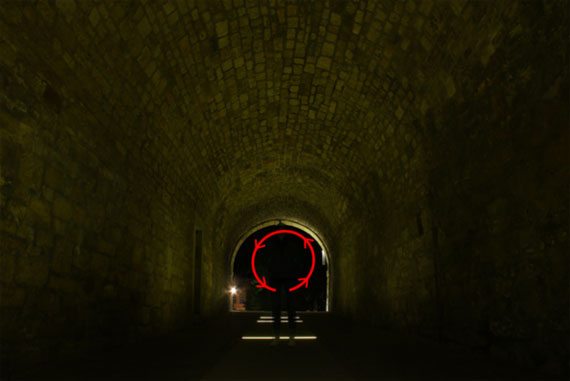
Once the person operating the camera hears the sound that the camera makes when it is taking a photo, inform the other person to proceed in swinging the steel wool device in a circular motion for the 10 second duration of the photo.
As illustrated by Figure 36 my friend swung our steel wool device in a circular motion at a distance of six metres from the camera. The circle shape swung by the steel wool device had a diameter of approximately 144cm.
Figure 36: Steel wool execution illustration
Five important points regarding the execution:
- When swinging the steel wool in a circular motion it must be done with quite some force. The power needed in the swinging must be enough to propel the steel wool out of the whisk. To give an idea of the power and speed that is needed to do so, in my example, the steel wool device was swung roughly 40 rotations in the 10 seconds which is about 4 rotations per second.
- When spinning steel wool, no matter what the distance is from the camera, you should aim to swing a circle shape with the diameter of approximately 144cm. This is slightly above head height and slightly below waist height.
- You should hold the lead/strap/cord that is attached to your whisk approximately 38cm from the bottom of the whisk which is also approximately 72cm from the top of the device.
- Communication is key between the person swinging the steel wool and the person operating the camera in order to capture the photo at the right moment.
- Each piece of steel wool is enough to take two photos and sometimes possibly a third. So when the camera has stopped taking the first photo, stop swinging the steel wool device, set off the self timer and swing the steel wool again for the 10 second duration of that photo. Repeat this as many times as the steel wool lasts.
Stage 4 – Analyze
(A) Examine photo – once the camera has finished taking the photo, look at the screen to see what you have captured.
After taking the steel wool photo, you must examine the photo you have taken. This allows you to recognise any mistakes that you can correct in your next attempts. It also allows you to notice any adjustments that need to be made to the camera settings.
As each piece of steel wool is enough to take two or three photos, I took photos in sets of three before examining them.
(B) Make adjustments – after analysing your photo, make adjustments if any are necessary. You may need to adjust (A) and/or (B) and/or (C) from stage 2.
After examining your photos it should become apparent if any adjustments need to be made. Any adjustments needed to be made could be a combination of the following:
- Distance from the camera – you may need to move closer or further away from the camera to fit everything in the frame as desired.
- Focus – the photo/s taken might be blurry and you may have to refocus.
- Too bright – the photo/s you took might be overexposed. This can be due to either too much power and speed when swinging the steel wool device, or your original camera settings not being ideal. For the first scenario, to counteract this simply decrease the power and speed of swinging the steel wool device. For the second scenario, either decrease the shutter speed slightly or increase the aperture.
- Too dark – the photo/s you took might be too dark. This can be due to either not enough power and speed when swinging the steel wool device, or your original camera settings not being ideal. For the first scenario, simply increase the power and speed of swinging the steel wool device. For the second scenario, either increase the shutter speed slightly or increase
the ISO. However, I recommend that you only increase the shutter speed. This is because when the ISO is increased to higher numbers, images become grainy and therefore the quality decreases. If you choose to increase the ISO, try not to go above ISO 400.
My camera focus was perfect and the settings of ISO 100, aperture 8 and shutter speed of 10 seconds were ideal. However, I did need to adjust the position where the steel wool was spun. Originally my chosen position was actually seven or eight meters away from the camera. After examining my first set of photos I decided that the distance was too far away and it needed to be closer.
(C) Repeat stage 3 (execute) and stage 4 (analyse) until you are satisfied with the photo.
Simply repeat the execution from stage three and analysis from stage four until you create a photo that you are pleased with.
In the end I took two sets of three photos before getting my final photo in the second set. As stated, I changed the position where the steel wool was spun in order to get a photo I was satisfied with. Figure 37 is my final steel wool photo;
Figure 37: Final steel wool example photo
Conclusion to chapter
Learning how to take a steel wool photo is rather complex in comparison to light painting words and vehicle light trails. There are many things to consider throughout the entire process which can make it a challenging task. However, once you grasp how to do it, you will have the skills and knowledge to nail all other types of long exposure photos. As long as you follow all the stages and steps provided when moving forward, you will be fine.
While you are still new to steel wool photography, I recommend keeping it simple at first. By not over complicating shots you can focus entirely on all the individual steps needed to be taken. Doing so will help you to familiarise yourself with everything that has to be done. Once you start to gain experience in taking steel wool photos and become comfortable with it, slowly move onto being more creative with shots.
A final and very important point to make is that you are literally playing with fire so always be very careful!
Staying Safe
This entire chapter describes the crucial safety measures and precautions that must be taken and under no circumstances should be ignored. It outlines general safety measures along with the safety measures specifically for the photo types: steel wool, outlining and trajectory. When these safety precautions are not taken, there is a risk of harm to yourself and/or others and also damage to property and/or possessions. Safety is paramount in the undertaking of all photos taught in this book. The safety measures outlined for the photo type steel wool goes into far greater detail as it is undoubtedly the most hazardous.
General safety measures & precautions
Clothing
You must always wear clothing that provides you with maximum protection which leaves no skin exposed. This is imperative to ensure that you do not get hurt when taking these types of photos. It is necessary to wear the following:
- Hood and/or hat to cover your head and hair
- Safety goggles or sunglasses to protect your eyes
- Gloves to protect your hands
- Long trousers to protect your legs
- Hoodie or jacket to protect your top half
- Fully enclosed shoes to protect your feet
All pieces of clothing in the above list should be made out of natural fibres such as cotton. Clothing made from synthetic materials like nylon and polyester are extremely hazardous as they melt. Additionally, it is best to wear clothes that are old. You do not want to damage your favourite hat or the new jacket you just bought!
Extinguisher
As you are literally paying with fire, you must bring along something that can extinguish any flames or embers. This can be in the form of an actual fire extinguisher or a sufficient amount of water. Even having chosen a suitable location that has no flammable materials nearby, and doing it at a time where the environment is wet; you must still limit the risk of starting a fire.
You do not want any accidents or damages occurring. Having a fire extinguisher or a sufficient amount of water with you is also useful to put out and/or cool down your steel wool device or sparkler after it has been used.
Time
As all of these photos are long exposures, you will need to take them at night when it is dark. After dark there will be less people out and about that could get in your way. Generally, the later it is, the fewer members of public will be around. With this in mind, try to go out later and avoid busier times which are typically between 5pm and 9pm. Between 10pm and the early hours of the morning is suitable. Going out after 9pm will lessen the chances of getting interrupted by anyone. The activity of carrying out the photo types in this book will attract the curiosity of people. The general public or law enforcement will be curious to know what you are doing which will inconveniently cause disruption. Avoiding this will enable you to carry out your photography in peace and allow you to concentrate on what you plan to do. An advantageous time to go out and take these long exposure photos would be when the ground is wet. This can be just after it has rained or early in the morning when there is dew on the ground making it moist. When the environment and its surroundings are wet it makes it much safer by reducing your risk of causing a fire.
Additional precautions
Before describing the safety measures and precautions specific to steel wool, outlining and trajectory, there are few further points to be made. When taking any of the photos in this book, please practise common sense and always be considerate throughout. Drawing upon your common sense to make good judgements will not only ensure everything runs smoothly but also help keep you and others safe. Finally, always be considerate to others and your surroundings. Using your ability to be considerate will help prevent causing trouble or harm to others and the environment.
Safety measures & precautions for steel wool
It is important to stress that steel wool photography is potentially dangerous. You are playing with fire which involves spinning extremely hot pieces of molten metal around in a circular motion. This action sends the burning hot metal embers of the steel wool in many directions. If you are not careful, the steel wool can burn you or start a fire. Therefore, the following safety measures must be taken to keep you, others and the environment safe. Additionally, do not underestimate the potential danger.
Location
Make sure that the location you choose does not have any flammable materials nearby such as dead grass, dead trees, motor vehicles and wooden structures. All of the previously stated can potentially catch fire from the steel wool. Wooden structures are particularly hazardous and taking a steel wool photo near them should never be attempted. Although wooden structures such as boats and abandoned houses may seem like an interesting location to take a steel wool photo, they should be avoided as they can catch fire. They have an extremely high risk of catching on fire as the wood can be very dry and it can be covered in flammable substances such as its old paint.
Ideal locations to take steel wool photos are in secluded/remote areas that are away from the general public. Examples of these places are beaches, deserts, big open spaces and generally anywhere that has a concrete floor. It is important to choose a secluded/remote area that is also away from the general public because you do not want to injure anyone and also you do not want to be disrupted by law enforcement due to their curiosity of wanting to know what you are up to.
A final important point which should always be remembered is under no circumstances should you take a steel wool photo indoors.
Positioning
During the action of spinning the steel wool, it flies out and travels a long way. The sparks fly out to the left, right and above. Depending on the strength and speed of the spinning action, the sparks can fly out up to 13 metres in the directions mentioned. For this reason you should ensure you that you have plenty of space between you and anyone or anything nearby. If there is not enough space between you and anyone or anything nearby there is a risk of damage or injury. You do not want to damage anyone’s property or belongings and you certainly do not want to injure someone. Thus, make sure that all objects and any people are at a safe distance from whoever is spinning the steel wool so no injuries or damages occur.
Check before leaving
After finishing taking your steel wool photos do not leave the location immediately. Take a walk around the site to look for any burning steel wool embers and/or smoke. Carefully check the entire area to be sure that nothing is left burning after you have left. Embers can stay burning for some time before going out so there is a potential for it to cause a fire when you are gone if it is not put out. If you find any burning embers, extinguish them with the fire extinguisher or water that you have brought along. It is recommended that you remain at the location for at least ten minutes before leaving after you have finished.
Additional safety measures
There are two additional safety measures to be remembered when undertaking a steel wool photo. First, you should always make sure that the whisk and dog lead/chain that forms your steel wool device are attached together firmly. This will avoid any dangerous outcomes that could occur. Second, you will be using lighter fluid and a lighter to ignite the steel wool. Before commencing, ensure that you have put both of them away to avoid any fires being caused.
Notice of liability/Disclaimer – The information in this article is distributed on an “As is” basis, without warranty. While every precaution has been taken in the preparation of this article, neither Gim Liu nor PictureCorrect shall have any liability to any person or entity with respect to any loss or injury or damage caused or alleged to be caused directly or indirectly by the instructions contained in this article or by the equipment described in it. All readers are advised to proceed entirely at their own risk.
About the Author:
Gimagery is an internationally known, multitalented professional photographer based in the UK. Although his extensive portfolio comprises of hospitality, commercial, travel, landscape and architectural photography, he is a long exposure specialist and has established himself as an expert in his field. As a renowned photographer he has been featured by some of the biggest entities in the photography industry such as Digital Photography Review, Light Stalking, Photographycourse Net, The Photo Argus, PhotoWhoa and PictureCorrect.
Having attracted a considerable following, he became best known for his artistic creativity by using techniques that result in producing unique images that intrigue and captivate. His supporters have become accustomed to his trademark use of light sources to create the illusion/impression of movement in his photos and bringing static objects to life. He is the pioneer of two long exposure photo types he created which are outlining and trajectory.
In the photography world, Gimagery’s greatest desire and ambition is simply to inspire creativity. This aim is facilitated by enlightening readers of his articles and clientele of his one-to-one experience packages to the discipline of long exposure photography. They receive expert knowledge and are left fully equipped with the skills to create eye-catching images. Taught with the reputable and self-developed after dark photography formula, he ensures an in-depth theoretical and practical understanding of the process is acquired. Readers and clients appreciate his comprehensive systematic approach, easy-to-understand writing and teaching style along with the ability to give explanation on complex and often confusing aspects of photography.
You can see his work on his Instagram @gimagery_ and he offers photography services along with fine prints on his website gimagery.net.
For Further Training:
A Beginner’s Guide to After Dark Photography enlightens you to the discipline of long exposure photography in a way that has never been done before. It provides in-depth step-by-step guides with interactive running examples on how to take five different types of long exposure photos; light painting words, vehicle light trails, steel wool, outlining and trajectory.
Readers outside the United States can find the book here. The six main objectives of the book are; introduce what to expect, provide a firm understanding of the theory and practical side to the entire process, prepare you for all aspects in relation to camera and photography equipment, outline safety measures and precautions, get you to apply all knowledge acquired whilst following individual guides to successfully take the photos and to equip you with knowledge and skills to further explore this discipline.
Found here: After Dark Photography Book
Like This Article?
Don't Miss The Next One!
Join over 100,000 photographers of all experience levels who receive our free photography tips and articles to stay current:


