 If you have ever wanted to improve your digital photography then you may want to consider learning about High Dynamic Range. If you have heard of this term in digital photography, but are not sure what it is, then keep reading because it will serious change the way you look at your digital photography images. What High Dynamic range does in your digital photography is simultaneously lighten your underexposed areas and darken your overexposed areas. Working with your Dynamic Range will aim to create digital photography images as your own eye would see them; even light all over the scene.
In the digital photography world Dynamic Range simply refers to the range of light (luminance) vales from the darkest to brightest. In the real world is really the range of dark to bright sections of light that you can see with the naked eye. This is transferred to digital photography and it given the name Dynamic Range. Digital Photography Dynamic Range is the range of light on your digital camera sensor that can be captured without having the higher light or lower light values altered or edited. In digital photography speak High Dynamic Range simply means a higher range of light values.
You will notice that after understanding Dynamic Range that your digital photography can be improved dramatically and, very fast. Digital photography Dynamic range can improve aspects of your image such as adding a sense of drama to your cloudy landscapes, giving detail to lines of colour, toning down some overexposed parts of light sections of a digital image.
You may find that when photographing things outdoors in your digital photography such as landscapes, beach and snowscapes etc, you have a lot of contrasting highlights that slow your progress down. To overcome sections of high contrast you can use ND filters, a polariser, exposure bracketing, post editing in Photoshop etc, etc, the list goes on what you can do in digital photography but really, to get a more accurate exposure working with your Dynamic Range will be more effective.
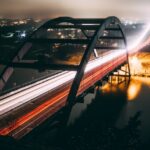
You can get a good idea of digital photography Dynamic when you go outside and look at the light. For example High Dynamic Range is the bright sunlight on a typical outdoor, sunlit scene. In saying that, a Low Dynamic Range may correspond to darker areas such as a dimly lit room.
 Let’s take my Sony digital camera to use as an example. It has 6 stops of Dynamic Range. The Dynamic range’s objectives are to capture more dynamic range. While it’s easy to capture daylight scenes with the Sony, in some instances like landscapes, more Dynamic Range might be needed. So in this case producing my High Dynamic Range requires that I take some separate exposures. Then I place all of the brightness levels that I want in my final image that my Sony’s sensor can record properly. What this means is putting the darkest values no lower than in the mid-range of the sensors light sensitivity range.
In the wonderful Adobe Photoshop I may decide to take a handful of exposures to cover the complete dynamic range. In each photo exposure I keep the aperture the same (changing aperture changes the depth of field). My aim here is to create different photos making sure that in each I cover the available brightness levels in the landscape.
I take a collection of photos of my landscape at about 1 stop changes in each photo. I don’t do this by altering the f stop I do this via my shutter speed. To check whether I’ve got variation in my exposures I can check the histogram to see whether I have adequately captured the scenes brightness.
Once I have all my exposures in the camera I go home and check it out in Adobe Photoshop. What I should be able to do then is edit them and create a picture as my own eye would see; good lighting on the foreground and good lighting on the background, without over exposure of the sky or underexposure of darker parts of the land.
Have fun and happy shooting!
Amy Renfrey
If you are serious about creating superb, sharp and clear images just go to http://www.digitalphotographysuccess.com/.
Like This Article?
Don't Miss The Next One!
Join over 100,000 photographers of all experience levels who receive our free photography tips and articles to stay current:


Leave a Reply