There are certain amazing phenomenon around us that we ignore. Water drops fall into that category as the speed in which the splashes are created is too fast for a human being to observe and appreciate. But with the power of photography, we have the ability to freeze that moment and take some time to marvel at the sheer beauty of that tiny drop. Photographer and film maker Adam Karnacz shares his tips on water drop photography:
What are we looking for in water drop photography?
While shooting water drops, the intention is to capture the moment the water hits the surface, bounces back up and creates a “stem”. Think of a mushroom shape.
Things You Need for Water Drop Photography
Karnacz suggests the following items to capture a beautiful water drop photograph:
- food coloring
- complementary background
- xantham gum
- electronic dropper system
- speedlights
- macro lens
Setting Up a Flash for Water Drop Photography
It’s not a fast shutter speed but flash that freezes the water drop. You can set the flash to its lowest power and set your shutter speed to the flash sync speed. You can also use two speedlights in the setup: one to light up the water drop and the second to light the background. Keep in mind that the angle and placement of the speedlight used to light up the water droplet will determine the final quality of the photograph. So try placing it in various places until you’re satisfied with the result.
Setting Aperture
Be mindful that macro lenses have a very shallow depth of field. Even when you’re shooting at a smaller aperture, say f/8 or f/11, small areas of the frame will be in focus. So, experiment with the aperture until you’re happy without hesitating to go with a narrow aperture setting.
Setting up the Focus
Karnacz has shared a pretty neat trick to set up the focus while shooting water drops. First, allow the water to drop for some time and notice the point where the drop makes contact with the surface. Then, place a pencil over that area and focus your lens on the pencil. Once in focus, switch the lens over to manual focus mode and make no further changes on the focus or the camera position.
You’ll notice in the video that Karnacz uses an electronically controlled dropper, which controls the size of the drop, interval between the first and second drop, size of the second drop, and also fires the camera. This type of device can make the entire shoot a little easier, but if you don’t happen to own this technology, you can use a manual dropper and hope that your timing is perfect.
To capture a “perfect” water drop photo, you may need a lot of adjustments and practice. Have patience and keep shooting until you’re satisfied. Try variations of colors and backgrounds, and also try shifting the speedlight to various positions.
Post Processing Water Drop Photos
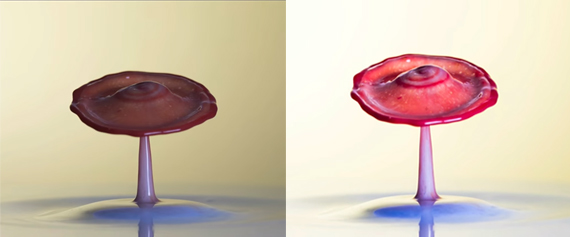
Water drop photo before and after post processing
After you’ve managed to shoot a composition of your liking, load the file up to the editor of your choice. These are some important points to consider while processing:
- Experiment with white balance. Sometimes a little tweak can have a massive difference in the look and feel of the photograph.
- If there are unnecessary reflections of the speedlight on the water drop, try getting that edited out.
- Since water drop photography is mostly about colors, adding a little bit of extra saturation and vibrance don’t hurt.
Remember that this genre of photography requires a lot of persistence. Don’t be thrown off by the difficulties you will face in the beginning stages. Keep practicing and you will definitely be able to get beautiful water drop photos.
Like This Article?
Don't Miss The Next One!
Join over 100,000 photographers of all experience levels who receive our free photography tips and articles to stay current:


Just keep up the good work