Everyone is guilty of using their camera improperly at some point. Sometimes even the pros make rookie mistakes. But, nobody is to be blamed. The experts over at B&H have compiled a list of eight mistakes that photographers make with their cameras. See if you’ve made any of them:
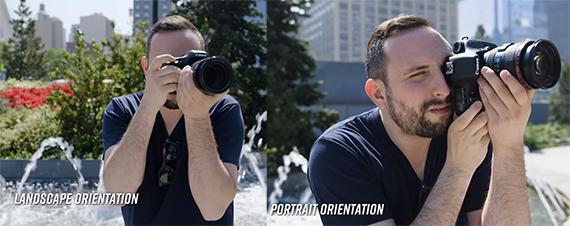
1. Improperly Holding the Camera
By improperly holding a camera the photographer is not able to distribute the weight properly. This can cause photos to come out blurry. Hold the camera with your right hand in charge of all the controls and your left hand supporting the lens and the camera from below. For better stability, your elbows should be tucked in close to your body. This can vastly reduce camera shake, especially while shooting with low shutter speeds.
2. Not Cleaning the Lens
During the course of numerous photo shoots, the front element of the lens can collect dust, dirt, and smudges, hugely affecting image quality. Images may appear soft, out of focus, and hazy. It’s thus a good idea to clean the lens on a regular basis using recommended lens wipes and cleaning cloths. A clean lens can also save you from spending hours in post recovering the image.
3. Not Having Enough Batteries or Memory Cards
Imagine how it would feel if you were out in the field for a shoot and your only battery was about to die or your only memory card was full. Professionals cannot risk getting into situations like this. Before heading out for a shoot, makes sure your batteries are fully charged and your memory cards have sufficient space. Pack spare batteries and memory cards in case you run out.
4. Not Adjusting the Focus Point
Many photographers use a traditional method of “focus and recompose” by relying on the center focus point. This method is a bit risky in the sense that while recomposing, if the photographer sways away from the initial plane of focus, the subject will be out of focus in the final image. Instead, set the focus point on the subject, focus, and take the photo.
5. Shooting in the Wrong Mode
Another mistake is to not know which mode to use in what circumstances.
- Auto Mode: This is fine if the user doesn’t know much about photography or just wants a quick snap. Beginners should learn to get off of this mode as soon as possible, as this mode allows little room for creativity.
- Aperture Priority Mode: This mode allows the user to control the depth of field by enabling him/her to change the aperture. Choose a smaller f-value (f/1.8,for example) for shallower depth of field and a larger f-value (f/11, for example) to have more of the frame in focus; the camera takes care of the shutter speed. Changing the ISO is also possible in this mode.
- Shutter Priority Mode: This mode allows the user to control the shutter speed. Choose a faster shutter speed (1/2000 second, for example) to freeze the action and a slower shutter speed (1 second, for example) in low light conditions or to capture the trails left by the subject; the camera will automatically choose the aperture. Changing the ISO is possible in this mode, as well.
- Manual Mode: This mode allows the photographer to have complete control over the camera. The photographer is responsible for choosing the aperture, shutter speed, and the ISO. The photographer thus has a full control over creativity.
Before making the jump from auto mode to manual mode, it’s recommended to go through aperture priority and shutter priority modes so that you have a better understanding of how changes in those variables affect the photograph.
6. Depending Too Much on Auto White Balance
In most situations, auto white balance works just fine. But there are situations when the camera meters a wrong light temperature and the entire photograph seems to have an unflattering color cast. This can be fixed by either using one of the white balance presets or by manually entering the correct temperature. RAW shooters might argue that white balance can easily be fixed in post. While this is true, why not to get it right in camera?
7. Not Shooting in RAW
RAW files have way more information stored in them compared to jpeg files. You can recover details from shadows and highlights, correct the white balance easily, recover an under or over exposed photo, and have lots of flexibility by shooting in RAW. So always shoot in RAW.
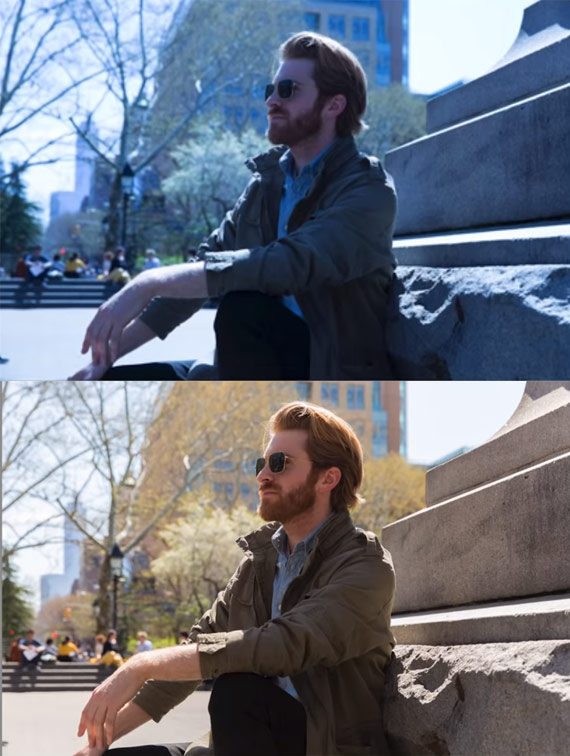
RAW photos have much more flexibility when it comes to editing compared to jpeg files.
8. Not Exposing Properly
By either over or underexposing a shot, we can lose details on the highlights and shadows respectively. If the lighting is very difficult due to a mixture of bright and dark scenes, it is recommended to underexpose, as most cameras do better in recovering shadow information than highlights. Go through your camera manual and understand how the different metering systems work in your camera. Also, if you feel that your camera is constantly under or over exposing in certain scenarios, try to use exposure compensation, which will deliberately over or underexpose the photograph.
So, are you guilty of committing any of these mistakes? Or do know about other common mistakes that photographers make? Let us know in the comments below.
Like This Article?
Don't Miss The Next One!
Join over 100,000 photographers of all experience levels who receive our free photography tips and articles to stay current:


Canon cameras tell you the actual aperture rather than the “functionally correct” aperture. The Canon EF series is a good option for macro photography.