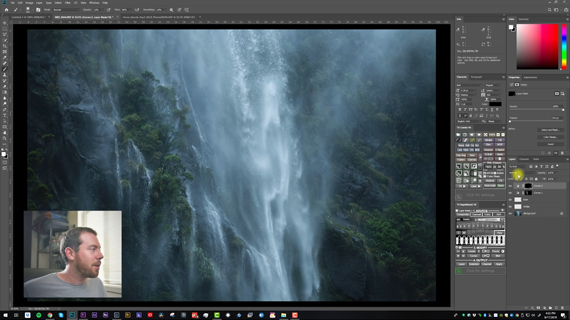
When capturing any image, a photographer wants the viewers to pay attention to certain things, and ignore the rest. If the viewers really view the image as the photographer intended, the image is successful. One convenient way to do so is by highlighting what you want the viewers to pay attention to, and by darkening the less important aspects. This can be achieved by using the dodge and burn tools in Photoshop. Landscape photographer Michael Shainblum goes over some simple techniques for dodging and burning your images to enhance the composition, and highlight elements of interest:
Before getting started with dodging and burning your images, a good idea is to first plan out what you can do to accentuate the image. Think of what regions in the image can be highlighted more, and what can be darkened. Once you have your plan laid out, go ahead with the rest of the process.
Dodging and Burning Using Blend Mode
Using blend mode is one of many ways to get started with dodging and burning your images. To dodge using blend mode:
- Create a new layer above your image, and change the blending mode to Soft Light.
- Select the brush tool and paint over the areas you want to highlight (dodge) with white color.
- Keep the opacity of the brush low (to about 5-10%) for subtle effect. Using a brush at low opacity multiple times over an area results in much better effect than using it at high opacity once.
- If you feel that the effect is too much, you can decrease the opacity of the layer.
Once done, you can switch the blending mode to Overlay to add some punch to the highlights. If it feels a little overdone, decrease the opacity of the layer you are dodging in.
Next, to burn using blend mode:
- Create a new layer, and change the blending mode to Soft Light.
- Brush over the areas you want to darken (burn) with black color selected.
- Again, be sure to use the brush at low opacity for a subtle effect.
Dodging and Burning Using Curves Adjustment
If you are not familiar with using curves adjustment, it is necessary to understand that pulling the curve downwards makes the image darker. On the contrary, if you pull it upwards, the image becomes brighter. The middle portion of the curve represents the mid-tones. The area to its right represents the highlights, and to its left lie the shadow areas.
To selectively add some contrast to the image using curves adjustment:
- Open the image you want to work with, and add a new Curves Adjustment Layer.
- Add contrast by pulling the highlights sections upwards and the shadows section downwards so as to create something called an S-curve.
- Add a mask to the layer and invert it by pressing Ctlr + I (Cmd + I in Mac). This will hide the contrasty look you’d just created.
- Select a brush tool with white color selected and paint over the areas in the image where you want to reveal the high-contrast look.
If certain regions in the image have unwanted highlights, you can get rid of them by following these steps:
- Add a new Curves Adjustment Layer.
- Take down the brightest highlights by pulling the upper right hand corner of the curve downwards.
- Add a mask to the curves adjustment layer, and invert it by pressing Ctrl + I (Cmd + I in Mac).
- Paint over the areas where you want to reveal the the curves adjustment layer with white. This will effectively reduce the highlights of that particular region.
Be sure to be very selective when working with your photos. You can work by zooming in to 100% for accurate results.
Try out these techniques to emphasize the interesting bits and strip the attention off of the distracting elements in your images. These dodge and burn techniques are a must-have in your arsenal of post-processing techniques.
Like This Article?
Don't Miss The Next One!
Join over 100,000 photographers of all experience levels who receive our free photography tips and articles to stay current:


Leave a Reply