Before you start creating beautiful images, it’s essential that you’re comfortable using your camera. In this video, photographer Mark Denney discusses three simple tests you can perform at home to become more comfortable with the exposure triangle and start taking better landscape photos:
1. Shutter Speed
Simply speaking, shooting with faster shutter speed exposes the sensor to light for a short period of time. On the other hand, shooting with a slower shutter speed exposes the sensor to light for a longer period of time. Besides exposure, shutter speed also controls movement.
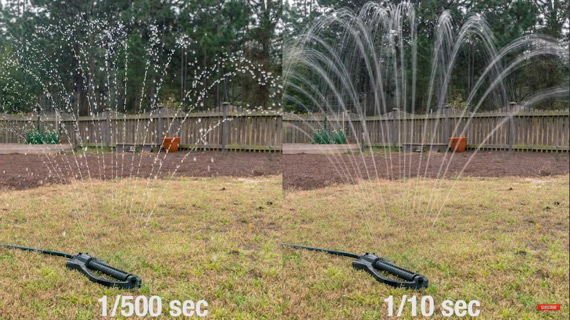
Movement in landscape photography can be categorized into two types: positive movement and negative movement. Positive movements are desired movements that make an image interesting. The movement of clouds and water, for instance, are positive movements. To determine what kind of positive movement you like in your images, set your camera to shutter priority mode, mount it on a tripod, and take a series of photos at varying shutter speeds. Your subject can be a sprinkler in your backyard or a small stream nearby (if you have one). With this practice, you’ll know where you should be starting.
Negative movement, on the other hand, has to do more with unintentional camera movement/camera shake. In certain scenarios, you may need to use slower shutter speeds but you may not have a tripod with you. You will need to rely on the camera’s in-body stabilization system or the lens’s optical stabilization. In any case, it’s important that you know your limit and understand how slow can you go handheld without introducing camera shake. To understand your limit, simply head out and photograph any stationary subject. Starting from a reasonably fast shutter speed like 1/60 second, take a series of images while continuing to reduce the shutter speed. Inspect the image sharpness after every shot and determine your shutter speed limit for handheld shots.
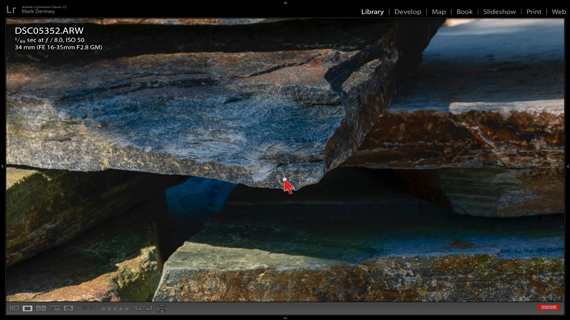
Handheld shot at 1/60 second
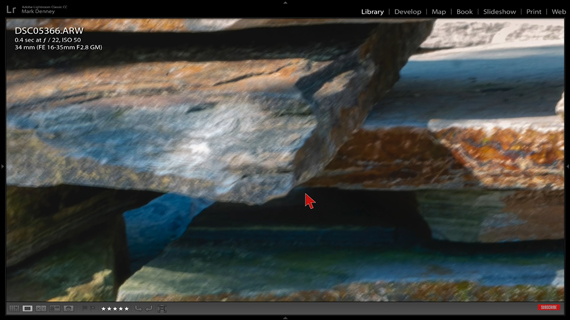
Handheld shot at 0.4 second
2. ISO Performance
The ISO value that you use correlates to the amount of digital noise and level of details in your image. The greater the ISO, the greater the noise and the lesser the details. Camera manufacturers boast of crazy ISO numbers that their cameras are capable of going to but those numbers don’t mean anything when it comes to usability. It’s essential that you know your camera’s ISO upper limit for getting an image that’s good enough for you.
A simple way of getting to know your camera’s ISO performance is to take images of the same subject while increasing the ISO value after every frame. Then later, evaluate for yourself on a bigger screen the level of noise that you’re comfortable with. Try to identify the highest ISO value at which there is a good balance between noise and details and set that as your upper ISO limit mentally.
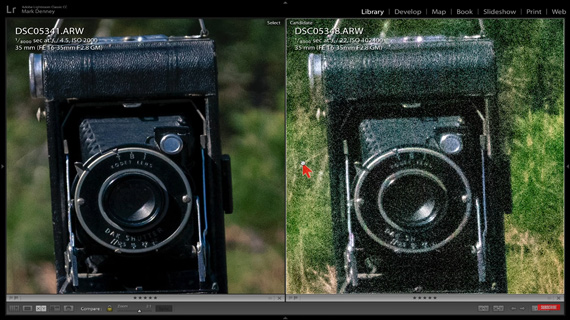
ISO 2000 (left) vs ISO 102400 (right)
In landscape photography, you mostly get away without increasing the ISO much as you can slow down the shutter speed to maintain proper exposure. But in cases when you want to freeze motion, bumping up the ISO becomes necessary.
3. Aperture
Getting the greatest depth of field is important in landscape photography. This allows you to have most of the scene in focus. For the greatest depth of field, you might be tempted to use the smallest aperture setting. But, at smaller apertures, lenses suffer from an optical phenomenon called diffraction that negatively affects the sharpness. If you go anywhere above f/16, you’ll start noticing that your images appear softer.
“An image usually shot at f/8, f/9, maybe f/7 or right around that range is usually going to be where your lens is the sharpest.”
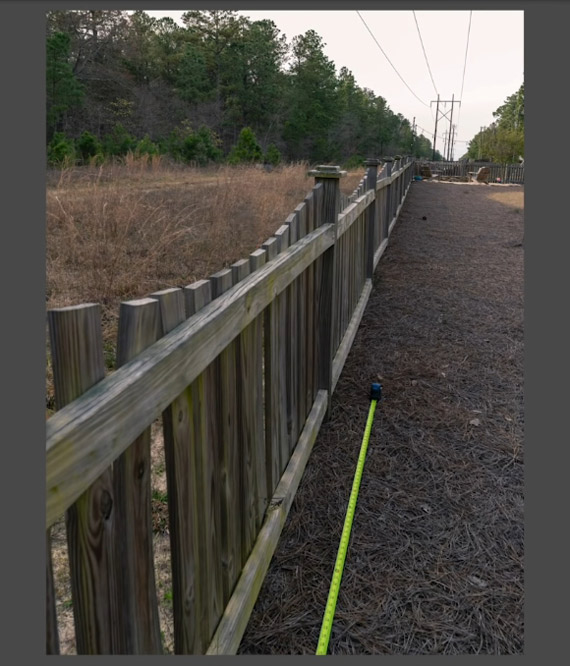
To understand how aperture affects depth of field, here’s a simple trick that Denney recommends:
- Fix a measuring tape on the ground starting from the front of your lens.
- Set your lens to focus to infinity.
- Starting from the widest aperture setting, keep on taking photos and increasing the f-value after every shot.
- Keep a note of the f-value for which the markings in the measuring tape become readable and sharp. For instance, in Denney’s test, at f/14 the tape was in focus up to the 4-foot marker. This means that by setting focus to infinity and aperture to f/14, everything beyond 4 feet will be in acceptable focus.
Having these values handy will make you more efficient when working on location.
All of these tests are easy to do. Spend some time understanding how your gear performs; it’s well worth your time!
Like This Article?
Don't Miss The Next One!
Join over 100,000 photographers of all experience levels who receive our free photography tips and articles to stay current:


Loved the video. Just wondering if you knew that your clock over your left shoulder did not move the entire video. It was at 7:50 for the whole time.
Great video good information.