We’re all familiar with the power of Lightroom presets. They’re time saving tools that we use on an everyday basis to edit and finalize our images. But did you know that you can also use presets to export your images with your preferred file name convention and sizing? Aaron Nace has this solution:
From Lightroom’s Develop module, go to the Export dialog by right-clicking on an image and selecting Export—or go to File > Export.
Under the Export Location menu, for the Export To option, select Choose Folder Later.
Renaming the file is the ultimate objective—making a preset that automatically renames your images according to the end purpose. Under File Renaiming, check Rename To and select Edit… from the dropdown menu. This option will allow you to keep your file name and then add some custom text to it. Now edit the custom text. As Nace was making this preset for Instagram, he entered the custom text “_1080_instagram”.
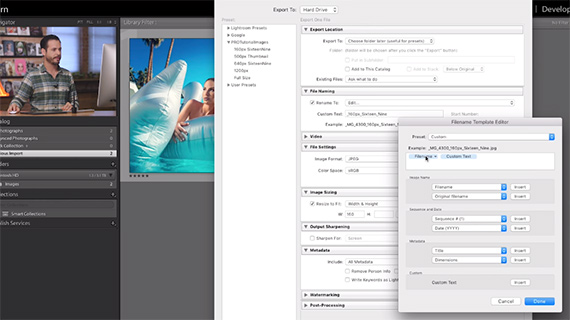
Filename Template Editor
Take a look at the other settings, including the color space, image format, quality, etc. Scroll down to the Image Sizing option and enter your file width and resolution. Nace wanted to make this export preset specific to Instagram, so he kept the width at 1080 pixels. Check or uncheck Output Sharpening according to your needs. Okay, you’re set. Now to save this preset.
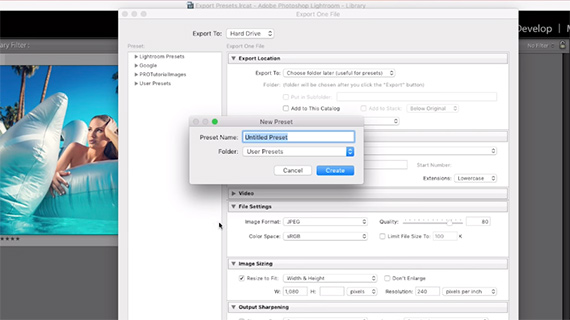
Saving an Export Preset
Clicking the Add button at the bottom left of the page opens up the New Preset dialog. Enter a name for the preset. Select the folder name and click Create. This will save your preset in the folder you chose.
Nace recommends using Google Drive or Dropbox folders for the final images. This allows your images to be accessed from anywhere in the world and from any device.
Using Your Presets
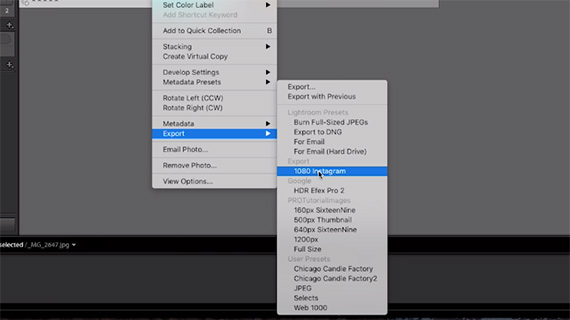
The next time you choose to export your images with the specific settings, all you have to do is right-click on the image and choose the right preset, then select the folder where you would like to store the image, and click Open.
You can replicate these steps for each of the file dimensions you need.
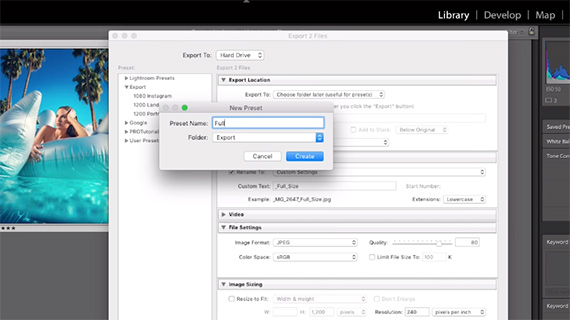
Creating a New Preset
You can also make a preset for saving full-sized version of your images. In this case, make sure that you uncheck the ‘Image Sizing’ option.
That’s it. Now, when you want to make appropriate file size exports for a series of images, all you have to do is select the right preset and export them to your preferred folder. This can save an incredible amount of time, especially when you’re working on a series of images and need multiple file dimensions for all of them.
Like This Article?
Don't Miss The Next One!
Join over 100,000 photographers of all experience levels who receive our free photography tips and articles to stay current:


Leave a Reply