Photography can be a fun and exciting activity for all who have a passionate interest in learning camera fundamentals. I have done photography from the time I was perhaps five or six years old watching my father shoot then do his own black and white darkroom work. I’m a photographer and illustrator and have a keen interest in the medium from both a business and a teaching standpoint.

Photo by Christopher Michel; ISO 320, 1/100-second exposure.
Now let’s get down to the business of this article. First, I’d like to discuss the use of the camera and its various controls. I’m going to focus on the single lens reflex style of digital camera. In the old days before many digital cameras were around, many film cameras had a dial or turn knob—usually on the top right-hand side of the camera when viewing from the back of the camera—to set both the (ISO) and the shutter speed.
ISO is the abbreviation for the International Standardization Organization, a governing body based in Europe that provides the standards for a wide variety of subjects. It’s also known as the film or digital cameras sensitivity speed (the old name for ISO was ASA, the American Standard Association).
The ISO controls the sensitivity of the digital camera to light. A low ISO (e.g. 100) generally can be used for shooting when there are good lighting conditions in a variety of lighting situations such as outdoors or indoors providing that there is enough light to get a good shutter speed and aperture (f-stop) combination. A low ISO generally will produce a clean image without digital noise. Digital noise is a dotty appearance in your image, which can look like grainy colored dots that reduce the appearance of detail or sharpness in your image. This can be even more apparent when you enlarge your images. (In the film days this would have been called grain instead of digital noise.)
When you’re shooting pictures in darker lighting conditions generally you must increase the ISO and make the camera have a greater sensitivity to light. In this case, you can increase the ISO perhaps to 400 or higher. Just remember that as you increase the ISO you may increase the digital noise.
Generally, on digital cameras there will be a button labeled ISO either on the top or the back of the camera and a thumb wheel close to the shutter release on the camera. If you push the ISO button and hold it in then toggle the thumb wheel back and forth, you will see on the digital display either on the top of the camera or on the back LCD display. (See your owner’s manual for your particular camera.)
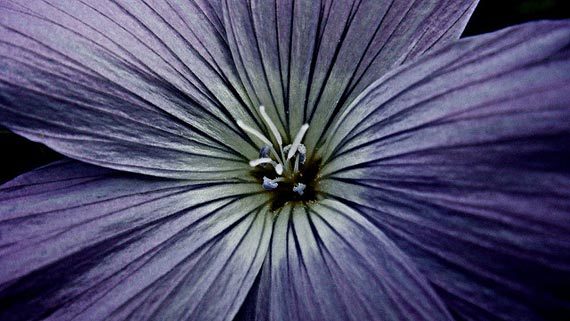
Photo by CameliaTWU; ISO 100, f/5.6, 1/250-second exposure.
Shutter speed is the duration of time that your camera’s shutter remains open. This can be either a fast shutter speed or a long shutter speed. Shutter speeds go from very fast speeds, such as 1/8000 second, all the way down to 30 seconds. On a Canon camera, the dial for shutter speed is designated as Tv (time value). After you set this to Tv you can toggle your shutter speed up or down with the thumb wheel that is generally located behind your shutter release button. As you toggle the thumb wheel back and forth, notice the different speeds: 1/8000, 1/6400, 1/5000, 1/4000, etc. (The large numbers such as 1/8000 to 1/2000 of a second are very fast shutter speeds used for stopping extremely fast action.)
Long shutter speeds are used to capture images in lower light when you don’t have to stop as much action. Some examples are shutter speeds from 1/4 of a second up to 1/30 of a second. Often we start with these speeds when we are shooting an image in lower light situations because the camera’s shutter is open for a longer period of time. When shooting at these shutter speeds you need to hold your camera steady and put your elbows against your chest, take a deep breath in and hold it, then push the shutter release in or put the camera on a tripod to steady it. Here are some scenarios that may help you: 1/60 of a second is a good starting point to stop action; a person walking slowly can be successfully photographed clearly at that speed.
Aperture: Also known as lens opening. Imagine holes or openings that go from large to smaller.
These openings control the amount of light that reaches the sensor in the digital camera much in the same way that shutter speeds do but the iris or lens opening stays at a constant depending on the speed you set it for during the shot. Along with the various lens openings we have another thing to think about, Depth of Field. Depth of field governs what parts of our image are sharp and what parts of the image are out of focus. If you select a lens opening (aperture) also known as an F-Stop anywhere from f/22, which is a small opening or wider up to f/11 you will have a deep depth of focus. Imagine you’re looking over a table near the long end and have set up several cereal boxes standing up from one end of the table to the other or dominos standing up like soldiers one in front of the other. With one of the lens opening as we just suggested, if you focus your camera lens at the first box or domino you will generally have sharp focus from the front to the back cereal box or domino in the image.
If you were to take a picture at a larger lens opening or aperture, such as f/1.4, f/2, f/2.8, f/4, you will most likely achieve a shallow depth of focus where if you focus on the front cereal box or domino then the cereal boxes or dominoes closer to you will be in focus and the cereal boxes or dominoes going further would appear out of focus. The larger apertures are used in photography to get softer images in photographs such as portraits and wedding pictures as well as in images of children. Have you ever noticed when you watch a movie or TV show how depth of field is masterfully controlled by the camera person? This allows the characters in the scene to have most of the attention drawn to them and blurs out the background, which can distract you from what’s going on.

Photo by Mariusz Kluzniak; ISO 100, f/4.5, 1/1250-second exposure.
On a Canon digital camera the way to set an aperture is to turn the upper dial usually to the Av mode, this will let you set the aperture first instead of the shutter speed.
About Measuring Light in a Scene: All cameras with a light meter to measure light are usually calibrated to see a tonal value of 18% middle gray. No matter what you aim the camera at it wants to get an exposure value of 18% middle gray. Tonal values are shades that go from very light to very dark. Imagine a grayscale and middle gray is a tone that is in the middle area which is not light and not dark but in between.
There are various ways to get a good exposure in photography, aside from putting the camera in the P or program mode where everything is set for you. This mode will work well in many situations but not all. Don’t get into using the built-in flash; a flash flattens forms in the image and generally is only effective up to about 10 feet or so.
Learn how your camera measures light and in what areas. Generally, the center area in the middle when you look through the finder is where you want to aim the camera to take a meter reading. If you’re shooting a portrait, try to aim the camera up close to the subject’s skin, press your shutter button halfway, then move to the position that you’d like to take the picture from. Some cameras have an exposure lock button that you can push to remember the camera settings.
When you look through the viewfinder usually at the bottom of the image area you will see a series of numbers going from a -3 to a +3. Directly in the middle between the -3 and +3 is your normal exposure starting point. Push your shutter button halfway while adjusting the thumb wheel, turn it back and forth until you see an indicator line up in between or in the middle. Take your picture, view it in the play mode, determine if the shot looks too dark or too light. If it’s too light toggle the thumb wheel letting the indicator in the finder lean more toward the – area. If the image is too dark, toggle the thumb wheel so that the indicator in the finder lines up more toward the + direction. Always study the results and ask yourself questions.
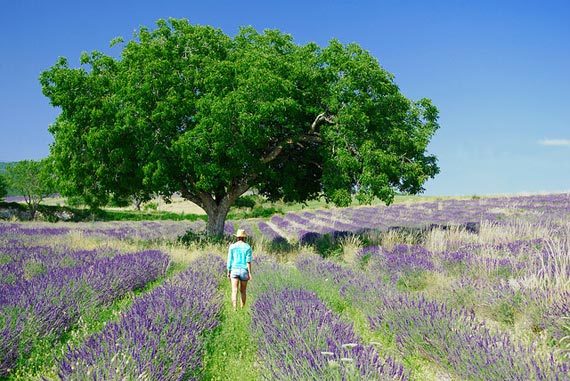
Photo by Vincent Brassinne; ISO 200, f/3.5, 1/250-second exposure.
Tv Mode: You set the shutter speed and the camera will set the aperture (f-stop). Use this when you want to control the action stopping ability of your camera.
Av Mode: In this case you want to think about the range of focus, You set the lens opening (aperture) and the camera will set the shutter sped. Use a lens opening that is big like an f/1.4, f/2, f/2.8, f/4 to get a shallow depth of focus, which is good for portraits. Use a smaller lens opening when you want sharpness from front to back.
M: In Manual mode, you set both the shutter speed and the aperture yourself.
About the Author
Daniel Johnson writes for (imagemanphotography.com). He specializes in portraits, special occasions, weddings and more.
Like This Article?
Don't Miss The Next One!
Join over 100,000 photographers of all experience levels who receive our free photography tips and articles to stay current:


The grammar is terrible. When I see an article with so many grammatical errors, I find that I cannot trust it to provide accurate information.
Great article – but – ISO is not and has never been the abbreviation for a mythical ‘International Standards Organization’. ISO is the trading name of the International Organization for Standardization (abbr to IOS), formed in 1947 who develop a wide range of industry standards and base their name, ISO, on the Greek word isos, which means equal.
Um, small correction, ISO is not an abbreviation, it’s a word. Also, it’s “International Organization for Standardization” and not International standardization organization. See http://www.iso.org/iso/home/about.htm “…our founders decided to give it the short form ISO. ISO is derived from the Greek isos…” Play the video on that page and you’ll see that they pronounce it Eye-so.
Very helpfully information. I’d keep trying many time a variation of fstop in a moment, especialy indoor shoot, but the result still not going well – either the subject clear nor it’s comes with some blurry scracth. For your mention, i used e-5 Olympus pro DSLR. Anyway thanks for the tips!
really helpful!!! many thanks…please keep posting such knowledgeable stuffs…
Amazing article… I loved how you put the 3 numbers of photography in the article plus a bit more about their controls in the camera… good job.
Great article and very good tips! Thanks.