
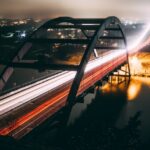
Before Changes
After Changes
This tutorial is to help you learn how to make a water motion blur (slow shutter speed) effect on a photo that had a fast shutter speed. Normally you would need a tripod to make this effect when taking the picture, but with this technique you can simply add the motion blur effect later. Ok, once you have your picture open in photoshop:
1. Make a copy of the Background Layer, so you have two layers with the exact same photo on them (Layer>Duplicate Layer).
2. On the bottom layer (with the bottom layer selected) apply a Motion Blur Filter (Filter>Blur>Motion Blur). Make sure you set the Angle of the blur to match the angle of the water flow. And set the distance to somewhere around 31 pixels.

Keep in mind that you won’t see the filter effect because there is another duplicate layer covering it.
3. Then select the top layer, and add a Reveal All Layer Mask to it (Layer>Add Layer Mask>Reveal All).
4. Then pick a big soft paintbrush that you can use to draw in the motion blur.
5. Then (with the layer mask selected) simply paint brush the color black anywhere on the photo where you would like the motion blur to be seen on the water.

For different photos, you will probably have to change the angle of the blur, and perhaps adjust the intensity of the motion blur. But with this technique you do not have to be a professional photographer to create water motion shutter speed effects.
Like This Article?
Don't Miss The Next One!
Join over 100,000 photographers of all experience levels who receive our free photography tips and articles to stay current:


Leave a Reply