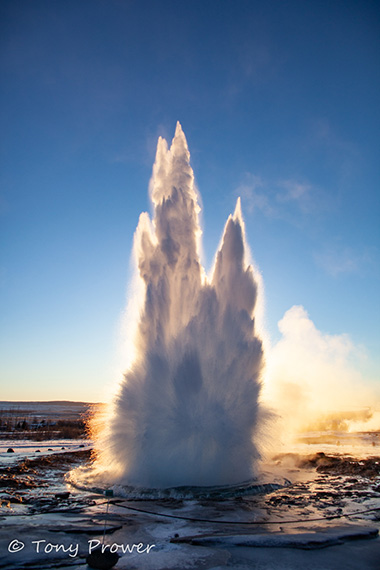
Geysir in Haukurdalur, Iceland is the home of the original geyser. The large geyser doesn’t erupt any more due to a history of soap powder and earthquakes. However, its little brother, Stokkur, does erupt regularly at intervals of around 5 to 7 minutes, so a typical visit to Geysir should allow any photographer to capture 5 to 10 eruptions. A visit to Geysir is an important part of any trip to Iceland and can be seen on the popular Golden Circle tour, which almost every Iceland tour operator runs.
Contre Jour
This photograph was taken in December. In Iceland in mid-winter, the sun doesn’t get very high. Using the sun as a strong back-light really brought out a long of textures and details that would otherwise be missing. The strong back-light shows various layers of water within the boiling spout. In the early days of photography, it was believed that shooting Contre Jour (into the light) was not possible. It was thought that you had to shoot with the light or at an obtuse angle.
Camera
I’m using a Canon 5D Mark II in shutter priority mode with a 1/2000 second shutter speed. The fast shutter captured tiny water droplets as they escape the explosion. The fast shutter also allows the continuous burst mode to run smoother. On a compact camera, the “sports” (or action) mode would be a suitable choice of shooting mode. I adjusted the iso to 400 which gave me an aperture of f/4. On a 24mm prime, that aperture easily gave me a depth of field to cover the surface of the erupting geyser. On a wide angle lens, it’s difficult to get a shallow depth of field, but I didn’t want to shoot this scene at f/2.8; f/4 is a better choice to ensure sharpness on the subject. If you’re shooting compact or iPhone, this sort of wide angle shot with a limited depth subject will rarely suffer from DOF issues. It is far better to prioritize the shutter speed by using sports/action mode or shooting in good lighting.

Eruption
Composition
I’m composing vertically with the geyser vent at the bottom of the frame. My lens was the Canon 24mm f/1.4 and the full height of the eruption just fit into the frame. Today, the rope circle has been extended to cope with larger crowds. The same type of composition can be achieved with a 50mm now because you have to stand much farther away. If you’re unsure of your focal length, it may take a few practice attempts before the geyser fits nicely in your frame. Eruptions do vary and you have to see 3 or 4 before you see a full height eruption.
Steady
It’s important to use a tripod at the geyser. Although this is a fast shutter, the tripod is so useful for holding your camera between eruptions. For this shot, I had my manual focus set so that when I press the shutter, the camera will respond faster. An erupting geyser has no hard edges so your camera would have great difficulty auto-focusing in this situation. Continuous burst is a highly recommended way to capture the various stages of the eruption.
Compensation
You can see how the sun is directly in the lens before the eruption, so I used a +1 stop exposure compensation to account for the change in brightness as the Geyser erupts.
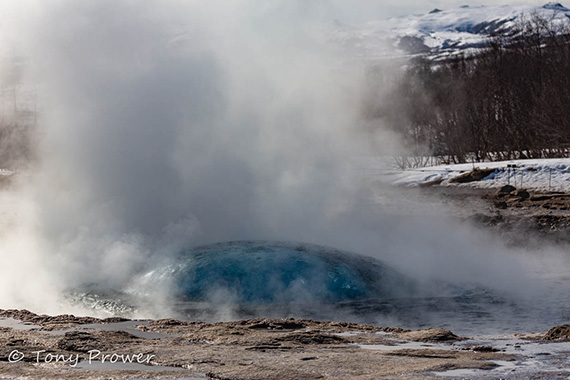
Blue Bubble
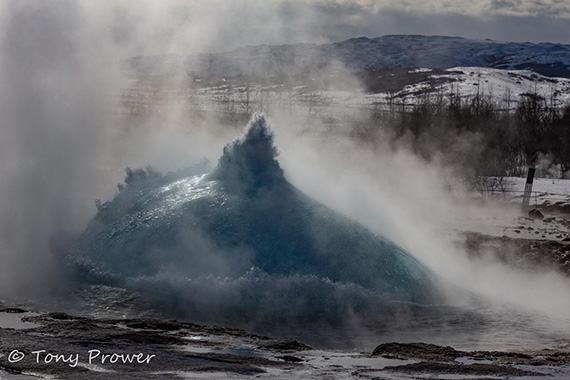
Blue Bubble
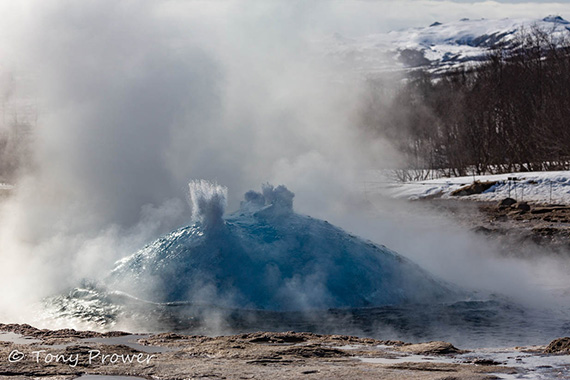
Blue Bubble
Just before an eruption, the surface of the water stretches and forms a blue convex (bubble). Capturing the blue bubble is a bigger challenge than photographing the full-length geyser eruption. This series of photos was taken in April, and you can see the snowy landscape in the background. The setup is the same as for the erupting geyser regarding the tripod, fast-shutter (1/3200 second), manual focus, and continuous bursts, but there was no compensation. The lens was a 135mm prime lens. I adjusted the ISO to 200 to allow a f/7.1 aperture. This gave me just enough DOF to cover the surface of the bubble and give me sharp details.
About the Author
Tony Prower is an Iceland landscape photographer.
Like This Article?
Don't Miss The Next One!
Join over 100,000 photographers of all experience levels who receive our free photography tips and articles to stay current:


You are very welcome Anna. I hope to write more about my Iceland photography.
Iceland is on my wish list, so cool.. Thanks for tips (for both location and photography)