I am always looking for a way to convey a message in my photography. That often means finding a bizarre angle, a lower vantage point, or simply getting closer. But all in all, every photograph is about telling a story, and to do so, you need a connection.
1. Get to know your camera.
Cameras come with instruction manuals for a reason. Use them. Quite often, these little books packed full of information explain the reason for your terrible shots. I teach beginners the ins and outs of not being scared of your camera’s settings and features. I always tell students that the more they know about their camera, the quicker they can respond, especially when on holiday, enjoying something like whale watching. Not getting to know all the features of your camera and how to adjust or access them with practice will always ensure you get the after splash and not the tail fin of the whale.
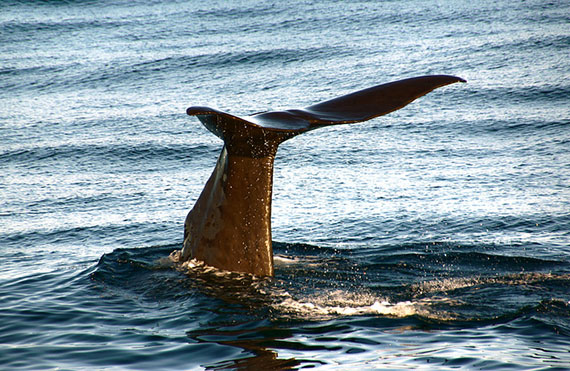
Photo by Bernard Spragg. NZ; ISO 200, f/7.1, 1/500-second exposure.
2. Use every setting you can find.
The features built into some cameras nowadays are astounding. One example is extreme ISO speed. You can set the sensitivity of your camera to see light that essentially can’t be seen. The ISO speed in a digital camera is no different to the film speeds we used to use many years ago. Remember from your local supermarket or department store you could buy Kodak 100, 200, or 400 speed film.
Well digital doesn’t use film. Cameras now come with an ISO speed setting built into them, where you can adjust the sensitivity to suit your needs. This is especially good for parties. Here’s my tip, free to you. Turn off the flash at a party and push your ISO button and move it from the standard of 100 or 200 up to 1600 or 3200 or higher and see what you get. I bet you’ll be surprised that without the flash you can actually see all the colours of the party, making for a much more interesting shot. Try it, along with all the other buttons and settings, and experiment.

Photo by Denise Bentulan; ISO 1600, f/4.5, 1/30-second exposure.
3. Look at what makes a good photograph…and remember it.
I am always looking at the work of other professionals. This gives me the ability to assess my own work against industry standards and what trends are being sought by clients. Amateurs can do exactly the same, especially if they are planning on taking their photography to a professional standard. In a previous article on photographic awards and competitions, I wrote about two organizations: the AIPP (Australian Institute of Professional Photography) and the PPA (Professional Photographers of America). Both these organizations have a history of past winners on their website. Take the time to see what’s the best in the world, and take note of their way of doing things.
I’m not saying copy them, but take note of the fact that aspects of their images don’t have a tree branch poking out of a persons ear in the background, they don’t cut off the tops of peoples’ heads, they don’t have a crooked horizon, etc. I think you get the drift.
4. Become friends with your F-stops.
F-stops are often identified on a camera’s LCD screen or aperture adjustment wheel as numbers in decimals, e.g. f/4.5, f/5.6, f8. f/11, etc. They are also known as the aperture of your camera, which dictates two things in your photographs: how much light is let into the camera to allow for an exposure and how much of your scene is in focus, referred to as “depth of field”. I’ll start with the first, which is fairly simple: light control. Choosing an aperture of, say, f/16 or f/22 will generally minimize the amount of light in your exposure and require a longer time to expose the photo. But choosing f/4 will let in a lot more light. That said and done, your chosen aperture then dictates your depth of field, as well. An easy way to remember what’s happening is this example:
If we choose f/22 for an image, then we will have the equivalent of 22 meters, or a “long” focus, and we will have turned off 22 of our light bulbs, resulting in a picture that has everything in focus from right in front of our camera to the far off horizon, but we will have a very dark image. Choosing the opposite end of the aperture range, say, f/4, will give us exactly the opposite (in general terms). That is, only about 4 meters, or a “shallow” focus, and with only 4 light bulbs turned off, a much brighter picture. I hope I explained that well. F-stops are not difficult, and the above should help you get a better understanding of how they affect your photos.
5. Practice, practice, practice.
This is by far the most important, but it must be done consistently and with a concentrated effort. It took me a long time to understand the relationship between each of the crucial settings on my first camera, but the more I practiced and experimented, the quicker I understood, and then once it just clicked and I no longer had to think about it.
Practice costs nothing other than time, especially now that we are in a digital age with a delete button, to erase our mistakes!
6. Simplify the scene.
Including too much in your scene is often too much to view, hence why one of the most effective techniques is to lessen what’s in your shot. Keeping a single subject, complemented by a plain simple background or surroundings, makes all the difference.

Photo by Y Nakanishi; ISO 250, f/3.2, 1/1250-second exposure.
7. Line edges up.
Using the edge of something in your scene to interact with another edge creates a visual pathway. The shoreline of a beach leading out to a headland can create the impression of a continual line. Use these to your advantage. Line up as many things as possible to lead to your subject.
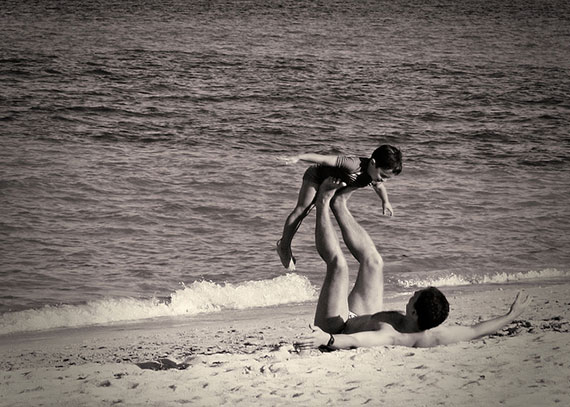
Photo by Paul Domenick
8. Tell a story.
The stronger the connection between your subject and its environment, the stronger the message, and the stronger the appeal of the image. Look to include items/things/views, etc. that complement the subject or challenge it. Either way, questions drawn from your image all lead to building a story.
9. Experiment with color.
Color isn’t the aim for every photograph. Experimenting with different color hues, such as black and white, or sepia, or some other monotone, or even just de-saturating (removing some intensity) the color a little can help reduce distraction. Too much color sometimes distracts the viewer from the subject, because they wow over the color and then look for a subject. It’s all about experimenting.

Photo by somarj
10. Show it off.
Showing your work is one of the best ways to get feedback. Show your images to everyone you can: friends, family, strangers. Listen to their very first reactions… “wow” or “oh OK” or “that’s nice.” The latter two are your first indicators that the image didn’t grab their attention immediately. Look at what can be improved and get out there.
About the Author:
Steve Rutherford is a photographer with a publication based in Australia.
Like This Article?
Don't Miss The Next One!
Join over 100,000 photographers of all experience levels who receive our free photography tips and articles to stay current:


Interesting tips and nice photos.
Excellent tips Steve. Simplifying the scene can be really effective for creating powerful images.