Shooting timelapse involves shooting at extended intervals—maybe one shot every few seconds, or minutes, or even hours. The shots are then played back at a greater speed which results in a clip that seems to zoom through time. Photographer Jay P. Morgan shares 10 basics of timelapse and how to process them in the following video:
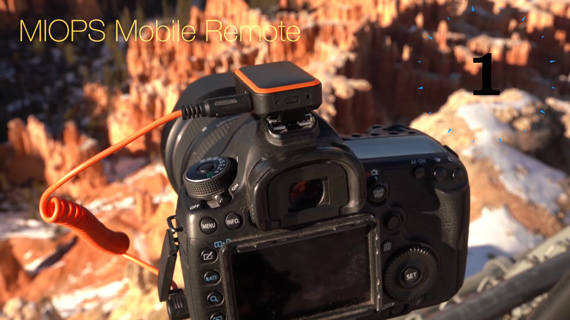
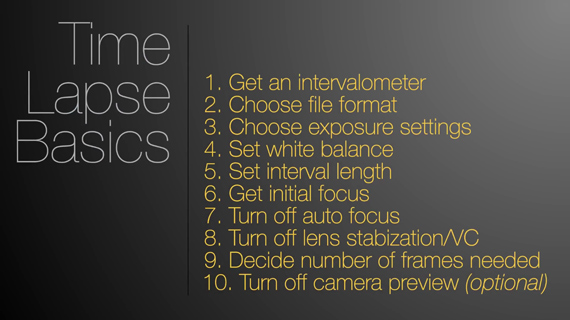
1. Use an Intervalometer
As timelapse involves taking a lots of photographs at defined intervals, you don’t want to stand there looking at your watch and taking hundreds of photos. An intervalometer is a device which you can simply plug into your camera, define the time period and number of shots to be taken, and forget about it. It will automatically trigger the camera to take photographs according to your settings.
Morgan recommends using the MIOPS Mobile Remote as it is small, easy to put on the camera and it can be controlled using your smartphone.
2. Choose Whether You Want to Shoot JPEG, RAW, or Both
Morgan likes to shoot both, as he can use the jpegs to have a look at how the image has turned out. He then uses the RAW files for greater flexibility in editing.
3. Focus on the Exposure Triangle
There are many camera settings to think about. However, Morgan suggests to focus on the exposure triangle for timelapse photography. The settings for shutter speed, aperture, and ISO will change depending on whether you’re shooting from day to night or night to day. In this video, he talks about sunlight daytime exposure. Be sure to set your aperture, shutter speed, and ISO according to your scene.
4. Set Your White Balance
Morgan recommends using Auto White Balance for day to night or night to day timelapses. But if you’re recording in sunlight, set it to sunlight for consistent results.
5. Set the Interval
Morgan likes to sets his interval between shots at 2 seconds to have as much information as possible. If he doesn’t need them all, he can simply throw out the unnecessary shots.
It is important to note that the interval should be greater than the shutter speed. For instance, if you’re going for low light timelapse with a shutter speed of 10 seconds, your interval must be greater than 10 seconds.
6. Set Your Focus on the Scene
For the first scene, either use manual focus or auto focus to set your focus on the scene.
7. Turn Off Auto Focus
After you have set the focus on the first scene, turn off auto focus if you used auto focus. Auto focus will refocus on every shot and that can cause the lens to move back and forth.
8. Turn of Image Stabilization
Using any kind of lens or camera stabilization while the camera is mounted on a tripod is a bad idea.
9. Set How Long You Want Your Time Lapse to Be
Morgan generally prefers to have his timelapse videos last 30 seconds. To calculate the number of photos you need for a 30 second timelapse, you multiply the total duration of your timelapse by the video frame rate. For a 24 frames per second video, you will thus need 30 x 24 = 720 photos. However, you can let it run longer and then choose the timelapse video where it looks the best.
10. Save Battery by Turning the Preview Off
If you don’t want the preview on your camera to show every time it takes a photo, simply turn it off via the camera menu. It will help to reduce battery consumption, as well.
How to Process Timelapses
Morgan follows a basic three step process to process his timelapses:
- Browse through the images in Adobe Bridge.
- Make adjustments in Photoshop RAW.
- Turn images into a timelapse video in Adobe Premiere.
Morgan likes to browse through his batch of images using Adobe Bridge. He then opens up one file in Adobe Camera RAW and gives it a look that he’d want all of his images to have. For this, he makes basic adjustments by adjusting the exposure, dehazing the image, and using the gradient tool to make the sky and the rocks pop a little.
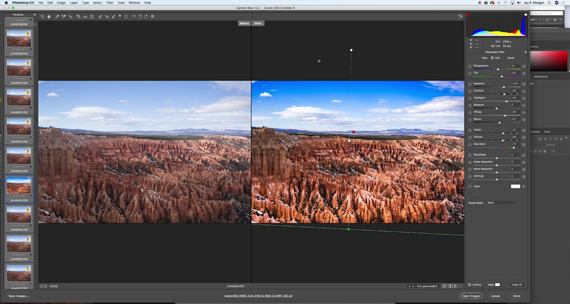
Once he is happy with the edit, he syncs the edit across all the images to give it a consistent look and then saves all the images as jpeg on a folder in the computer.
Once the images are ready and exported, fire up Adobe Premiere and import the images as a sequence. You can then drag the image down to the timeline to create the timelapse footage. Take note that you will get footage with a 4:3 aspect ratio. If you want yours at 16:9, you can crop the footage in Adobe Premiere accordingly. Once you are happy with the result, go on to File > Export > Media… to export the timelapse video in the format that you like.
Using these basic and easy to follow steps, you can now create a mesmerizing timelapse video of your own!
Like This Article?
Don't Miss The Next One!
Join over 100,000 photographers of all experience levels who receive our free photography tips and articles to stay current:


Leave a Reply